Manny,
I'm also not John L, but do a lot of spindles. I keep skews from 1/4" up to wide (forget, 1-3/4" or so)
My favorites for the 2-3" sizes you mention are 3/4" to 1-1/4"
I use 1/2" skews a lot on about 3/4" diameter down to about 1/16". But the 1/2" is fine for 1" diameter stock although for beginners the 3/4" gives a little extra edge.
I usually start with 3/4" to 1" stock for these wands and use a 1/2" skew - I sometimes make them pretty thin on the ends.
I cut the coves with a 3/8" spindle gouge.
View attachment 81845
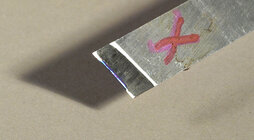
But some other things to consider on skew size: the type of wood, the included angle of the grind, the shape of the edge (straight/curved), the angle of the edge measured from the edge of the bar. Lots of variables: a smaller included angle (maybe 25-30 deg can cut cleaner but might be harder to control when beginning - an included angle between 45 and 60 degrees with a curved edge is very forgiving when learning. For new beginners who have never touched a lathe I give them the skew in this photo as their first tool.
View attachment 81842
Note that a VERY small included angle can be a problem with some wood - I've had fibers pulled out of long thin spindles (1/2" and less) of some Osage Orange blanks, not all. No problem with any other type of wood with the same skew.
If planing cylinders or tapers, the width of the skew doesn't matter. When making shallow curves/coves a narrower skew can help. The larger the diameter of the work, a skew is my choice - for 3" diameters I'd probably pick up the 1.5" wide skew. I also often use a fairly wide skew for roughing square blanks instead of a roughing gouge - if done thoughtfully it can be quicker. Roughing 2" squares with a 1/2" skew can be challenging!
For miniatures and thin finials, the 1/2" is usually perfect for shaping, although I don't use it for coves - switch to the 3/8 or even 1/4" spindle gouges for detailed curves. I do most finger tops with a spindle gouge and a 1/2" skew.
View attachment 81843
What I recommend is to have a variety of skews if possible. Try one for a specific cut, then try another. Make planing cuts in both directions. Make v-grooves, shallow and deeper. Make peeling cuts. Try these on a variety of woods - soft, hard, fine, coarse grain. Each turner can see what works best for them. As Sir Lucas mentioned, practice, practice, practice. Spend 50 hours with the skew for each hour of watching videos!
And for the full effect, read and follow the the exercises in Mike Darlow's book "Fundamentals of Woodturning" and Richard Raffan's book "Turning Wood". That's how I learned - I was teaching turning to family and friends before I watched a video or a demo.
(I should really measure all my skews and make notes of which I like best for what. I get asked that a lot and never have a good answer.)
If you can manage it, take a road trip and go visit John Lucas in Cookville TN! Or if you want a lower quality perspective stop my my shop for an afternoon.
BTW, I'm with Bill Blasic - I skip the C&S and buy Thompson. I like Doug and I like his tools. However, I don't use Doug's factory grinds - they are a good start. But I have my own opinions on grinds.
JKJ

 ). Eric's certainly the best instructor all around that I've encountered for teaching and use (especially for some of his turning series) of honed edges, skews and gouges, though the most of it relayed via his in-person workshops. Do you need to hone? No, obviously not. Is efficient, easy honing a great tool to have in your arsenal? Heck, yeah.


")

 )
)