I'm still learning on my lathe and have been doing a lot of smaller projects, such as bottle opener handles and snowman or christmas trees. I recently picked up some maple logs between 2 and 5 inches in diameter. I turned one of them into a snowman and it turned well, but was hard to sand since it was still wet. I've been trying to research how to dry logs for small projects like this but can't find much information, everything seems to talk about drying wood for bowls. What is the best way to use this type of green wood? Do I need to remove the pith or can I turn them as is? Should I just leave the logs alone for a while, or should I turn them to get the bark off and then let them sit to dry?
-
December 2025 Turning Challenge: Single Tree! (click here for details) -
Congratulations to Bob Henrickson, People's Choice in the November 2025 Turning Challenge (click here for details) -
Congratulations to Steven Gordon for "Dropped Ice Cream Cone" being selected as Turning of the Week for December 8, 2025 (click here for details) -
Welcome new registering member. Your username must be your real First and Last name (for example: John Doe). "Screen names" and "handles" are not allowed and your registration will be deleted if you don't use your real name. Also, do not use all caps nor all lower case.
You are using an out of date browser. It may not display this or other websites correctly.
You should upgrade or use an alternative browser.
You should upgrade or use an alternative browser.
Turning small projects with green wood
- Thread starter Todd Acker
- Start date
Hello Todd. Turning green wood of any size and form is fun stuff. If you don't mind using good books to learn these skills, here is a revised edition of a great one that has been around for a long time. Turning Green Wood, by Michael O'Donnell.
2" in diameter is a branch, definitely not a log. Every whole branch will crack. Drying wood, small or large, dries with the same rules. It shrinks more around the outside than the center, so the cracking starts on the outside. A better type of green wood to use is split firewood.
I first was introduced to green wood turning in 1989 with Dell Stubs who demoed a thin walled goblet in cherry and have been doing it ever since. Dell did some tapes on the subject but I don't know that they are available on a modern format.

The above were done in 2019 from a small black cherry about 3" in diameter. To be successful you must use fresh cut live wood and turn thin in both the cup and the base. The pith is generally not in the center so therefore the stem will be stronger.
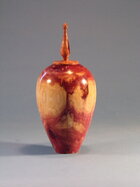
The end grain goblets gave me the idea to try hollow forms with the pith included so this juniper lidded urn has the pith in the base and of course the top opening eliminates the pith on top. These are usually rough turned, dried and finish turned. The full round presents the wood grain in a way I think is very attractive and not attainable any other way.
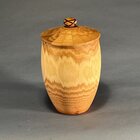
This ash box is my latest idea, where I use straight grain featureless small trees, this one was about 5 1/2" in diameter turned to a uniform 1/4" wall, a 4- 3/8" diameter opening on top and a 3" diameter base. The lack of knots or swirly grain meant that when dry the opening was still almost a perfect circle.

The above were done in 2019 from a small black cherry about 3" in diameter. To be successful you must use fresh cut live wood and turn thin in both the cup and the base. The pith is generally not in the center so therefore the stem will be stronger.

The end grain goblets gave me the idea to try hollow forms with the pith included so this juniper lidded urn has the pith in the base and of course the top opening eliminates the pith on top. These are usually rough turned, dried and finish turned. The full round presents the wood grain in a way I think is very attractive and not attainable any other way.

This ash box is my latest idea, where I use straight grain featureless small trees, this one was about 5 1/2" in diameter turned to a uniform 1/4" wall, a 4- 3/8" diameter opening on top and a 3" diameter base. The lack of knots or swirly grain meant that when dry the opening was still almost a perfect circle.
I have to disagree with you it can be done it just takes a little practice.2" in diameter is a branch, definitely not a log. Every whole branch will crack. Drying wood, small or large, dries with the same rules. It shrinks more around the outside than the center, so the cracking starts on the outside. A better type of green wood to use is split firewood.
- Joined
- Apr 27, 2004
- Messages
- 9,304
- Likes
- 6,058
- Location
- Lakeland, Florida
- Website
- www.hockenberywoodturning.com
small projects like this but can't find much information,
I have dried some small 3-4” diameter holly limbs and saplings. I left them in 3 ft lengths sealed the ends with ancho seal and let them dry for a year. About a 1/3 split. Wood shrink more tangentially than radially. Basically each growth ring wants to shrink more than the wood inside. So the wood cracks to relieve the stress. In small diameters they don’t always crack.
There are some other items you can turn from green wood to build your skills.
Natural edge bowls, Goblets, small vases, napkin rings can be turned from green wood
Abranet sand wet wood nicely.
These are all require skills at the advanced basic or intermediate level.
I’ve done napkin ring workshops with beginners.
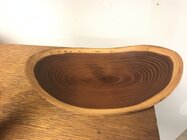
This NE bowl is turned from a half log 4” x 8”
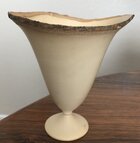
Goblets are fun to turn from the small diameter limbs.

The 5” diameter is good for vases ( bigger goblet)
See this thread
Green Goblet Turning
This is a technique that I was initially introduced to at a Demo by Del Stubs in about 1990 and I am guessing that I have turned well over 1000 goblet forms ranging in size from about 2" tall by 1 1/2" diameter to 18" tall by 10" diameter. The goblets are turned from the full round of a tree...
Napkin rings can be turned from green wood. This process drill out the center
three center turned Napkin Rings -
I've been trying to research how to dry logs for small projects like this but can't find much information, everything seems to talk about drying wood for bowls.
Todd, as others mentioned so far, there are lots of ways to use green wood and I’ve don’t many.
However, I far prefer to turn dry wood. As for drying wood for small or larger projects, it can be VERY difficult to successfully dry log sections. Due to the nature and structure of wood, primarily the way it shrinks at different rates for tangentially to the rings vs radially, a log section will almost always crack. This depends on many factors including how it is sealed and stored, the temperature, the relative humidity, and the species of wood. (Some wood like mesquite and sassafras are far more stable than others like fruit woods, oak, dogwood, etc.)
Water in the wood escapes the log section far more easily through the end grain so the end of the log will start to dry and shrink quicker and check and cracks can form, sometimes quickly. (Cut some round sections and they can start to check within a few minutes.) These initial cracks will soon turn into large cracks and splits, quickly turning the log into firewood, The best thing to do with green wood, regardless of what
One defense, as show here and by “twice turning” bowls, is to turn a thin or relatively thin wall which can dry without cracks, depending - the thinner, the better, or with proper drying for thicker walls.
However, for my uses, I cut the logs up into square or rectangular sections and dry those. Some sizes and species may take years to dry while some may dry in weeks or months.
Making useful turning blanks from logs
My “Logs to Blanks” video shows how I use a shop bandsaw to make useful turning blanks from log sections. I almost always turn dry wood so I include a little information on drying. I made this video during the Covid pandemic for a club Zoom meeting demo. It’s long, about 45 minutes, but it’s...
Last edited:
That's not unusual, very few people agree with me. But when some one says they are still learning on the lathe, really thin walls are usually out of reach.I have to disagree with you it can be done it just takes a little practice.
- Joined
- Apr 27, 2004
- Messages
- 9,304
- Likes
- 6,058
- Location
- Lakeland, Florida
- Website
- www.hockenberywoodturning.com
Quite true - They have trouble with thick walls too.But when some one says they are still learning on the lathe, really thin walls are usually out of reach.
I’ve taught kids 8-80 they can all do it with classes. Few make it quickly teaching themselves
In my greenwood demos I point out the habits of successful greenwood turners. Newbees rarely accomplish them with any measure of consistency. With a good class they are well on their way


Link to greenwood
Working with green wood
The August 2015 AAW JOURNAL has great article by David Ellsworth on working with green wood. This is followed by 11 marvelous ways turners turned cracks into features. One of David's themes is that the deck is stacked against newer woodturners successfully working with wet wood. Might be a nice...
I'm still learning on my lathe and have been doing a lot of smaller projects, such as bottle opener handles and snowman or christmas trees. I recently picked up some maple logs between 2 and 5 inches in diameter. I turned one of them into a snowman and it turned well, but was hard to sand since it was still wet. I've been trying to research how to dry logs for small projects like this but can't find much information, everything seems to talk about drying wood for bowls. What is the best way to use this type of green wood? Do I need to remove the pith or can I turn them as is? Should I just leave the logs alone for a while, or should I turn them to get the bark off and then let them sit to dry?
Let them dry before sanding. There are myriad ways to dry. I would consider drilling a hole through your snowman to facilitate drying with less cracking.
Drying methods:
- Microwave: Microwave on defrost for 1:30-2:00 minutes at a time. Let cool for an hour or so. Weigh the piece. Rinse and repeat until it stops losing weight. This is a fast drying method, and might lead to cracks in some woods.
- Paper Bag Method: Put the piece in a paper bag. Change the bag every few days. Some people add shavings to the bag, but I understand it works just as well without the shavings and with less chance of mold. This is probably the slowest and safest drying method.
- Just let it sit. I do this a lot. If the wood is stable and isn't going to crack, I just leave it in the house for 4-5 days, weighing it every day until it stops losing weight.
- Others: Dessccants, boling, etc.
Todd, I've been drying my smaller blanks (3x3, 4x4 etc) in desiccant. I take the small chucks left over from cutting bowl blanks and box blanks from wet wood and throw them into a big Ziplock for about a week, then I let them sit for a week to equalize. I've had good luck thus far. I bought an 8lb jug of color indicating desiccant off Amazon for about $36 and when the color changes you can dry the desiccant out in your oven (I've been using a solar kiln for that but that another topic altogether). Might be worth trying to green turn, dry in desiccant then sand. For $36 and a tree limb the experimental possibilities are vast.I'm still learning on my lathe and have been doing a lot of smaller projects, such as bottle opener handles and snowman or christmas trees. I recently picked up some maple logs between 2 and 5 inches in diameter. I turned one of them into a snowman and it turned well, but was hard to sand since it was still wet. I've been trying to research how to dry logs for small projects like this but can't find much information, everything seems to talk about drying wood for bowls. What is the best way to use this type of green wood? Do I need to remove the pith or can I turn them as is? Should I just leave the logs alone for a while, or should I turn them to get the bark off and then let them sit to dry?
I bought an 8lb jug of color indicating desiccant off Amazon for about $36 and when the color changes you can dry the desiccant out in your oven
I buy quantities of indicator desiccant for various shop uses and dry them as needed with the shop toaster oven in small aluminum containers. A couple of things: the stuff works well in a airtight container to greatly increase the life of CA glue (water vapor is an accelerator and the plastic of most CA glue bottles lets water vapor through.) Also, if you can find non-indicator (usually white) desiccant cheaper, just add a small amount of indicator desiccant and shake to mix. Even a few indicator beads in the lot will let you see when they all need to be dried with heat.
JKJ
Last edited:
I have turned hundreds of Birdhouses, and basically all, or most were turned from green wood.
Thin-walled and they never split that way, here are a bunch to be delivered to an art store that sold them for me.
I stopped with doing so many, as it became a job, demand was there, but I turn for the fun of it, still turn the odd one, as some wood just wants to be used for things like that.
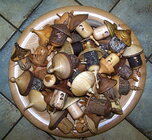
Thin-walled and they never split that way, here are a bunch to be delivered to an art store that sold them for me.
I stopped with doing so many, as it became a job, demand was there, but I turn for the fun of it, still turn the odd one, as some wood just wants to be used for things like that.

Leo- I started turning bird house ornaments last year. They're quite a bit of fun and were well received. I like yours with the bark. I'll have to try some like that. Thanks for the idea.
