I made a YouTube video to go along with my original post.
View: https://www.youtube.com/watch?v=PYNx5Wtr_v0
-
December 2025 Turning Challenge: Single Tree! (click here for details) -
Congratulations to Bob Henrickson, People's Choice in the November 2025 Turning Challenge (click here for details) -
Congratulations to Steven Gordon for "Dropped Ice Cream Cone" being selected as Turning of the Week for December 8, 2025 (click here for details) -
Welcome new registering member. Your username must be your real First and Last name (for example: John Doe). "Screen names" and "handles" are not allowed and your registration will be deleted if you don't use your real name. Also, do not use all caps nor all lower case.
You are using an out of date browser. It may not display this or other websites correctly.
You should upgrade or use an alternative browser.
You should upgrade or use an alternative browser.
Video for "Simple Jigs for Setting Angles with the Oneway Wolverine"
- Thread starter Paul Ruud
- Start date
Lance Mirrer
AKA "taxman"
Went to save the video to Watch Later and received an error message. "This action turned off for content made for kids."
Assuming this is not something you want, there may be an odd setting on your account.
Assuming this is not something you want, there may be an odd setting on your account.
Thank you, Lance. I’ll try to figure it out.
Video worked fine for me (just finished watching). Using MS Edge on a surface Pro.
@Paul Ruud Thanks--your video really helped me follow what you were saying in your written posts. Really not as complex as i was making it as i read!!
@Paul Ruud Thanks--your video really helped me follow what you were saying in your written posts. Really not as complex as i was making it as i read!!
Okay, it seems to be fixed. Thanks again!
Earl, thanks for responding. And I’m really pleased to hear that the video gets the (not so complex) point across. That’s what I was aiming for.Video worked fine for me (just finished watching). Using MS Edge on a surface Pro.
@Paul Ruud Thanks--your video really helped me follow what you were saying in your written posts. Really not as complex as i was making it as i read!!
Last edited:
Well done Paul; great information. Thanks
Cheers, Roger. I appreciate knowing that you found the video helpful. Making those things isn't as easy as it looks, at least for me.Well done Paul; great information. Thanks
Thank you!!
Lance Mirrer
AKA "taxman"
Okay, it seems to be fixed. Thanks again!
Fix worked. Enjoyed the video!
Great video Paul. Very concise, well paced and good filming. Except for your big thumb in the way 
@Bill T Tucker you are most welcome. Thank you for dropping a note. It's nice to get feedback.
@Lance Mirrer Excellent, on both counts. I appreciate your help sorting out the YT thing. I've made lots of other mistakes, but they aren't so obvious. At least, I hope not.
@Will Armstrong, cheers for the appreciation. Especially of my thumb. After many filming takes, I just went with it. I literally laughed out loud when I saw your comment.
An interesting approach. Thanks for the video. I think the clamp is good for your implementation but also a little clunky. Your method may be a good jump point for improvement ideas but the base design is very good.
The last comments you made probably touched on my initial thoughts of how things were going to change for different thickness gouges. And the question of where the angle is measured from. I think at the cutting edge would be best. But as we all know it’s a concave grind so we are probably splitting hairs if measuring a line tangent to the grind at the cutting edge. Maybe an insignificant amount, I might draw it up to see
Thank you for the great post!
Last edited:
Thanks, Scott! I agree with everything you say. Using the clamp for the Veri-Grind jig application is awkward and it would be nice to address that.An interesting approach. Thanks for the video. I think the clamp is good for your implementation but also a little clunky. Your method may be a good jump point for improvement ideas but the base design is very good.
The last comments you made probably touched on my initial thoughts of how things were going to change for different thickness gouges. And the question of where the angle is measured from. I think at the cutting edge would be best. But as we all know it’s a concave grind so we are probably splitting hairs if measuring a line tangent to the grind at the cutting edge. Maybe an insignificant amount, I might draw it up to see
Thank you for the great post!
And thanks for bringing up different gouge thicknesses. Every different thickness technically requires a different jig/gauge. They are easy to make but who wants "a gauge for every gouge?" I use 1/2" and 5/8" gouges and all from the same manufacturer so not a big deal. But others? Then again, this is an issue for every fixed setup jig/gauge.
You can use the formula to see how sensitive the angle is to where the angle is measured from. I think a lot of turners will consider the differences ignorable. Still, many of us will want to understand the consequences of different locations. I didn't go into that to keep the video focussed. If you have further thoughts, please share!
Last edited:
Tom Gall
TOTW Team
Without giving this much thought (none really!) ... would magnets work?Thanks, Scott! I agree with everything you say. Using the clamp for the Veri-Grind jig application is awkward and it would be nice to address that.
That is a really cool idea! It keeps everything really simple. Otherwise it seems like a clamp would have to be made part of the jig, that way you wouldn't be juggling two things (the clamp and the jig).Without giving this much thought (none really!) ... would magnets work?
I'm going to go try this.
I'm happy with this. I just hot-glued two magnets into the jig where it sits on the gouge and it worked very well. I think it might be good to add more to the back of the jig where the Veri-Grind jig gives a square reference. Thank you, @Tom Gall, that is a sweet solution!Without giving this much thought (none really!) ... would magnets work?
Tom Gall
TOTW Team
Glad it works. I'm sure you will work on it further to meet all your expectations. Pictures are always nice.I'm happy with this. I just hot-glued two magnets into the jig where it sits on the gouge and it worked very well. I think it might be good to add more to the back of the jig where the Veri-Grind jig gives a square reference. Thank you, @Tom Gall, that is a sweet solution!
Indeed. I'll post about the revision.Glad it works. I'm sure you will work on it further to meet all your expectations. Pictures are always nice.
Great Video. I'll be making some of these! Do you have a picture of the magnet idea and it's application you could share?I'm happy with this. I just hot-glued two magnets into the jig where it sits on the gouge and it worked very well. I think it might be good to add more to the back of the jig where the Veri-Grind jig gives a square reference. Thank you, @Tom Gall, that is a sweet solution!
Thanks for this post. I worked on this for a while but then got busy with other things and forgot to update. Here's a couple of pictures:Great Video. I'll be making some of these! Do you have a picture of the magnet idea and it's application you could share?
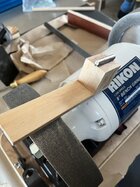
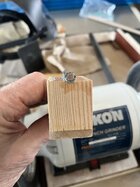
It took me several tries to find an adhesive that could hold up. JB Weld Original was the only one that worked.
You can see that I ended up using cylinder magnets. To get a strong connection, I found I needed to get magnets that would go inside the flute. The tips of the flute do not provide enough surface area for magnets to work well. Note that the cylinder magnets are diametrically magnetized. The poles are not on the circular ends. The poles are on either side of the cylinder. The magnets shown are 1/2" long and have a 1/4" diameter.
Here are pictures of this jig on 1/2" and 5/8" bowl gouges:
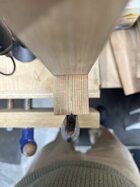
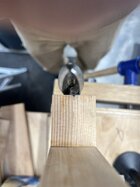
These magnets are a little proud of the flute edges in the 1/2" so the base of the jig has a groove in it where the magnets are glued in. The connection to the 1/2" is quite strong. For the 5/8", there is contact on only one side making for a weaker, but adequate hold.
(Continued in next post. Only 4 attachments/photos allowed per post.)
I just got around to trying this out for setting platform. So far, I’m impressed. Easy to make, accurate, and easier to use than what I have been using. No finesse required at all to make Or use, unlike the ones that touch the wheel in two places.
I have been using a homemade version of Ron Brown’s jig. https://longworthchuck.com/index.php?route=product/product&product_id=404
I have been using a homemade version of Ron Brown’s jig. https://longworthchuck.com/index.php?route=product/product&product_id=404
Nice job. Another thing people often ask is how the Varigrind for various bevel wing shapes. Tormek provides, or at least used to years ago, useful diagrams in their manual of the effect of different settings. Has someone done this for the Varigrind? For skews and scrapers and such I make simple aids from plexiglas to set my favorite platform angles.
I'm glad you included the math. I'm often asked by teens why they would ever need to use math outside of the classroom. I tell them when I worked as a software designer/developer I couldn't do the job without being able to calculate things. I tell them the math is not as important if your goal is to work in fast food or retail sales and spend your free time in front of the TV. I'm surprised when adults can't even calculate things like the volume of concrete needed for a slab or at least approximately how many tons of gravel to order for a project.
I'm glad you included the math. I'm often asked by teens why they would ever need to use math outside of the classroom. I tell them when I worked as a software designer/developer I couldn't do the job without being able to calculate things. I tell them the math is not as important if your goal is to work in fast food or retail sales and spend your free time in front of the TV. I'm surprised when adults can't even calculate things like the volume of concrete needed for a slab or at least approximately how many tons of gravel to order for a project.
Paul, great job with this video. I also attended your demonstration of the compliment jig a couple years go at Totally Turning.I made a YouTube video to go along with my original post.
View: https://www.youtube.com/watch?v=PYNx5Wtr_v0
"compliment jig" ?
"compliment
Sorry for the mis-spelling. Paul's complement jig is used for box joints. He has a couple YT videos on his channel."compliment jig" ?
nice video,
the closeups and graphics were extremely helpful
thx
the closeups and graphics were extremely helpful
thx
Lots of good info and a great video......thanks. However, I once used magnets to hold my turning tools in a rack, after a while I found that they were magnetised sufficiently to stop them moving smoothly along the tool rest so might be a problem in the long run. Who knows, time will tell.
demagnetizer work on those ?Lots of good info and a great video......thanks. However, I once used magnets to hold my turning tools in a rack, after a while I found that they were magnetised sufficiently to stop them moving smoothly along the tool rest so might be a problem in the long run. Who knows, time will tell.
demagnetizer work on those ?
I keep an old bulk tape demagnetizer hanging on the wall in my shop and use it on tools that get magnetized. (Mild magnetization can cause annoyance when sharpening on a dry Tormek CBN wheel - particles of steel can cling to and trail behind the tip.)
Amazon also sells simple tool magnetizer demagnetizers. I have some from another source and they work well. Especially good to magnetize screwdrivers to hold steel screws when needed. Haven't tried them on turning tools. I hold lots of small things with strong magnets at the lathe and bandsaw but never turning tools.
John, thanks for your feedback. I didn’t realize this thread was still active until just now. What a pleasant discovery.Nice job. Another thing people often ask is how the Varigrind for various bevel wing shapes. Tormek provides, or at least used to years ago, useful diagrams in their manual of the effect of different settings. Has someone done this for the Varigrind? For skews and scrapers and such I make simple aids from plexiglas to set my favorite platform angles.
I'm glad you included the math. I'm often asked by teens why they would ever need to use math outside of the classroom. I tell them when I worked as a software designer/developer I couldn't do the job without being able to calculate things. I tell them the math is not as important if your goal is to work in fast food or retail sales and spend your free time in front of the TV. I'm surprised when adults can't even calculate things like the volume of concrete needed for a slab or at least approximately how many tons of gravel to order for a project.
I have found myself focusing on the wing cutting edge. I go for a profile that is mildly convex. So, the angle of the wing bevel will vary a bit from Tormek to Vari-Grind to … but the cutting edge doesn’t much.
Hi Gregg, I really appreciate your praise. Thank you. Sorry to be so slow responding.Paul, great job with this video. I also attended your demonstration of the compliment jig a couple years go at Totally Turning.
Sweet! All the best!nice video,
the closeups and graphics were extremely helpful
thx
So interesting. Recently the magnets came off one of my jigs. I’m back to just clamping, or just holding the jig with my hand.Lots of good info and a great video......thanks. However, I once used magnets to hold my turning tools in a rack, after a while I found that they were magnetised sufficiently to stop them moving smoothly along the tool rest so might be a problem in the long run. Who knows, time will tell.
I keep an old bulk tape demagnetizer hanging on the wall in my shop and use it on tools that get magnetized. (Mild magnetization can cause annoyance when sharpening on a dry Tormek CBN wheel - particles of steel can cling to and trail behind the tip.)
Amazon also sells simple tool magnetizer demagnetizers. I have some from another source and they work well. Especially good to magnetize screwdrivers to hold steel screws when needed. Haven't tried them on turning tools. I hold lots of small things with strong magnets at the lathe and bandsaw but never turning tools.
Oh, I experimented with a spindle gouge today, magnetized not by contact with a magnet in the shop but by the earth's magnetic field (yes, that's a thing.)
The little static demagnetizer didn't work at all but the bulk tape demagnetizer/eraser worked perfectly.
JKJ
Does your magnetizer/demagnetizer have the stair-step shape in a demagnetizer hole? Doing all the steps makes a difference.Oh, I experimented with a spindle gouge today, magnetized not by contact with a magnet in the shop but by the earth's magnetic field (yes, that's a thing.)
The little static demagnetizer didn't work at all but the bulk tape demagnetizer/eraser worked perfectly.
JKJ

I suspect the effect is the same as pulling the bulk tape erase/demagnetizer away slowly, a weaker and weaker magnetic field.
Does your magnetizer/demagnetizer have the stair-step shape in a demagnetizer hole? Doing all the steps makes a difference.
View attachment 76008
I suspect the effect is the same as pulling the bulk tape erase/demagnetizer away slowly, a weaker and weaker magnetic field.
Yes, I have several types and they work well on screwdrivers an small tools, but the gouges I tried were probably too bin in diameter. Maybe would work on a parting tool.
Got it and it makes sense. Thanks for the helpful tip: get a bulk tape eraser for your gouges.Yes, I have several types and they work well on screwdrivers an small tools, but the gouges I tried were probably too bin in diameter. Maybe would work on a parting tool.
Thank you Paul for the additional information and pictures about the magnets. I think I will stick to the clamp, setup, and sharpen situation. Works a treat for me. Cheers!

