
-
April 2026 Turning Challenge: Salad Bowl! (click here for details) -
Congratulations to David Bartell, People's Choice in the March 2026 Turning Challenge (click here for details) -
Congratulations to Ted Pelfrey for "Cherry Blossoms on Cherry" being selected as Turning of the Week for April 27, 2026 (click here for details) -
Welcome new registering member. Your username must be your real First and Last name (for example: John Doe). "Screen names" and "handles" are not allowed and your registration will be deleted if you don't use your real name. Also, do not use all caps nor all lower case.
You are using an out of date browser. It may not display this or other websites correctly.
You should upgrade or use an alternative browser.
You should upgrade or use an alternative browser.
What’s on your carving/embellishing bench?
- Thread starter Ted Pelfrey
- Start date
I really like this piece Darryl ! Is it oak and if so how well does it pierce ? I assume your using an NSK?I did one pierced piece about 10 years ago, so I decided it was time I tried it again. When you're partway into it is NOT the time to realize it should've been turned thinner.
I really like this piece Darryl ! Is it oak and if so how well does it pierce ? I assume your using an NSK?
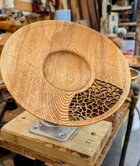
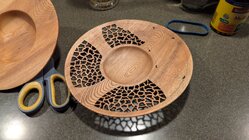
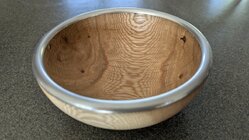
It's a piece of ash. We had a demo and hands-on with Pat Carroll (who is a great demonstrator BTW) plus an Empty Bowls event that our club was demonstrating at, so I had cut WAY too many blanks. It was wood that had come down over the winter winds and ice. I decided that since I had this large bin of leftover small blanks, I could crank out some pieces. To break it up and try other stuff, (and get away from just round & brown) I did another tile rim bowl, a pewter rim bowl, an abalone shell inlay rim and attempted some texture and color.
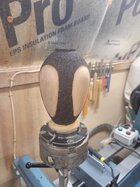
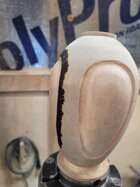
I just have a $20 eBay dental handpiece with diamond burs. It's slow and smoky, but something different. Crank up the tunes and make random holes.
Attachments
Still learning as I go! Doing some pyro to see if I need to narrow down the branches. The bottom of the tree will flare out some to show exposed roots, or so is the plan . Still a long ways to go. Critique welcome.

. Still a long ways to go. Critique welcome. Sweet!Still learning as I go! Doing some pyro to see if I need to narrow down the branches. The bottom of the tree will flare out some to show exposed roots, or so is the plan
View attachment 75952
Nice looking piece, David!
Well finished this after redoing it several times. The vision in my head did not transfer to my hand. However this was just for practice and I learned a lot. Don’t think I’ll post in the photo gallery since I could not get my lighting adjusted correctly.

Nice work, regardless. I always find self-reflection useful. That said, what don’t you like it as much as you thought you would? What would you do differently to improve it?The vision in my head did not transfer to my hand.
Looks great to me!Well finished this after redoing it several times. The vision in my head did not transfer to my hand. However this was just for practice and I learned a lot. Don’t think I’ll post in the photo gallery since I could not get my lighting adjusted correctly.
View attachment 76118
Not sure what the vision was but the form is spot on, the piercing looks great , and I really like the tree! I’m with Michael, what is your critique?
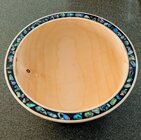
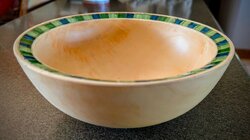
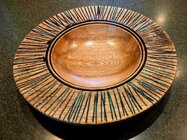
14"x2" wide rimmed maple platter with dyed maple leaves.

Absolutely beautiful! Can you explain your dying technique?14"x2" wide rimmed maple platter with dyed maple leaves.
View attachment 76138
Can you explain your dying technique?
Sorry, I had to chuckle at this!
My own technique for dying is plan to live forever and do as much good as I can.
Then someday realize this won't work and give up and go quietly.

Oh, I think you meant something else!!!
Yes, I'd also like to know more about Scott's embellishment.
Well finished this after redoing it several times. The vision in my head did not transfer to my hand. However this was just for practice and I learned a lot. Don’t think I’ll post in the photo gallery since I could not get my lighting adjusted correctly.
View attachment 76118
I think it looks great. One thing that nags my brain is the branch top-center that curves to the left. It looks out of place to me. Great prototype!
I think it looks great. One thing that nags my brain is the branch top-center that curves to the left. It looks out of place to me. Great prototype!
that looks better than 90% of what gets on WoW!Well finished this after redoing it several times. The vision in my head did not transfer to my hand. However this was just for practice and I learned a lot. Don’t think I’ll post in the photo gallery since I could not get my lighting adjusted correctly.
View attachment 76118
Thanks Ted, the process is relatively simple. Here is a quick detail. If anyone wants more detailed info, I'd be happy to share. Just shoot me a dm.Absolutely beautiful! Can you explain your dying technique?
The process is simple; the key is to have supplies that make it easy. I use Gourd Master Ink Dye’s. I've tried other dyes and couldn't find ones that were as vibrant. GM dyes are rich and thick with pigment and produce vibrant colors. Micro-applicator brushes from online marketplaces used for make-up are used to apply the dye.
- Sand project to finish
- Burn in your image. The burn helps stop the dye from running
- Seal project, I use 4 coats of sanding sealer this prevents dye blead
- Apply a base coat of yellow to leaf
- Apply red on top of yellow, heavy at tips of leaf and thinning out and blending with the yellow to produce orange as you work towards center
- Use a “dabbing” or “blotting” method to apply dye to avoid brush marks
- Multiple coats of dye will darken the color
- Green towards center can be blended with yellow for late summer colors
- I use multiple reds, yellows and greens to produce variations
- Mix in a little blue to get brown for the stem.
- The dye’s go a LONG way, use the smallest drop you can on a canning jar lid for a palette

Burn in your image. The burn helps stop the dye from running
By that, do you mean use use a woodburning pen? Or a laser?
Nice work, regardless. I always find self-reflection useful. That said, what don’t you like it as much as you thought you would? What would you do differently to improve it?
Not sure what the vision was but the form is spot on, the piercing looks great , and I really like the tree! I’m with Michael, what is your critique?
I think the branches need a little work, should have used a lighter wood, think it would be better suited for a more open top vase/ bowl.I think it looks great. One thing that nags my brain is the branch top-center that curves to the left. It looks out of place to me. Great prototype!
The branches need leaning to the left bothers me. I had the piercing smaller but opened it up since it seemed a little crowded. I darkened the piercing, added some smaller branches but that didn’t look right so I sanded it off the pierced area.
I’m okay with the look considering it was mainly for practice but when the vision you have for the piece does not happen it creates doubt in my mind about the piece.
But this is all part of the learning process.
I’ll try to take a picture of the other side if I can get my lighting adjusted on the booth.

Last edited:
Hi John,By that, do you mean use use a woodburning pen? Or a laser?
I personally use a woodburning pen for all my work. I left that part vague because you could use a machine to burn an image and then dye it if you wish. It's just not my style.
Lol! I see it now!Sorry, I had to chuckle at this!
My own technique for dying is plan to live forever and do as much good as I can.
Then someday realize this won't work and give up and go quietly.
Oh, I think you meant something else!!!
Yes, I'd also like to know more about Scott's embellishment.
I’d like to see a pic where the two trees meet. I really like this piece David. But I understand being your own harshest critic.I think the branches need a little work, should have used a lighter wood, think it would be better suited for a more open top vase/ bowl.
The branches need leaning to the left bothers me. I had the piercing smaller but opened it up since it seemed a little crowded. I darkened the piercing, added some smaller branches but that didn’t look right so I sanded it off the pierced area.
I’m okay with the look considering it was mainly for practice but when the vision you have for the piece does not happen it creates doubt in my mind about the piece.
But this is all part of the learning process.
I’ll try to take a picture of the other side if I can get my lighting adjusted on the booth.
View attachment 76151
Also the opening to me is the perfect size.I’d like to see a pic where the two trees meet. I really like this piece David. But I understand being your own harshest critic.
I'm setting up to do some more chip carving.
For anyone who has never tried chip carving, you might be surprised at how easy it is. The most important thing is to sharpen the knife properly. A caution: a long time ago I bought a Wayne Barton (big name in chip carving) knife from Woodcraft. The blade outline was a good but it came with a ground bevel. I tried it and put it aside until a long time later I learned that it had to be reground to the right cross section and sharpened correctly. I reground on a Tormek water wheel so it didn't overheat. I later ordered other knives which were made properly and only needed sharpening. Hock makes a nice one.
I learned to chip carve (from books) so I could carve on things turned round. I had mostly seen chip carving of flat wood. Ordered some northern basswood and started turning it and some glued-up things.


Properly sharpening is the most important thing. I got a nice sharpening aid from My Chip Carving. Practiced for a few weeks before starting on turnings.

When I get started on a new piece I'll post a photo. Note: chip carving on end grain is difficult; I found working on side grain (around the circumference of an end-grain turning) is more doable.
Be prepared to be amazed if you look at Bill Johnson's work:
 www.carolinamountainreefs.com
I met him at the Klingspor shop in western NC once and he set me straight on the knives.
www.carolinamountainreefs.com
I met him at the Klingspor shop in western NC once and he set me straight on the knives.
I later sent him a few woodturings to carve.
JKJ
For anyone who has never tried chip carving, you might be surprised at how easy it is. The most important thing is to sharpen the knife properly. A caution: a long time ago I bought a Wayne Barton (big name in chip carving) knife from Woodcraft. The blade outline was a good but it came with a ground bevel. I tried it and put it aside until a long time later I learned that it had to be reground to the right cross section and sharpened correctly. I reground on a Tormek water wheel so it didn't overheat. I later ordered other knives which were made properly and only needed sharpening. Hock makes a nice one.
I learned to chip carve (from books) so I could carve on things turned round. I had mostly seen chip carving of flat wood. Ordered some northern basswood and started turning it and some glued-up things.
Properly sharpening is the most important thing. I got a nice sharpening aid from My Chip Carving. Practiced for a few weeks before starting on turnings.
When I get started on a new piece I'll post a photo. Note: chip carving on end grain is difficult; I found working on side grain (around the circumference of an end-grain turning) is more doable.
Be prepared to be amazed if you look at Bill Johnson's work:
Home | Carolina Mountain Reefs.com
I later sent him a few woodturings to carve.
JKJ
Worked on carving a couple of different things today. The first is a bit of texturing on the bottom of an African Blackwood pedestal. Still needs a bit of oil and buff.

The second is some progress on the Canarywood bowl I just posted in the lathe thread. This has a bit more work to do. I started with a spiral base, then added some texture. Next step is to do more texture. Then color. End goal is attempting to make it look like stones in a spiral pattern. We'll see how it turns out. Fun stuff!

The second is some progress on the Canarywood bowl I just posted in the lathe thread. This has a bit more work to do. I started with a spiral base, then added some texture. Next step is to do more texture. Then color. End goal is attempting to make it look like stones in a spiral pattern. We'll see how it turns out. Fun stuff!
Last edited:
John, you’re a jack of all trades! Thanks for the photos—enjoyed. I’ve dabbled in chip carving, but never got a proper chip knife. Will have to correct that soon!I'm setting up to do some more chip carving.
What I have found with the saburr they clog up quickly, especially the finer gradesI mostly use Saburrtooth burrs. They recently came out with the white "Whisper" line which are surprisingly aggressive considering the relatively clean surface they produce.Whisper
With the carving station I tend to have more than one on the go at any onetime and all at different stages as it helps with the tedium
I’ve dabbled in chip carving, but never got a proper chip knife. Will have to correct that soon!
I can show you what I found works the best for me and even loan a chip carving book if you want. (and some basswood for practice if you don't have any handy)
After significant work, my Barton knife went from having a useless crude bevel to this this cross section shape, drawn looking from the pointed end and just a very short distance from the point. (It's easiest to shape and sharpen the entire blade but the only thing that matters is the first few mm at the point! This shows my three knives with the cross section a small distance from the point. The "Modified" knife has a more pointed curve at the tip which makes it easier to cut tighter curved chips, sometimes helpful when carving text.

Note the subtle change in angle near the bottom of the cross section drawing, the sharpened edge. (You can ignore what look like coarse scratches on the sides of the blade above the sharpened edge. They are from grinding, meaningless to the chip carving, never touch the wood.) The only thing that matters is the narrow sharpened edge at the bottom, the cutting edge.
Note also that all these knives are angled, relative to the handle, in a way best for cutting and control. Designs stolen, er, learned from the old traditions in Europe.
After using some methods suggested in books and from a local carving shop, I found the sharpening kit from My Chip Carving and will never go back. It's amazing! It uses hard-to-find narrow adhesive-backed strips of sandpaper up to 8000 grit with water as a lubricant. Then strop on leather glued to a flat board. The resulting edge is polished like a mirror.
If interested in the process scroll down and watch the video at the bottom of the page.

Scary Sharp Knife Sharpening Kit - My Chip Carving
Learn how to sharpen your knife scary sharp. It's not expensive and I guarantee you'll have a sharp knife like you've never had before - Scary Sharp!
 mychipcarving.com
JKJ
Last edited:
Progress on a new dragon egg. This started as an unfinished example piece for a workshop I gave in Barnesville, GA last month. Many more layers of paint needed, and some working/painting of the base. These are fun.

That's incredible!!Progress on a new dragon egg. This started as an unfinished example piece for a workshop I gave in Barnesville, GA last month. Many more layers of paint needed, and some working/painting of the base. These are fun.
View attachment 76250
Awesome!! I will take you up on that offer. Thank you for the information as well!I can show you what I found works the best for me and even loan a chip carving book if you want. (and some basswood for practice if you don't have any handy)
Some updates on the Canarywood top. I like the comfort and flexibility of drawing the pattern in pencil prior to committing to carving, so first I drew in most of the stone borders, and carved the section that looked best.

Afterward, I carved the rest of the lines. To do this, I used a 1/8" diameter fluted cylinder with and used the top edge to carve up and down, making a shallow v-groove along each pencil line. I then used a 3/16" round diamond burr to smooth out the texture on the top of the "stones", and a fine tapered diamond burr to smooth out the texture of the grooves I cut. I also used a sharp woodburning skew tip to undercut each of the spirals (proper thanks to @Donna Banfield for the tip a while ago). This helps to exaggerate the very minimal relief (~1/32").

After all of that, I went over the surface with a fine bristle disc to remove most of the fuzzies. I also rubbed some of the high spots with fine sandpaper. This prepared the surface for a coat of gesso. My gesso had sat around, unused, in my non-insulated garage for a while, and when I opened it up it separated (think of sour cream separating--liquid on top). After a very thorough mixing session it was mostly ready though not as smooth as it needed to be. I tinted the white gesso with a few drops of black acrylic paint, and then applied a thin even coat on the top surface to paint everything the same base color. Gesso is basically acrylic paint mixed with gypsum. You can see that the surface is a bit rough because of some wood fuzzies that remained, as well as the gesso not being completely smooth. No worries though, as I will finely sand the top surface once the gesso cures. Then I’ll begin the detail painting process.

I also applied a thin coat of TY oil to the underside of the bowl, mostly just because (but it also protects the bottom surface from random paint).

Afterward, I carved the rest of the lines. To do this, I used a 1/8" diameter fluted cylinder with and used the top edge to carve up and down, making a shallow v-groove along each pencil line. I then used a 3/16" round diamond burr to smooth out the texture on the top of the "stones", and a fine tapered diamond burr to smooth out the texture of the grooves I cut. I also used a sharp woodburning skew tip to undercut each of the spirals (proper thanks to @Donna Banfield for the tip a while ago). This helps to exaggerate the very minimal relief (~1/32").
After all of that, I went over the surface with a fine bristle disc to remove most of the fuzzies. I also rubbed some of the high spots with fine sandpaper. This prepared the surface for a coat of gesso. My gesso had sat around, unused, in my non-insulated garage for a while, and when I opened it up it separated (think of sour cream separating--liquid on top). After a very thorough mixing session it was mostly ready though not as smooth as it needed to be. I tinted the white gesso with a few drops of black acrylic paint, and then applied a thin even coat on the top surface to paint everything the same base color. Gesso is basically acrylic paint mixed with gypsum. You can see that the surface is a bit rough because of some wood fuzzies that remained, as well as the gesso not being completely smooth. No worries though, as I will finely sand the top surface once the gesso cures. Then I’ll begin the detail painting process.
I also applied a thin coat of TY oil to the underside of the bowl, mostly just because (but it also protects the bottom surface from random paint).
Last edited:
Looking good! Got a base wood picked out?Some updates on the Canarywood top. I like the comfort and flexibility of drawing the pattern in pencil prior to committing to carving, so first I drew in most of the stone borders, and carved the section that looked best.
View attachment 76264
Afterward, I carved the rest of the lines. To do this, I used a 1/8" diameter fluted cylinder with and used the top edge to carve up and down, making a shallow v-groove along each pencil line. I then used a 3/16" round diamond burr to smooth out the texture on the top of the "stones", and a fine tapered diamond burr to smooth out the texture of the grooves I cut. I also used a sharp woodburning skew tip to undercut each of the spirals (proper thanks to @Donna Banfield for the tip a while ago). This helps to exaggerate the very minimal relief (~1/32").
View attachment 76265
After all of that, I went over the surface with a fine bristle disc to remove most of the fuzzies. I also rubbed some of the high spots with fine sandpaper. This prepared the surface for a coat of gesso. My gesso had sat around, unused, in my non-insulated garage for a while, and when I opened it up it separated (think of sour cream separating--liquid on top). After a very thorough mixing session it was mostly ready though not as smooth as it needed to be. I tinted the white gesso with a few drops of black acrylic paint, and then applied a thin even coat on the top surface to paint everything the same base color. Gesso is basically acrylic paint mixed with gypsum. You can see that the surface is a bit rough because of some wood fuzzies that remained, as well as the gesso not being completely smooth. No worries though, as I will finely sand the top surface once the gesso cures.
View attachment 76266
I also applied a thin coat of TY oil to the underside of the bowl, mostly just because (but it also protects the bottom surface from random paint).
View attachment 76268
Great piece! Thanks for the detailed description, it really helps those of us who are just starting to carve.Some updates on the Canarywood top. I like the comfort and flexibility of drawing the pattern in pencil prior to committing to carving, so first I drew in most of the stone borders, and carved the section that looked best.
View attachment 76264
Afterward, I carved the rest of the lines. To do this, I used a 1/8" diameter fluted cylinder with and used the top edge to carve up and down, making a shallow v-groove along each pencil line. I then used a 3/16" round diamond burr to smooth out the texture on the top of the "stones", and a fine tapered diamond burr to smooth out the texture of the grooves I cut. I also used a sharp woodburning skew tip to undercut each of the spirals (proper thanks to @Donna Banfield for the tip a while ago). This helps to exaggerate the very minimal relief (~1/32").
View attachment 76265
After all of that, I went over the surface with a fine bristle disc to remove most of the fuzzies. I also rubbed some of the high spots with fine sandpaper. This prepared the surface for a coat of gesso. My gesso had sat around, unused, in my non-insulated garage for a while, and when I opened it up it separated (think of sour cream separating--liquid on top). After a very thorough mixing session it was mostly ready though not as smooth as it needed to be. I tinted the white gesso with a few drops of black acrylic paint, and then applied a thin even coat on the top surface to paint everything the same base color. Gesso is basically acrylic paint mixed with gypsum. You can see that the surface is a bit rough because of some wood fuzzies that remained, as well as the gesso not being completely smooth. No worries though, as I will finely sand the top surface once the gesso cures.
View attachment 76266
I also applied a thin coat of TY oil to the underside of the bowl, mostly just because (but it also protects the bottom surface from random paint).
View attachment 76268
One thing that would be nice is occasionally everyone showing a photo of the actual carving bit used ( for use just starting
). Or just sending me a message show the bit and name
Thanks David! And, your wish is my command. Here is a photo of the carving bits, in order, that I used for this project:Great piece! Thanks for the detailed description, it really helps those of us who are just starting to carve.
One thing that would be nice is occasionally everyone showing a photo of the actual carving bit used ( for use just starting

- Dovetail burr (fine) - used to carved the spirals
- Cone-shaped taper burr (fine) - used to blend the bowl curve with the channels made with the previous dovetail bit
- Curved riffler rasp with 90 degree edges - used to refine the spiral and crisp the edges
- Fluted 3/16" ball burr - add initial texture
- Fluted 1/8" cylindrical burr with flat top - used to carve the borders between the "stones"
- Diamond 3/16" ball burr - used to soften the overall texture
- Diamond tapered burr - used to siften/refined the borders between the "stones"
- 220g bristle discs - used to cleaned up the surface
")
@Ted Pelfrey still deciding on the base. I like it when the top takes a while, because I can really stew on the design choices.
I'm new to carving and pyrography. The "bulging" sections are my take on a demo I watched by Trent Bosch. I can see areas for improvement but I've enjoyed the process. The pyro is simple dimples with a ball shaped end. Still working on it.
Attachments
Thanks David! And, your wish is my command. Here is a photo of the carving bits, in order, that I used for this project:
View attachment 76270
I hope that helps!
- Dovetail burr (fine) - used to carved the spirals
- Cone-shaped taper burr (fine) - used to blend the bowl curve with the channels made with the previous dovetail bit
- Curved riffler rasp with 90 degree edges - used to refine the spiral and crisp the edges
- Fluted 3/16" ball burr - add initial texture
- Fluted 1/8" cylindrical burr with flat top - used to carve the borders between the "stones"
- Diamond 3/16" ball burr - used to soften the overall texture
- Diamond tapered burr - used to siften/refined the borders between the "stones"
- 220g bristle discs - used to cleaned up the surface
@Ted Pelfrey still deciding on the base. I like it when the top takes a while, because I can really stew on
Excellent, thank you!!Thanks David! And, your wish is my command. Here is a photo of the carving bits, in order, that I used for this project:
View attachment 76270
I hope that helps!
- Dovetail burr (fine) - used to carved the spirals
- Cone-shaped taper burr (fine) - used to blend the bowl curve with the channels made with the previous dovetail bit
- Curved riffler rasp with 90 degree edges - used to refine the spiral and crisp the edges
- Fluted 3/16" ball burr - add initial texture
- Fluted 1/8" cylindrical burr with flat top - used to carve the borders between the "stones"
- Diamond 3/16" ball burr - used to soften the overall texture
- Diamond tapered burr - used to siften/refined the borders between the "stones"
- 220g bristle discs - used to cleaned up the surface
@Ted Pelfrey still deciding on the base. I like it when the top takes a while, because I can really stew on the design choices.
I don’t think I’ll need it on this one
, a little too thin. 
The painting phase of this type of project is so enjoyable. After the tinted gesso base coat dried, I lightly sanded with fine grit paper. Then I dry brushed a few “stone” colors to add a bunch of high- and low-lights to the surface. Afterward, I began painting each stone in batches, blending my colors to create as many hues as possible. Here is a series of progress shots:


I’m not quite done painting, but am close. Then, I’ll work on the base and the finial/stem. No more progress shots of those though…gotta keep the suspense high. Haha.
I’m not quite done painting, but am close. Then, I’ll work on the base and the finial/stem. No more progress shots of those though…gotta keep the suspense high. Haha.
I would recommend a micromotor tool that has 1/8" and 1/32" collets. Depending on what you want to do, the burs will vary. MDI has a nice variety of saburr tooth burs, which can remove wood quickly. For more detailed work you would want double-cut burs. Diamond burs for smoothing can also be helpful, and there are a bunch of specialty burs for texturing (e.g., cup burs).If one were to start carving their turned projects, is there a suggested or recommended system? What horse power? Carving bits? I like buying used so I would love to see some suggestions as to what to look out for. I do know Foredom has been in the business for years, but I don't even know if they are currently "the best" way to go. Or what to look for in there drive units? Anyone have any thoughts? Thanks, Todd Bowen