You will knock this out of the park! When second turning are you just touring up the outside and a little on the top of the inside? Or do you second turn the full inside?1/2 inch opening is tough freehand (no laser or camera). I’m twice turning this wet camphor so the hole will likely get a bit bigger. Tools, concentration, and steadiness are needed. I’m usually not successful.View attachment 83424

-
April 2026 Turning Challenge: Salad Bowl! (click here for details) -
Congratulations to David Bartell, People's Choice in the March 2026 Turning Challenge (click here for details) -
Congratulations to Ethan Hoff for "Basket Illusion Platter" being selected as Turning of the Week for April 13, 2026 (click here for details) -
Welcome new registering member. Your username must be your real First and Last name (for example: John Doe). "Screen names" and "handles" are not allowed and your registration will be deleted if you don't use your real name. Also, do not use all caps nor all lower case.
You are using an out of date browser. It may not display this or other websites correctly.
You should upgrade or use an alternative browser.
You should upgrade or use an alternative browser.
What’s on your lathe?
- Thread starter Rusty Nesmith
- Start date
Opening and outside first, then inside. Full inside. Would love to know what others do. On occasion I’ve turned the whole wet piece but don’t like warped hollow forms.You will knock this out of the park! When second turning are you just touring up the outside and a little on the top of the inside? Or do you second turn the full inside?
simple boxelder bowl 4.5 x 7.5
It had been sitting waiting to be finish turned and what little flame it had is almost gone.
This was a practice piece for the Bosch system. I gotta question the cost of that versus being able to do the inside with regular tools usually, although not as easy.
I know smoothness on the inside isn't as critical on the small openings because who can feel in there?
Am I going to have to buy one of his tear drop scraper tool or other suggestions? Had quite a bit of tear out inside which is par for the course for me with boxelder.
Attachments
Opening and outside first, then inside. Full inside. Would love to know what others do.
The same, but sometimes decide on the opening after I refine the outside. I do most turnings this way.
Yes, you will need scrapers. As you get thinner, carbide is too aggressive. You’ll want a smooth even wall, just won’t need to sand when opening under 3/4 inch. The final smooth wall thickness is—for me—achieved with scrapers.simple boxelder bowl 4.5 x 7.5
It had been sitting waiting to be finish turned and what little flame it had is almost gone.
This was a practice piece for the Bosch system. I gotta question the cost of that versus being able to do the inside with regular tools usually, although not as easy.
I know smoothness on the inside isn't as critical on the small openings because who can feel in there?
Am I going to have to buy one of his tear drop scraper tool or other suggestions? Had quite a bit of tear out inside which is par for the course for me with boxelder.
I know smoothness on the inside isn't as critical on the small openings because who can feel in there?
Am I going to have to buy one of his tear drop scraper tool or other suggestions?
The teardrop and other rounded scrapers are invaluable for insides, even if you can't feel to the bottom you can still see it. I want it baby=cheek soft all the way inside (unless the opening is too small for even a little finger.)
I use some of the Sorby scrapers but started making my own shapes from card scrapers. (The only problem is sometimes making the hole for the screw - a drill bit won't cut it. I usually grind a hole with a diamond bit in a Dremel.
I like the thin scrapers for the insides more than the thicker, stock, scrapers.
JKJ
I went with Trent bosch's recommendation and got the hss, not the carbide. I just need more practice feeling out the surface with the hollowing tools I'm sure.Yes, you will need scrapers. As you get thinner, carbide is too aggressive. You’ll want a smooth even wall, just won’t need to sand when opening under 3/4 inch. The final smooth wall thickness is—for me—achieved with scrapers.
Just another mulberry bowl. Has a coat of lacquer ready for some polishing then finish the foot.
Last edited:
 Have a local art show coming up in couple weeks. I rent a booth usually do pretty well. Display about 25 pieces. Almost all local wood. The large bowl is a piece of tamarind with a little resin where I cut out the rot which has amazing chartoyance and a couple small pieces of buttonwood which also has beautiful grain. I used the Laserpecker to engrave the buttonwood as the tourist love anything that has the locale printed on it
Attachments
Last edited:
Haven’t figured out the posting of photos showing up upside down yet
Please tell more. What are your exact steps for posting a photo? The command Posting from a computer, tablet, phone? Did you edit the photos before posting?Haven’t figured out the posting of photos showing up upside down yet
Show him John!Please tell more. What are your exact steps for posting a photo? The command Posting from a computer, tablet, phone? Did you edit the photos before posting?
 You remember what I went through not even a month ago. We did figure it out though.
From my iPad. I clicked on attach file. The photo was upright when I uploaded it. One photo posted correctly the other flipped upside down for some reasonPlease tell more. What are your exact steps for posting a photo? The command Posting from a computer, tablet, phone? Did you edit the photos before posting?
Use the "insert image" icon instead.
From my iPad. I clicked on attach file. The photo was upright when I uploaded it. One photo posted correctly the other flipped upside down for some reason
Looks to me, when I enlarge the photos, that both posted upside down.
As David mentioned, several have had problems with photos rotated when posting directly from a phone. I looked into the file internals and found a clue then did some tests and found that I could replicate this problem if I used the "Attach files" control at the bottom of a message:

However, at least in those cases, the problem went away when I used the "Insert image" control at the top of the message:

You might try this and see if it works. You can Edit your message, use "Insert image" on both, check the results, then delete the originals (or the new uploads if it didn't work) by clicking on the little trashcan icon in the thumbnails below the message.
BTW, another quicker way I insert images when using one of my computers is copy/paste - click on the image or name in the Win10 File Explorer, Ctrl-C to copy, put the cursor where I want picture in the message and use Ctrl-V to paste. (iPad uses Cmd instead of Ctrl).
This will put the photo in the message body at a large (or forum maximum) size. I then click on the image and drag one of the blue corner boxes to reduce the image size as I want. This makes it easier to add text above and below, and put several small images beside each other. The viewer can always click on the reduced size image to view the larger size.
JKJ
With an iPad, try taking the picture in landscape (camera up), and then attaching the file with the camera up (position it was when you took the picture). Also make sure lock rotation is off.
Bingo! Thank you John!! Happy New Year to all!!Looks to me, when I enlarge the photos, that both posted upside down.
As David mentioned, several have had problems with photos rotated when posting directly from a phone. I looked into the file internals and found a clue then did some tests and found that I could replicate this problem if I used the "Attach files" control at the bottom of a message:
View attachment 83565
However, at least in those cases, the problem went away when I used the "Insert image" control at the top of the message:
View attachment 83566
You might try this and see if it works. You can Edit your message, use "Insert image" on both, check the results, then delete the originals (or the new uploads if it didn't work) by clicking on the little trashcan icon in the thumbnails below the message.
BTW, another quicker way I insert images when using one of my computers is copy/paste - click on the image or name in the Win10 File Explorer, Ctrl-C to copy, put the cursor where I want picture in the message and use Ctrl-V to paste. (iPad uses Cmd instead of Ctrl).
This will put the photo in the message body at a large (or forum maximum) size. I then click on the image and drag one of the blue corner boxes to reduce the image size as I want. This makes it easier to add text above and below, and put several small images beside each other. The viewer can always click on the reduced size image to view the larger size.
JKJ
Thanks Webb, I’ll look into thatWith an iPad, try taking the picture in landscape (camera up), and then attaching the file with the camera up (position it was when you took the picture). Also make sure lock rotation is off.
Playing with hollowing. I need practice - so .... practice on wet apple - about 6 inches diameter. Maybe do some texturing or something after it comes off the lathe.


The last of my big maple log was put on the lathe today. I was able to get two 17-1/2” bowls and two 13” cores roughed turned today. I was able to get a large platter blank that I’ll try to rough turn tomorrow.


Western Red Cedar (Thuja plicata) taken from an old Federation home making over 100 years old, laminated old 8" skirting boards. The end you can see will be the opening, I will have to support the piece with the steady as this cedar is very soft. Western Red Cedar is now very hard to get and expensive when you find it, this piece of skirting I managed to get as a freebee.
I have a mechanical issue with my carving jig and so while I get that sorted, thought I might as well get the cedar under way as it will need the carving jig, as it will have semi spiral coves running across the laminations.
I have a mechanical issue with my carving jig and so while I get that sorted, thought I might as well get the cedar under way as it will need the carving jig, as it will have semi spiral coves running across the laminations.
Attachments

Is that imported from west coast of north America or grown down under?Western Red Cedar
The grain and color look identical to what is commonly sold as western red cedar in the USA.
Grown locally and I am not sure if its actually (Thuja plicata)that is cultivated in Australian plantations, or Toona ciliata on the other hand is the true native "red cedar" prized for its soft, rich red woodIs that imported from west coast of north America or grown down under?
The grain and color look identical to what is commonly sold as western red cedar in the USA.
A collaboration with my daughter. A hollow form from a chunk of camphor. Smells great while being turned. The hole is 1 1/2 inches in diameter.

Decided to practice with my new skew and spindle gouge today. After a little practice I ended upped up with a tenon on each end and decided to make a small box in the shape of a hollow form. It ended up 3-3/4” tall x 2” wide. Haven’t made something this small in a long time.


That's really cool! Small stuff is all I do so far. I just sold a two inch tall toothpick holder on eBay for 10 bucks.Decided to practice with my new skew and spindle gouge today. After a little practice I ended upped up with a tenon on each end and decided to make a small box in the shape of a hollow form. It ended up 3-3/4” tall x 2” wide. Haven’t made something this small in a long time.
View attachment 83735
View attachment 83734
View attachment 83733
Jay, what kind of steady rest is that? Looks pretty stout!A collaboration with my daughter. A hollow form from a chunk of camphor. Smells great while being turned. The hole is 1 1/2 inches in diameter.
View attachment 83727
Dan,
Kevin Weir asked that same question back on December 17th in post #6,045. I erroneously replied that it had a label sticker of the probable manufacturer that was only partially readable. David Morris took a stab at deciphering the label. I got the steady when I bought the Stubby lathe from our past president of the Central Coast Woodturners turning club, George Paes. At the time the question first came up, George was in the hospital having a pacemaker installed. A short time later I heard that George was out of the hospital and doing fine. I gave him a call and we spent about an hour talking on the phone and going through old club newsletters trying to come up with the name of the guy that built the steady.
Evidently the sticker on the Steady Rest (SR) had nothing to do with the SR. George told me he had it made by a former club member many many years ago. He paid $80. Both the husband and wife were members of the club at the time it was made. They moved to Rogers, Arkansas. He could not remember their names so we both pulled up the old newsletters to see if we could come up with some info. We discovered that the couple were Rick and Awilda Wilson.
Here is a screenshot from the newsletter.

Fast forward a few years and we found another item in the newsletter that they were in Rogers, Arkansas and selling custom made threading jigs as “A-R Liberty woodturning Accessories” and the web site was “www.ar-liberty.com” A quick google search determined that the site no longer existed. I googled Rick and Awilda in Rogers, AR and found out that Rick had passed away in June of 2024.
I punched “www.ar-liberty.com” into the “Wayback Machine” and found the old site.

It was fun tracking this info down and great talking with George as we walked down memory lane of the club’s history. George passed away on Saturday, December 27th. I will always cherish that last memory of George Paes. https://www.centralcoastwoodturners.com/in-memoriam
Jay Peterson
Kevin Weir asked that same question back on December 17th in post #6,045. I erroneously replied that it had a label sticker of the probable manufacturer that was only partially readable. David Morris took a stab at deciphering the label. I got the steady when I bought the Stubby lathe from our past president of the Central Coast Woodturners turning club, George Paes. At the time the question first came up, George was in the hospital having a pacemaker installed. A short time later I heard that George was out of the hospital and doing fine. I gave him a call and we spent about an hour talking on the phone and going through old club newsletters trying to come up with the name of the guy that built the steady.
Evidently the sticker on the Steady Rest (SR) had nothing to do with the SR. George told me he had it made by a former club member many many years ago. He paid $80. Both the husband and wife were members of the club at the time it was made. They moved to Rogers, Arkansas. He could not remember their names so we both pulled up the old newsletters to see if we could come up with some info. We discovered that the couple were Rick and Awilda Wilson.
Here is a screenshot from the newsletter.
Fast forward a few years and we found another item in the newsletter that they were in Rogers, Arkansas and selling custom made threading jigs as “A-R Liberty woodturning Accessories” and the web site was “www.ar-liberty.com” A quick google search determined that the site no longer existed. I googled Rick and Awilda in Rogers, AR and found out that Rick had passed away in June of 2024.
I punched “www.ar-liberty.com” into the “Wayback Machine” and found the old site.
It was fun tracking this info down and great talking with George as we walked down memory lane of the club’s history. George passed away on Saturday, December 27th. I will always cherish that last memory of George Paes. https://www.centralcoastwoodturners.com/in-memoriam
Jay Peterson
Thanks for sharing that bit of history Jay!Dan,
Kevin Weir asked that same question back on December 17th in post #6,045. I erroneously replied that it had a label sticker of the probable manufacturer that was only partially readable. David Morris took a stab at deciphering the label. I got the steady when I bought the Stubby lathe from our past president of the Central Coast Woodturners turning club, George Paes. At the time the question first came up, George was in the hospital having a pacemaker installed. A short time later I heard that George was out of the hospital and doing fine. I gave him a call and we spent about an hour talking on the phone and going through old club newsletters trying to come up with the name of the guy that built the steady.
Evidently the sticker on the Steady Rest (SR) had nothing to do with the SR. George told me he had it made by a former club member many many years ago. He paid $80. Both the husband and wife were members of the club at the time it was made. They moved to Rogers, Arkansas. He could not remember their names so we both pulled up the old newsletters to see if we could come up with some info. We discovered that the couple were Rick and Awilda Wilson.
Here is a screenshot from the newsletter.
View attachment 83736
Fast forward a few years and we found another item in the newsletter that they were in Rogers, Arkansas and selling custom made threading jigs as “A-R Liberty woodturning Accessories” and the web site was “www.ar-liberty.com” A quick google search determined that the site no longer existed. I googled Rick and Awilda in Rogers, AR and found out that Rick had passed away in June of 2024.
I punched “www.ar-liberty.com” into the “Wayback Machine” and found the old site.
View attachment 83737
It was fun tracking this info down and great talking with George as we walked down memory lane of the club’s history. George passed away on Saturday, December 27th. I will always cherish that last memory of George Paes. https://www.centralcoastwoodturners.com/in-memoriam
Jay Peterson
On WoW.Post it as a mapleke and see what happens.
")
FWIW, I only use the Bosch stabilizer for hollow forms. Any other hollowing is done the traditional way.simple boxelder bowl 4.5 x 7.5
It had been sitting waiting to be finish turned and what little flame it had is almost gone.
This was a practice piece for the Bosch system. I gotta question the cost of that versus being able to do the inside with regular tools usually, although not as easy.
I know smoothness on the inside isn't as critical on the small openings because who can feel in there?
Am I going to have to buy one of his tear drop scraper tool or other suggestions? Had quite a bit of tear out inside which is par for the course for me with boxelder.
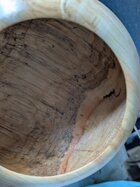
I managed a few hours in the shop last week. This is a piece of mystery oak I got as a cutoff from an Amish furniture maker. I assumed it was all red oak, but this one is different. Is this live oak perhaps?


Jaramiah Severns
TOTW Team
Sam, are you measuring the wall thickness as you hollow? Even with the laser, measuring is a good practice to get into and will help avoid going through the side (and will tip you off to any laser misalignment).Well...... whoever said start with a bigger opening was right.. You can see right in there. no wait that's not right........... Oh well, I'm 2 for 2 on the hollow forms.
practice practice practice.. And learn to set the laser better. I'd have been alright with a bigger form because I'd have made the walls thicker but this little thing I kept smoothing and smoothing and oops a 2 piece bowl?
I knew the beading would throw me off but I'm pretty sure I just don't have the setting of the laser down yet.
I'd have been pretty upset if I had done the spokes of the beading but I knew better.
Jaramiah Severns
TOTW Team
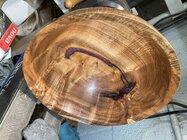
The only way I’ve managed to end up with a 1/2” opening is to start with a 3/8” opening…just large enough to sneak the hollower inside. You’ll inevitably bang the shaft into the rim a few times and that extra 1/8” allows for a little bit of clean up.1/2 inch opening is tough freehand (no laser or camera). I’m twice turning this wet camphor so the hole will likely get a bit bigger. Tools, concentration, and steadiness are needed. I’m usually not successful. This is camphor—love the smell View attachment 83424
It’s the elusive BowlOak treeI managed a few hours in the shop last week. This is a piece of mystery oak I got as a cutoff from an Amish furniture maker. I assumed it was all red oak, but this one is different. Is this live oak perhaps?
View attachment 83761View attachment 83762
 . Some nice color and grain in that!!
I managed a few hours in the shop last week. This is a piece of mystery oak I got as a cutoff from an Amish furniture maker. I assumed it was all red oak, but this one is different. Is this live oak perhaps?
View attachment 83761View attachment 83762
If you still have a small scrap off the wood showing the endgrain (maybe 1/2" wide or so and thick enough to hold onto), you can shave the endgrain with a single-edge razor blade or a very sharp knife (sanding is not recommended) and examine it under magnification. A 10x hand lens is recommended. (I use a stereo microscope since I have one.)
This shows the end grain of Live, Red, and White oak. Notice the live oak has quite indistinct ring boundaries compared to the others. Live oak also has very wide aggregate rays, pores arranged radially. In this photo of live oak the latewood pores are large, diffuse, and to me look a bit like strings of bubbles
All oaks that grow around here I've looked at have radial towers of tiny pores (I call them "tornadoes", but the red and white oaks have very large earlywood pores and tiny latewood pores. The red oak pores are empty like soda straws; white oak pores are clogged with tyloses (making the wood good for outdoor furniture and whisky barrels.)
The Wood Database indicates red oak usually looks more red than live oak.

We have no live oak here - it grows mostly on the southeastern coastal plains.
Note there are a number of species called life oak and according to Wikipedia, are not all closely related:
https://en.wikipedia.org/wiki/Live_oak. They apparently keep their leaves in the winter.
If you do have a scrap, save it for me to examine.
JKJ
I do have a piece, still. I'll bring it to the TAW Symposium.If you still have a small scrap off the wood showing the endgrain (maybe 1/2" wide or so and thick enough to hold onto), you can shave the endgrain with a single-edge razor blade or a very sharp knife (sanding is not recommended) and examine it under magnification. A 10x hand lens is recommended. (I use a stereo microscope since I have one.)
This shows the end grain of Live, Red, and White oak. Notice the live oak has quite indistinct ring boundaries compared to the others. Live oak also has very wide aggregate rays, pores arranged radially. In this photo of live oak the latewood pores are large, diffuse, and to me look a bit like strings of bubbles
All oaks that grow around here I've looked at have radial towers of tiny pores (I call them "tornadoes", but the red and white oaks have very large earlywood pores and tiny latewood pores. The red oak pores are empty like soda straws; white oak pores are clogged with tyloses (making the wood good for outdoor furniture and whisky barrels.)
The Wood Database indicates red oak usually looks more red than live oak.
View attachment 83765
We have no live oak here - it grows mostly on the southeastern coastal plains.
Note there are a number of species called life oak and according to Wikipedia, are not all closely related:
https://en.wikipedia.org/wiki/Live_oak. They apparently keep their leaves in the winter.
If you do have a scrap, save it for me to examine.
JKJ
Right now its down for a little maintenance and some mods to the carving jig. Machining of the Banjo back to some sort of parallel state, as its a welded construction Banjo, never quite got around to it 10 or 15 years back, time flies when you're having fun 
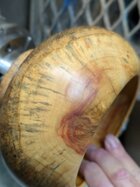
Twice-turned sassafras platter.
