• June 2025 Turning Challenge: Turn a Wand! (click here for details)
  • Sign up for the 2025 AAW Forum Box Swap by Monday, June 30th (click here for details)
  • Congratulations to Carl Ford for "Rings of Raindrops in Living Color" being selected as Turning of the Week for June 16, 2025 (click here for details)
  • Welcome new registering member. Your username must be your real First and Last name (for example: John Doe). "Screen names" and "handles" are not allowed and your registration will be deleted if you don't use your real name. Also, do not use all caps nor all lower case.

Witness Marks, Sanding Scratches, and other issues that crop up when trying to produce a superb finish...

I just ripped a 36" long strip of dry, 1" thick red oak. Below is typical of what gets left on the black tires, more on the bottom tire. ... maybe that big dog dust system you have on your saw keeps things cleaner than the mediocre dust collection by way of a shop vac these saws have.


Hmm. Maybe the DC helps. But I think tire brushes help more. I used the Delta 14" with riser for a bunch of years with just a shop vac or an open garage door and a fan.

Do you have stiff brushes that clean the tires while running? I made brackets, cut apart and modified a stiff-bristled brush, and mounted brushes in contact with the upper and lower tires, positioned so they contacted the tires just before they rotated into contact with the blade. This was on the Delta 14" before I got the 18" Rikon. The Rikon came with a brush mounted.

I don't think I ever replaced the tires on the Delta. (I did do a complete workover to make the wheels precisely coplanar, stronger tenson spring and tension block, cool-block guides, and quick tension release.) I processed a LOT of green wood on that saw to make turning blanks for drying.

I had to replace the tires on the Rikon a few years ago and put on some of those pretty orange Sulpher Grove urethane tires. The original Rikon tires didn't hold up like those on the Delta.

Softwood dust often contains sticky resins. Thickly packed sticky sawdust builds up horribly on inside of my Woodmizer blades every time I saw pine. I came up with a safe method to clean it off quickly while the mill is running. If I don't clean it off, the blade will dive in the cut Zero problems with hardwoods.

JKJ
 
I don't think I ever replaced the tires on the Delta. (I did do a complete workover to make the wheels precisely coplanar, stronger tenson spring and tension block, cool-block guides, and quick tension release.) I processed a LOT of green wood on that saw to make turning blanks for drying.

JKJ
I've done the same to my 2 Deltas, minus the quick tension. One saw did need a replacement tensioning threaded rod (threads worn away) that I replaced with an Acme thread rod kit from... from... oh, what's his name, the Delta/Jet bandsaw guru?

Anyway, no wheel brushes on either saw.
 
t I replaced with an Acme thread rod kit from... from... oh, what's his name, the Delta/Jet bandsaw guru?

Was it from Iturra Design? I went to Louis often for parts and information.

To Mark Duginski and Lonnie Byrd for more info.

I ended up practically giving away my Delta. Two woodcutting bandsaws, the bandsaw mill, and two metal-cutting bandsaws was getting a bit too much to use, not enough time...

JKJ
 
Yes, Iturra. Amazing that he still does everything by paper catalog and phone calls.
 
I have been turning a lot of madrone lately. I went to turn on my big bandsaw, Laguna 16 HD, and got the belt squealing/slipping sound. There is a lot of very sticky gunk that comes off of the madrone as I turn and as I cut.... I loosened it up a bit and then used some slick stick on the blade. Use it on my small bandsaw too, just to help reduce the gunk build up. Works on the tool rest and tool backs too.

robo hippy
 
Wet! It is pretty much impossible to dry madrone boards, which is unfortunate because the wood is so beautiful! Red tints throughout. The problem with madrone is that it warps to no rhyme or reason, and in insane amounts. In some logs, the grain spirals. One bowl I turned came off the lathe at 22 inch diameter. When finished drying and moving, it was some thing like 29 by 19 inches and in kind of a D shape. You just never know what it will do. You can boil it, but with the amounts that I do, I couldn't do that. Also, the boiling tends to muddle the colors together. It needs to be turned down to about 1/4 inch. 5/16 will crack more. Also, it needs to be harvested when the spring sap is running. If you harvest mid summer or fall or winter, you will get a lot more cracking. Got one last year that was cut in the winter and left on the ground. I had to resort to the brown bag method to tame the cracks. If I core a set of bowls, they do not all warp the same. That is just the way madrone is. Dale Larson likes to boil his madrone bowls. To me, that is just wrong! I like it when they potato chip!

robo hippy
 
Pretty sure most of us understand the need to work through grits starting at a level that removes “fine” inconsistencies. This needs to be done in conjunction with tool control that assures steady transitions and consistent light bevel riding. Final shear scraping often needed in final passes to make sure bevel not burnishing the wood fibers, often difficult to see till finish begun.
 
make sure bevel not burnishing the wood fibers,

One think I don't see everyone do is round the bottom of the bevel. I find this give better clearance and eliminates the horrible burnishing by a hard edge at the back end of the bevel. I round the back of the bevels on spindle and bowl gouges as well as some Hunter tools. The Tormek gouge jig has a nice feature which makes this so easy.

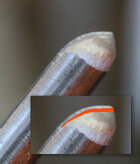
Chris Ramsey takes this to extreme to turn his cowboy hats. I took this picture of a gouge he just sharpened by hand. All of the bevel is rounded except the extremely narrow bevel at the cutting edge (which I outlined in red).

Ramsey_gouge_comp.jpg

Sometimes he has a more curved bevel but this appeared to work fine, turning green of course.
Yes, he had excellent took control!

JKJ
 
One think I don't see everyone do is round the bottom of the bevel. I find this give better clearance and eliminates the horrible burnishing by a hard edge at the back end of the bevel. I round the back of the bevels on spindle and bowl gouges as well as some Hunter tools. The Tormek gouge jig has a nice feature which makes this so easy.

Chris Ramsey takes this to extreme to turn his cowboy hats. I took this picture of a gouge he just sharpened by hand. All of the bevel is rounded except the extremely narrow bevel at the cutting edge (which I outlined in red).

View attachment 76612

Sometimes he has a more curved bevel but this appeared to work fine, turning green of course.
Yes, he had excellent took control!

JKJ

You really do ROUND those off. I do grind a secondary bevel, and on my two largest bowl gouges I will even do three. I haven't fully rounded them, though, so there is still kind of that sharper corner between the two (or three) bevels.

Regarding the very thin bevel, since I've been trying to improve my tool edges and grinding, I've been watching a lot of videos. I forget who it was, actually I think there were a couple different people, who stated that the primary bevel should be fairly narrow, and that the rest should be ground off so you can get it out of the way to round corners without burnishing. I wouldn't say anyone reduced their primary bevel as much as Chris Ramsey, but they often weren't more than 1/8" at most. Some of my tools don't have removable handles, so grinding a secondary bevel often runs into clearance issues with my jig system. But I try to keep the primary bevel narrower now.
 
One think I don't see everyone do is round the bottom of the bevel. I find this give better clearance and eliminates the horrible burnishing by a hard edge at the back end of the bevel. I round the back of the bevels on spindle and bowl gouges as well as some Hunter tools. The Tormek gouge jig has a nice feature which makes this so easy.

Chris Ramsey takes this to extreme to turn his cowboy hats. I took this picture of a gouge he just sharpened by hand. All of the bevel is rounded except the extremely narrow bevel at the cutting edge (which I outlined in red).

View attachment 76612

Sometimes he has a more curved bevel but this appeared to work fine, turning green of course.
Yes, he had excellent took control!

JKJ
I've been doing something similar for decades. But I take it to extremes ... not necessary - but it makes me happy! 😁

1) I rough out the rounding over on the grinder - more than shown in your photo. (hand held)
2) Then take it to my 1" belt sander with a fine grit belt. Hold the tool above the platen - which removes any facets left from the grinder and further rounds out the curve. (hand held)
3) Then take it to my leather wheel with compound (green in my case) to further smooth and polish the rounded 'bevel'.😜
4) THEN - take it back to the grinder to put on a fresh mini-bevel as shown in your photo. After numerous sharpenings and the bevel gets too long then I will repeat the process ... If I feel like it! OVERKILL, I know.

I think I've been doing that since seeing a demo back in the '90s (?) by ????? (name escapes me at the moment), a woman woodturner that was well known for her wooden jewelry - she even wrote a book or two about it.
 
3) Then take it to my leather wheel with compound (green in my case) to further smooth and polish the rounded 'bevel'.😜

...woman woodturner that was well known for her wooden jewelry

Excellent. I didn't mention it but after I round the bevel I also polish it - I use the leather wheel on the Tormek.

Judy Ditmer?
 
I don't go that extreme on my gouges for inside bowls, but I do round it over rather than a "secondary bevel". Just freehand grinding. Good way to slow down my wheels.

As for round bottom bowls, I have seen "earthquake" bowls which are half round/hemispheres. They would rock during an earthquake....

robo hippy
 
Back
Top