• Beware of Counterfeit Woodturning Tools (click here for details)
  • Johnathan Silwones is starting a new AAW chapter, Southern Alleghenies Woodturners, in Johnstown, PA. (click here for details)
  • Congratulations to Jim Hills for "Journey II" being selected as Turning of the Week for May 6th, 2024 (click here for details)
  • Welcome new registering member. Your username must be your real First and Last name (for example: John Doe). "Screen names" and "handles" are not allowed and your registration will be deleted if you don't use your real name. Also, do not use all caps nor all lower case.
Spheres
Lou Jacobs

Spheres

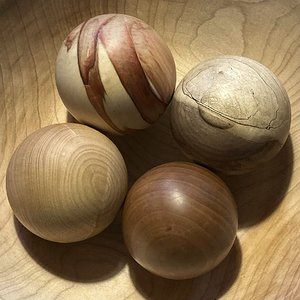
My club had a sphere-turning demo last week. I’ve never made one before and thought I’d give it a shot. These are my first four, ranging from 3” to 3 3/8” in diameter. From the top, going clockwise, they are box elder, spalted maple, Bradford pear and ash.
Funny you should write now Tom, as I just came in from the shop having made another out of cherry. I could try to describe the process which is really not difficult. I wish my bowl turning was as consistent as these spheres. Give me a bit of time to try to put some notes together.
 
I’ll try to describe the process. It would be easier to demonstrate, but here goes:
1) turn a cylinder
2) mark it off exactly as long as it is wide.
3) mark a centerline
4) use a parting tool to cut the ends in, down to about a quarter the diameter of the cylinder. In other words, let’s say your cylinder is 3” in diameter. You’ve marked out a section of it 3” long, then use the parting tool to cut in until the remaining axis is about 3/4” in diameter.
5) from the each end, Measure in .30 x the diameter and draw these lines on the cylinder. For our 3” cylinder, that’s .9” from each end.
6) cut down at 45° from these outer lines to the ends of the cylinder. I simply use a trysquare held against the bevel to see if it is 45°. If the angle is correct, the arm of the square will be perpendicular to the turning axis. You can also do it by marking the ends of the cylinder the same distance down (.9”) and connecting your two lines.
You’ve now got a symmetrical octagon.
7) from the top left and right sides of the horizontal face (the one that’s parallel to the turning axis) mark four lines that are .11 x the diameter. In our example, it would be .33”.
8) cut between those lines. Have I lost you here? You’re simply going to add two additional facets to the octagon.
Now the fun part starts!
9) part off the 3” piece, or bandsaw off the ends.
10) make a wood cup center that you can hold either in a chuck or on a screw chuck. The cup should be about 1/3 the diameter of your cylinder. In our example’s case, about 1”.
11) make some kind of soft touch to mount on your tailstock live center, or if you’ve got a live center with a blunt inserts mount that.
12)The object is to hold your rough ball between centers and very gently turn off everything that’s not perfectly round. Frequently reposition the piece so it turns on a different axis. At first you’ll get rough shavings, but as you go, only taking a bit off at a time, you’ll continue to refine the shape until it approaches perfectly round.
13) when you’re satisfied that you are as close as you can get with a gouge, switch to sandpaper. I start with 120 grit and work up to 400 or so. During sanding you’re again, just like when you are cutting, constant tilt shifting the piece so it turns on a different axis. Each time take gentler passes than you did before,
14) you’re done!
 
Thanks for all that explanation, Lou. I'm "sort of" familiar with that method - or something very similar.
I like Mike Hosaluk's method ... only one mounting and "turn away everything that doesn't look like a ball". :D
 

Media information

Category
Member Galleries
Added by
Lou Jacobs
Date added
View count
1,167
Comment count
14
Rating
0.00 star(s) 0 ratings

Image metadata

Filename
DEC16329-170D-4A3A-BB46-FC6ABCB2830C.jpeg
File size
452.8 KB
Dimensions
1280px x 1189px

Share this media

Back
Top