Cans would not be my first choice for shop lighting, either.

-
April 2026 Turning Challenge: Salad Bowl! (click here for details) -
Congratulations to David Bartell, People's Choice in the March 2026 Turning Challenge (click here for details) -
Congratulations to Gianni Di Gregorio for "Simple Piercing" being selected as Turning of the Week for April 20, 2026 (click here for details) -
Welcome new registering member. Your username must be your real First and Last name (for example: John Doe). "Screen names" and "handles" are not allowed and your registration will be deleted if you don't use your real name. Also, do not use all caps nor all lower case.
You are using an out of date browser. It may not display this or other websites correctly.
You should upgrade or use an alternative browser.
You should upgrade or use an alternative browser.
Dream shop
- Thread starter Webb Willmott
- Start date
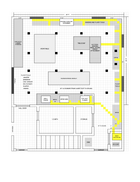
Send your drawing to Oneida, years ago they would provide recommended ducting for free when you’re purchasing from them, I suspect they still will. BTW - your going to love the V3000My dream shop is well underway. Drywall done. Electrical pulled. Here is the plan. Again asking those in the know for suggestions. The black square are led cans for general lighting.
I am installing a V 3000 Oneida dust collector so the drawing is for the engineers to suggest ducting.
Cans are my preference for general lighting. 16 in a 500sf area with brighter bulbs are what I want for general shop lighting since I have 10’ ceilings. With 2 additional over the lathe for a total of 18. I will add more concentrated light after I get things situated and determine what additional is needed. And cans don’t gather dust.Cans would not be my first choice for shop lighting, either.
I suspect every wood worker didn’t start out with all the lights they ever needed and added as need arose.
Hope you are putting doors on the DC and compressor cubby. I used double steel insulated doors on mine - the closet walls and ceiling are insulated as well - can hear a whisper outside the closet when the sound would be deafening inside.
I use a series of can lights down the shop, all powered by one switch. Mine are not for work lights but just to let me see to walk and grab tools and things from the various areas (5 areas, 4 divisions/rooms, depending on how I count). For work lighting I use T5 fluorescent tubes. These are great since each fixture has two bulbs but the ballast is (or can be) wired to turn on just one bulb, both if I flip an extra switch. One is enough for almost anything but higher on the wall I have the second switch for those times I want to be blinded by the light. (Think Manfred Mann's Earth Band ‧ 1976) Plenty of daylight frequency light. One friend visited when I got everything set up and asked for sunglasses...
I also am a true believer of 3-way and 4-way switches so I can control lights from several locations - saves walking back to the main light switch boxes by the entrance doors.
I have a slightly different philosophy for wiring inside the cyclone and air compressor closet, each with 5hp motors- central disconnects and power distribution but remote wireless controls at the major stations (lathe, bandsaw, drum/disk sanders) with a central disconnect near the center of the shop and another in the closet which controls a contactor/relay in the closet. If something goes south I want to be able to shut things down quickly.


JKJ
I use a series of can lights down the shop, all powered by one switch. Mine are not for work lights but just to let me see to walk and grab tools and things from the various areas (5 areas, 4 divisions/rooms, depending on how I count). For work lighting I use T5 fluorescent tubes. These are great since each fixture has two bulbs but the ballast is (or can be) wired to turn on just one bulb, both if I flip an extra switch. One is enough for almost anything but higher on the wall I have the second switch for those times I want to be blinded by the light. (Think Manfred Mann's Earth Band ‧ 1976) Plenty of daylight frequency light. One friend visited when I got everything set up and asked for sunglasses...
I also am a true believer of 3-way and 4-way switches so I can control lights from several locations - saves walking back to the main light switch boxes by the entrance doors.
I have a slightly different philosophy for wiring inside the cyclone and air compressor closet, each with 5hp motors- central disconnects and power distribution but remote wireless controls at the major stations (lathe, bandsaw, drum/disk sanders) with a central disconnect near the center of the shop and another in the closet which controls a contactor/relay in the closet. If something goes south I want to be able to shut things down quickly.
JKJ
I did send. Yellow is the ductwork I had in mind. Will see what they come up with. My question to the peanut gallery is where would you put the floor tools?Send your drawing to Oneida, years ago they would provide recommended ducting for free when you’re purchasing from them, I suspect they still will. BTW - your going to love the V3000

Rough lumber comes into my shop through a garage door. First machine meeting the lumber is the jointer for face jointing. Than the other side goes through the planer and back to the jointer for edge jointing. Finally to the table saw. To work efficiently I grouped those three machines together with as few steps as possible between the garage door and the machines. The infeed side of the machines are alternated to again save steps.
The rest of the machines line the walls with no real thought on work flow or efficiency.
When I first built my shop, I had a long workbench up against one wall. I later added a 4' X 7' assembly table away from the wall. A few years later I built a small workbench about 30" X 40". It sits out in the middle of the shop and I love it. Fast to walk around which really helps when building stools and chairs. It's small enough I can't leave stuff on the top. To reclaim space I got rid of the wall workbench and that was one of my better idea's. It was far too easy to leave stuff (junk) on the top plus it was hard to work off of with access on only one side.
I am finishing my dream shop. 24 X 36 with loft, second floor. The loft is 12' x 36', and there's no head-bump ceiling with a wonderful set of stairs with a railing.
The main floor is three rooms: the shop, the man cave, and the bathroom. Two attached extra buildings, a mechanical room with Dust Collection and Compressed Air. The second 4 x 6 building is a wood drying room.
All the bells and whistles I could think of, many have been listed here already. I would make one change: a wooden floor in the shop. Concrete is faster, but placing dust control, electrical, water/sewer, and others would have been so much easier from a tall crawl space. Over the years, I have only brought one car into the shop for repair, so a concrete floor isn't necessary, in my opinion. Some days, my legs ache from the concrete.
The other thing I wish I had added was an extra 15 feet for my wife's She-Shed. She is running her quilting frame in a small bedroom. She deserves better.
I think I'll work on that.
I am installing a V 3000 Oneida dust collector so the drawing is for the engineers to suggest ducting.
Hello Webb,
Just thinking of your dust collection system, Instead of hard wiring switches at each point you might want to turn on your dust collector, you might give the switch below a look. This one is by Greencycle.
These are for lighting systems, 1000 to 1200 watts, and 1800 watts for non lighting circuits. They have a 200 ft range indoors, you can place them with a screw or double sided tape wherever you want. The batteries last a long time, I have had mine installed, with 6 transmitters for at least four years and have never changed a battery.
Of course, they will not work directly to start your dust collector, but they will handle the 120 volt start coil on a contactor. 1000 watts on 120 volt equals 8.7 amps. A 120 v coil on a contactor for a five hp motor typically draws .25 to .5 amps to hold the contactor after start, and 3 to 5 amps for the initial engagement.
When I installed mine, I figured up the cost of the copper for six 3 /4 way switches, the contactor and remote switches were 20% less than the copper, and I would still have to buy switches, boxes, conectors, etc. (They have come down in price since I purchesed mine.)
Hope this helps,
WH

I hadn't included an work table yet but with all that floorspace in the middle, it was on my list. Also my woodworking bench wasn't on there. Now is. Exact placement TBD but once I get the cabinet saw and bench located, I'll know the size to build the table. Here is an update with doors labeled as to where they lead. The door directly to the garage is 3' wide. If wider needed, there is a double door out to the back porch that so I got that covered. I thought hard and long about putting a true garage door in but decided not to for several reasons.Rough lumber comes into my shop through a garage door. First machine meeting the lumber is the jointer for face jointing. Than the other side goes through the planer and back to the jointer for edge jointing. Finally to the table saw. To work efficiently I grouped those three machines together with as few steps as possible between the garage door and the machines. The infeed side of the machines are alternated to again save steps.
The rest of the machines line the walls with no real thought on work flow or efficiency.
When I first built my shop, I had a long workbench up against one wall. I later added a 4' X 7' assembly table away from the wall. A few years later I built a small workbench about 30" X 40". It sits out in the middle of the shop and I love it. Fast to walk around which really helps when building stools and chairs. It's small enough I can't leave stuff on the top. To reclaim space I got rid of the wall workbench and that was one of my better idea's. It was far too easy to leave stuff (junk) on the top plus it was hard to work off of with access on only one side.
Thanks for the suggestion WH but the Oneida system uses a keyfob and if needed, extra fobs are $19.95. I'll probably spring for a few extra ones.
Attachments
Webb Willmott - two additional comments:
1) I’d recommend a DC drop by your workbench. I have one and don’t use it often, but on occasion I really like one there.
2) I purchased a second key fob from Oneida and have one constantly hanging on both ends of my shop (one at the lathe, and one near my TS/planer). Your shop is larger, but I’d recommend hanging them in a couple/few places so you always have an on/off in relative easy reach.
A drum sander or a small widebelt are really handy for segmented work. If you don't plan on one for now, you might want to leave a stub out on your DC pipe for a future addition.
I have a floor sweep that feeds my DC next to the lathe. Makes for really fast clean ups. I blow all my dust outside so don't think about DC bags or filters.
I have a floor sweep that feeds my DC next to the lathe. Makes for really fast clean ups. I blow all my dust outside so don't think about DC bags or filters.
Just thinking of your dust collection system, Instead of hard wiring switches at each point you might want to turn on your dust collector, you might give the switch below a look. This one is by Greencycle.
When I bought my ClearVue cyclone, I got the wireless remote option that came with a keyfob on/off transmitter and a receiver that switched 110v. I found more of the identical models on amazon which gave me spare receivers and all the transmitter fobs I needed. The receiver switches a contactor in the DC/compressor closet with enough switching capability to turn on two 5hp motors at once, with the wire sized appropriately. I wouldn't activate them both manually at the same time but I could see the air compressor "deciding" to switch on at the same time I turned on the cyclone.
I mounted the receiver, a circuit for a bin-full sensor, a power supply, in a box and added an 110v switch to disable the whole system from the main shop if needed (for example if I went into the closet to check the DC bin and the compressor decided to come on it would be loud!) On the front of the box is a strobe light and audible alarm for the bin-full sensor.


All wires are in conduit in the walls.
All this has worked perfectly for the 10 years since I built the shop.
Consolidating all this made a neat package inside as shown here and in an earlier message.

I've learned over the years to keep electrical things as clear and organized as possible. Cue Billy Joel "Get it right the first time".
Call me a fanatic but I didn't like the looks of the "typical" in-closet installation ClearVue pictured in their instructions.

JKJ
1) I will have a hose with a hand help floor sweep and that will serve for work bench. Got that covered!Webb Willmott - two additional comments:
1) I’d recommend a DC drop by your workbench. I have one and don’t use it often, but on occasion I really like one there.
2) I purchased a second key fob from Oneida and have one constantly hanging on both ends of my shop (one at the lathe, and one near my TS/planer). Your shop is larger, but I’d recommend hanging them in a couple/few places so you always have an on/off in relative easy reach.
2) Will have a couple of fobs strategically placed
I have a floor sweep that feeds my DC next to the lathe. Makes for really fast clean ups.
That's a good idea, but I keep losing my broom.

I thought about a fixed floor sweep but couldn't figure where to put it.
I did connect a shop vac hose on a blast gate by the lathe, long enough to reach across the isle to the bandsaw as well. Just in case I lose my mind and decide to clean up.
Will have a floor sweep in the toe kick near the miter saw. The hose sweep will be near lathe and table saw. You mentioned a switch for the compressor and I have 3 on wall by the lathe. Lathe, table saw, and compressor.That's a good idea, but I keep losing my broom.
I thought about a fixed floor sweep but couldn't figure where to put it.
I did connect a shop vac hose on a blast gate by the lathe, long enough to reach across the isle to the bandsaw as well. Just in case I lose my mind and decide to clean up.
All good ideas I’m hearing. Keep em coming.
My floor sweep is under my jointer.
Tim
Tim
You mentioned a switch for the compressor
I'm sure I did but don't remember.
I use a remote key fob switch to turn the cyclone dust collector on and off, but use a single wall toggle switch to power the compressor. The compressor, of course, has a pressure switch to cut it on and off as needed. But one extremely important comment: I know someone whose shop burned down because the pressure switch on his compressor failed when he was out of town. The compressor ran continuously, overheated, and there went the shop and all his tools and wood. I think it's important to put the compressor power switch where it's easily seen and turned off when leaving the shop. Having more than one compressor switch would be good - each could be a simple 4-way light switch wired to control a contactor (relay).
BTW, I also had a pressure switch fail once, but it was while I was working in the shop. Some people have said when they leave they cut the power to the whole shop at the breaker box but that would be impractical for me - I have a egg cooler, incubators and brooders for hatching peacocks and guineas and they need to have constant power. I want the heat and air on all the time too, as well as the security system and cameras.
Since the compressor is in the sound-insulated closet with the doors in the back room, I put just one electrical switch on the wall in the main shop. (I had to buy a special switch rated for 5hp motor loads - a switch made for lights would likely have burned contacts in short order!)
I ran the air line from the compressor through the closet wall into the main shop and put the pressure gauge, water separator, desiccant drier, and regulator there so I could monitor and service things easier. The drier is especially important for certain tools like the plasma cutter. (Note that the desiccant drier company wants you to buy new cartridges of desiccant when one is exhausted - instead, I keep extra indicator desiccant beads and dry them out in a little toaster oven, then put them back into one of their cartridges I pried open. Desiccant beads can be dried and reused indefinitely.)

A three-valve header feeds air in lines to back inside the closet where they continue inside the walls and above the ceiling to different zones inside and outside the shop.

One feeds air outlets on the east side of shop, one the west, and the third one goes to the welding shop/maintenance/little machine shop. In that area I mounted a 50' air reel just inside a garage door so I can work with air tools outside when changing tires, etc. The east side line also feeds a second airline reel on the porch outside on the south end of the building, handy for airing up vehicle tires without taking them to the back and opening the big garage door, AND, for blowing dust out of radiators and equipment air filters, something I do a lot! I highly recommend mounting an air reel somewhere outside the shop - I use them at least several times a week.
I used RapidAir fittings and lines everywhere, bought at the local Northern Tool. (Since this is a farm, I have another compressor and reel at the barn - use compressed air there a lot to blow out water lines, air up wheelbarrow tires, blow dust out of alpaca/llama coats at shearing time.) I found the RapidAir company to be helpful too - for some reason one coil of flexible air line became WAY too stiff before I could use it - I called RapidAir and they sent out a new coil!
Note: I found two different kinds of quick connect fittings. The one in the pic below is great for air outlets mounted on walls - it allows connecting by simply pushing the hose connector without having to use the other hand to pull back on the sleeve on the connector. It is distinguished by an obvious gap near the front. The other type, that needs two hands, doesn't have this gap. I found both kinds at Home Depot and Northern Tool. I used the two-hand version on the end of air lines at the lathe, milling machine, and for various pneumatic tools.
The air line comes through the wall into the back of these outlets. (The valve on this outlet and the one at the bottom of the main air line from the compressor on the photo above are for draining any moisture that might condense inside the lines in rare conditions. I check them occasionally but none have ever had moisture.)

On the ends of air lines on the reels, I like this type of connector with a button release:

There, I'll bet you're sorry you mentioned the words "switch for the compressor"! I quit when I run out of energy but I don't think I have an off switch.
JKJ
John, you have a heart of gold and your thought about things is always appreciated. You do kiss the ear heavily but one never is left without a thorough explanation. You’ve taught me a lot.
My compressor is only 3hp so I’m not concerned about a wall switch. I’m not a heavy user of it so most of its life will be in a dormant phase.
Tim, picture please.
My compressor is only 3hp so I’m not concerned about a wall switch. I’m not a heavy user of it so most of its life will be in a dormant phase.
Tim, picture please.