• The forum upgrades have been completed. These were moderate security fixes from our software vendor and it looks like everything is working well. If you see any problems please post in the Forum Technical Support forum or email us at forum_moderator (at) aawforum.org. Thank you
  • April 2026 Turning Challenge: Salad Bowl! (click here for details)
  • Congratulations to David Bartell, People's Choice in the March 2026 Turning Challenge (click here for details)
  • Congratulations to Gianni Di Gregorio for "Simple Piercing" being selected as Turning of the Week for April 20, 2026 (click here for details)
  • Welcome new registering member. Your username must be your real First and Last name (for example: John Doe). "Screen names" and "handles" are not allowed and your registration will be deleted if you don't use your real name. Also, do not use all caps nor all lower case.

Laser inlay on lidded boxes

Joined
Apr 14, 2025
Messages
24
Likes
6
Location
Lethbridge, Alberta
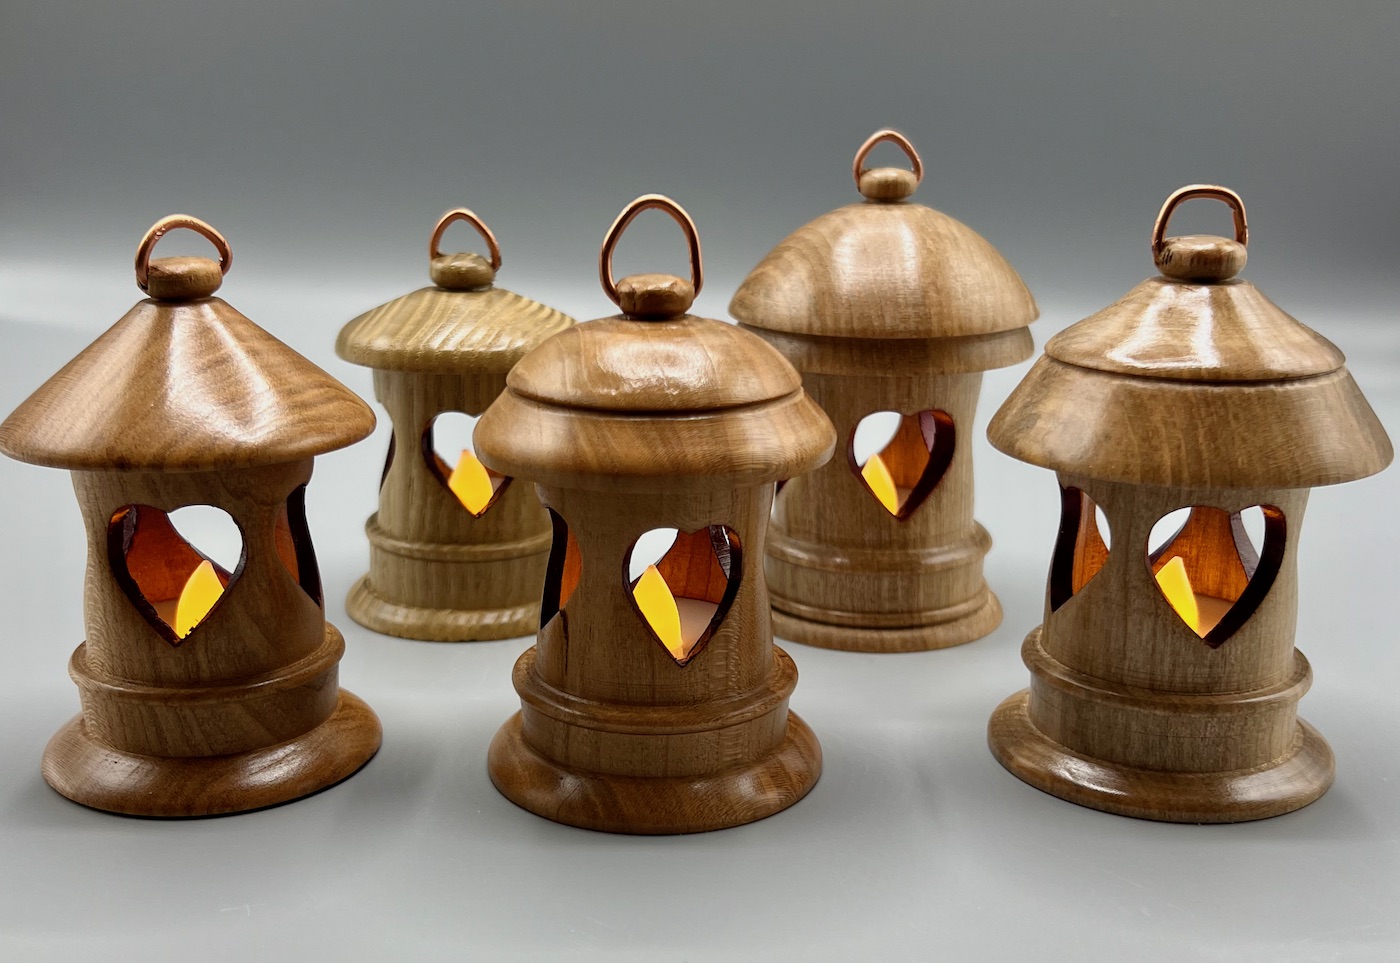
I was hoping that someone here has been down this road and can advise. I am a hobbyist with CNC and some lathe work. A bit obsessed with lidded boxes and their beauty. I have finally ordered about XTool S1 40 watt unit with the rotary tool accessory and am dying to get going with veneer inlays, first on flat surfaces to get it down, then on the sides of lidded boxes and the small hanging lanterns that many of you may have done on the lathe.

Also, I think that once I have done the Forstner bit coring on the lanterns, I might be able to cut out slots or other windows using the laser, rather than initially using a drill press prior to hollowing or using indexing while on the lathe to hand drill, etc.

So, has anyone here had experience with this?

Thanks
 
I recently got the X Tool F1 Pro and all the toys that go with it but have not had much time to use it (did build a rolling platform for it and the smoke eater plus drawers and shelves for the toys and burnables). I have a 60 watt laser for the Lathe Engraver and I bought a laser and power supply for my Rose Engine. I'm interested in seeing what you are doing.
 
I don’t have much experience. I did some lantern ornaments for my CPR group. The first one I hollowed out the lantern and then used the laser cut the heart shapes.out. Big mistake as it charred all of the inside. So without hollowing I cut the shapes and then hollowed so the shapes would fall out. I used acrylic paint to cover the charred edges.


the previous symposium there was a vendor selling inlay materials (like laminated sea shells) and they had a laser demonstration. They cut out the shape of the inlay with the laser and then used the laser to burn the depth and size into the wood. I think the guy said he increased the size by .1 mm for the insert to fit. I did buy some inlay, but never tried it.
 
I made a couple of pendent light shades using a laser to cut flower patterns in them. The person that wanted them supplied me with a scroll saw pattern file they bought. Its pretty easy to import a pattern file for scroll sawing into lightburn. Other then scaling it to the correct size I didn't have to modify it.
 
Great comments! Bill, the F series have me intrigued because of the ability to actually carve into metal and rock, but retirement means at least some common sense in budgeting, otherwise one can end up living in a kid's basement....so for now the S1. The airflow pump in the bundle should help, but I didn't spring for the purifier. I just have to cut a hole in the workshop wall somewhere.

William, I have made a number of those hanging lanterns with the votives that are cheap but can be programmed to turn on at a specific hour, turn off after 6 hours, then back on again next day. I like your finishing and the crafting of the hanger and the heart shapes. Your comment about creating the inlay bed BEFORE hollowing with the Forstner will save me grief! Happy to see you hanging in there after valvular surgery. CPR sounds unnerving, but it could mean Canadian Pacific Railway( Retired GI guy here, a plumber of sorts, and a fiddler with gadgets).

Chris, should I get Lightburn in addition to the XTools software? I'm also hoping to convert photo scans into shallow engraving or layered pieces in wood, and am trying to put together a work flow. So, convert to B&W, then some sort of height map, on to SVG and into LB. With Artcam Insignia, I could do a lot, but "lifetime" licenses were erased when the company changed hands and embedded a timed end-of-life on it. I think that the company that now has Artcam (Carveco) charges far, far too much for hobbyists working in 3D.

One other old guy complaint is who the heck has time to do these things? Being retired doesn't feel like it!
 
@Dave Koegler You can keep using light burn as long as you want. The expire is after the first year and if you do not renew you won’t get the updates, but the software will still work. I have a Xtool D1 pro and my computer is at end of upgrades so I won’t renew, but can still use the software as long as I want.. I really haven’t seen much in the upgrades that really affect anything. Yes, for me G code went from $60 (what I paid) to $99. Not sure what light burn software you need, but I would pay $99 and have to think hard about $199. Lightburn will give you better editing capabilities than XCS. Iwould start with XCS to just learn the different thing the laser can do. Most migrate to light burn, but there are those happy with XCS.
 
Thanks, Chris. Your spalted and burled and epoxied masterpieces are quite majestic. I don't want to die turning burls, but I can't find any in this region anyway. Out in the countryside here, my neighbour has some nice standing dead Russian olive and reasonably thick caragana. A friend near Bigfork Montana has given me some old birch logs about 4-5 cm calibre which look like spalted, so we'll see what can be done. The cost of hardwood here in Southern Alberta is painful, so I have been on the lookout.

Tonight, I have been busy assembling the S1 The fit and finish and solidity of the bundled components are better than I anticipated.

A lot will depend on specific needs. I would rather take an iPad into the shop than a laptop, and the latest iteration of XTool Studio combined with Lightroom should cover most needs, I would hope. The goal here is to make heirlooms for the kids, so the type of finished pieces need to be less likely to end up in a garage sale when I croak! I like FLW and Greene and Greene influences.

The hanging Christmas lanterns went over well, as did the 3D CNC family crest and some Harry Potter wands. Lidded boxes are next but now with the S1, interesting doors are opening. I have put together a couple of wood automatons and have just received the mechanical horse kit from Abong. The plan is to study the mechanics and structure and begin making some original items, but with boxes looking like real boxes, with finger and dovetail joints, avoiding "burnt ends" if I can.

I finally bought a nice branding iron, but with the laser, how simply elegant can we get? Sky seems to be the limit.

Is it possible to become addicted to all of this? :cool:
 
Last edited:
If your a tech guy yes. I didn't get into the laser as much as i thought i would. I use it once in a while but not to often. Now my 3D printer almost runs nonstop. So many things to print that can help in turning. Current thing printing is parts for a kinetic table that draws stuff in fine sand.
 
I 3D printed every piece I could find for the X Tool. They all fit in the slot at the bottom. I use Lightburn on my 40 watt tube laser but see no reason to use it on the X Tool as the program they have for it is pretty extensive. And Lightburn only allows you to put it on 2 computers. Every toy has its own computer down there and 3 lasers up and running with 2 more in the near future. There are 7 computers in my shop right now (will need 2 more in the near future). Glad I bought the Laser Pecker 1 as it works with a phone (only used for signing turnings).
 
You'll need to learn about "kerf" settings with whatever software you're using...a "kerf" is the actual width of material removed by the laser beam as it cuts. It’s the gap left behind after the beam cuts or vaporizes material. The inlay part needs to be re-sized to fill that gap and get a nice tight fit. You can find several how-to videos on this Kerf S/W setting using the Xtool proprietary app or Lightburn, on YouTube.
 

Attachments

  • 2026-061a_Bhilwood.jpg
    2026-061a_Bhilwood.jpg
    152.4 KB · Views: 5
Last edited:
No experience inlaying with veneers.

With a CNC router you can inlay with solid woods. Vcarve inlays, Google on it. With rounded surfaces you inlay as if it was a flat surface then turn the inlay to match the rounded surface.

Vcarve inlays don't have the issues that thin veneers have on compound curved surfaces. Plus no issues with kerf. On a thin walled bowl the inlay shows on both the outside and inside.

The big plus for the router is the bowl can be "turned" on the router, no lathe needed. Add a laser attachment and you've got everything in one machine.
 
Ed, I was watching some S1 clips on inlays and the kerf settings were noted. Sp thanks for the comment. I'll take a look.

Doug, my perpetual Artcam Insignia license has expired, so the closest relative is Vectric Aspire, which, for a hobbyist, has quite a steep price. I had not as yet got into veneers with my CNC. And on my lathe I have stuck with smaller items because I'm a bit twitchy about working with larger masses like bowls. Having said that, I am really enjoying carbide tipped tools.

But if I can find decently-priced software for my CNC to get it going again, that could be terrific. I don't think I can put a laser attachment on my General CNC, but perhaps I can use my S1 riser and try inlays on a turned bowl, depending on height limitations.

Bill, with the prices of 3D printers now, maybe I should add that in the shop. I was planning on using the S1 to carve a pull handle for its laser module from a 3D printer file converted to svg, but there is so much else to create that would actually be quite useful.

Still quite an amateur at this, but I took our family crest and created a 3D model and carved it for the gang. Some crude Harry Potter wands for the grandkids, one from native caragana. (DIdn't want them braking the tips or poking each others' eyes out). Some hanging lanterns, first try. Lidded boxes are still evolving, but they are quite nice to form and finish. I did make a prairie bed out of a neighbour's old barn that he tore down.
Everyone else here is so advanced and polished, so I am very grateful for the advice.
 

Attachments

  • IMG_8171.jpeg
    IMG_8171.jpeg
    571.3 KB · Views: 10
  • IMG_8176.jpeg
    IMG_8176.jpeg
    717.4 KB · Views: 10
  • IMG_8031.jpeg
    IMG_8031.jpeg
    1,010.9 KB · Views: 10
  • IMG_6390.jpeg
    IMG_6390.jpeg
    432.6 KB · Views: 10
A couple of top planks came from ancient grain elevators here in Southern Alberta. The wheat kernels did the sandblasting type of action on the wood as they slid down, creating beautiful textures. Problem is, that bed that we took to our little cabin in Montana is so heavy that it is almost impossible to move. So I learned something there too.

I was watching a documentary that pointed out that this seems to be the only planet in this entire universe that has wood! Gold, diamonds, silver, yes. But not wood. So we should count ourselves as very fortunate to have something that is so much fun to work with...


IMG_2108.JPG
 
But if I can find decently-priced software for my CNC to get it going again, that could be terrific. I don't think I can put a laser attachment on my General CNC, but perhaps I can use my S1 riser and try inlays on a turned bowl, depending on height limitations.
There are lots of free/cheap CAM options out there that work quite well. kiri:moto is free and web-based. EstlCAM is cheap and quite easy to use. GrblGru is a bit more complex to get going, but has a lot of features. As long as your CNC is Grbl-based or Grbl-compatible the output any of those options would work.
 
if I can find decently-priced software for my CNC to get it going again, that could be terrific.
Vectric Desktop is one piece of software I use. 350 bucks. Quite a bargain in my opinion. I have much more expensive software used in my company's work for years, but Desktop is usually my goto first because it's so much easier to use and very well supported.

Until recently I used CNC metal working machines for all my wood machining. Then I bought a used Millright CNC wood router with 4h axis. My low power diode laser can be used by switching on/off using the wood router's mist coolant relay. Free Gsender software controls the router's GRBL interface to my computer.
 
Thanks for the helpful input. My old General CNC, as I understand it, is not GRBL-based. So Vectric would work. And EasyCreate seems to be a great addition to use AI to generate 3D files and code. It's odd that my former flexibility is waning, because I have both Mac and Windows, but I have been steering away from Windows as a preference, when most if the computerized wood crafting software is still Windows-based. Paul, your website shows some very interesting and useful lathe engraving options.

All food for thought.
 
Back
Top