Well I set it up here on the desk and created my name and a wood name. Put in 9mm instead of 90mm and it printed in about 3 seconds or less, problem is 9mm is very very small. Yes pulled out the magnifying glass and it did a good job. Next printed the Santa from their pics, took about 12 minutes and yes on my Ipad. Only problem is that I had it an inch lower than it should be. I needed to hit the button to make it self focus which I did not do. But it printed fairly well for not being 8" away (7" actually). It was done at 50% power). So for sure it works with an I pad. I'll have to get a cable like I read and see if it will work with that cable and the desktop. While it is no speed demon it will work for what I want it to. Now to delve into the software and see what I can make it do.

-
March 2026 Turning Challenge: Olla! (click here for details) -
Congratulations to David Wyke, People's Choice in the February 2026 Turning Challenge (click here for details) -
Congratulations to Dave Belll for "Torus Teapot" being selected as Turning of the Week for March 9, 2026 (click here for details) -
Welcome new registering member. Your username must be your real First and Last name (for example: John Doe). "Screen names" and "handles" are not allowed and your registration will be deleted if you don't use your real name. Also, do not use all caps nor all lower case.
You are using an out of date browser. It may not display this or other websites correctly.
You should upgrade or use an alternative browser.
You should upgrade or use an alternative browser.
LP1 Pro 1st test
- Thread starter Bill Blasic
- Start date
Mark Hepburn
Artist & Chef
It looks pretty good Bill. I’ve been thinking about getting one and now I might pull the trigger.
Well the software on the computer is miles ahead of the software on the Ipad. I believe the software on the Ipad is the same as what you get on your phone. Will have to make on computer and then transfer to Ipad. Will take some learning to figure out the program on the computer. There is 3 times as much to print on the computer version than what's available on phone or Ipad.
Please continue to share. My bride gave me one yesterday and the box is staring at me as I read about using it.
I will try to keep my travails reported here. The big program isn't very responsive to learning yet.
I didn't see a way to drive it with a computer, so I'm just using my phone. I have a couple of extra (retired) PC laptops around and that would be more convenient. It's a clunky program on the phone, but it works.

I will say this I have ordered a USB C cable and it's supposed to be here today. The thing I read said the LP1 would work on the computer with a USB C. The C cable transfer rate is much much faster than a regular USB cable so I wonder. Also when I loaded the big program into the computer it gave me a choice to use LP1. So with any luck we will know in a day.
FWIW, I don't use the desktop app and only use the phone app to send an image to the laser. I create all my black and white images in Paint.NET. Much easier, but I have been using Paint.NET for years.
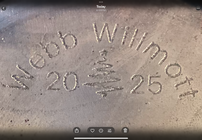
Did my first test run. The complete run was done with 3 separate sub runs. One for name, one for date, and one for image.
Make up a bunch of images so you don't have to do three passes. Mine are simple black and white bitmaps. If you put the year on, you will have to redo the images once a year. That will take about 20 minutes.


Agreed… mine is a year old, but i was told you had to run only the proprietary software using the app from the phone. Not true for the more expensive models, but the LP1pro I’ve only been able to run from the phone app. While limited for sure, it has served me well.I didn't see a way to drive it with a computer, so I'm just using my phone. I have a couple of extra (retired) PC laptops around and that would be more convenient. It's a clunky program on the phone, but it works.
Kent, thank you for answering something I was wondering.
For smaller images like a logo I find that a nice feature on the the IPad using the LP Designer App is that you can drag the image on the screen in preview mode and it will made fine adjustments to the red image box on your target so that you can get the image position exactly where you want it.
I don’t use the phone or the computer so I can’t speak to those.
Bob
I don’t use the phone or the computer so I can’t speak to those.
Bob
Mark Hepburn
Artist & Chef
That’s a great looking logo.Make up a bunch of images so you don't have to do three passes. Mine are simple black and white bitmaps. If you put the year on, you will have to redo the images once a year. That will take about 20 minutes.
View attachment 82522View attachment 82523
I had my brother do it. He's the artist in the family.That’s a great looking logo.
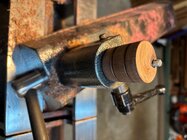
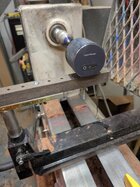
I found the tripod almost worthless. The hard feet slid, the mount was loose, and the laser moved if you breathed on it. And the ability to aim and repeat wasn’t as easy I would have hoped for. It should not take several minutes to get it aimed.
The fix was easy, turn a post that fits in the banjo and epoxy in a cut off bolt for mounting the laser. Since the center of the tool rest hole won’t quite line up with center, I offset the bolt. Hopefully I got the height right for center of a bowl. If not, a little tweaking will be in order. I can also raise it if I’m not burning something in a circle or need the etching dead center.
You know those little pieces that you hope you’ll find a use for. The post was from a a tool handle that had a skew catch.
The epoxy is curing right now and I’ll get a chance to test for alignment tomorrow.
Attachments
I found the tripod almost worthless. The hard feet slid, the mount was loose, and the laser moved if you breathed on it. And the ability to aim and repeat wasn’t as easy I would have hoped for. It should not take several minutes to get it aimed.
The fix was easy, turn a post that fits in the banjo and epoxy in a cut off bolt for mounting the laser. Since the center of the tool rest hole won’t quite line up with center, I offset the bolt. Hopefully I got the height right for center of a bowl. If not, a little tweaking will be in order. I can also raise it if I’m not burning something in a circle or need the etching dead center.
You know those little pieces that you hope you’ll find a use for. The post was from a a tool handle that had a skew catch.
The epoxy is curing right now and I’ll get a chance to test for alignment tomorrow.
Attachments
Sam, did you find center of the mirror was center of the bowl?

I just change the year, either with Paint or photo editing software.
I love your logo!!
I hope to dip my toes into the pond soon and see what the water's like. Supposed to have one delivered in a day or two.
JKJ
After I got the software to work it wasn't an issue. I just move the banjo where it needs to be by the centering dot the laser will project.Sam, did you find center of the mirror was center of the bowl?
I knew and know the power of this laser is far from the greatest but the versatility of this laser is what sold me. There are lots of fixes (as shown above) that can be done so the laser can be used in a lot of different circumstances.
Keep in mind, it gets its power from the USB-c connection. I got things mixed up and had it connected to a generic phone charger for a bit once. It would connect, I'd go thru the uploading and centering process to burn, but when I tried to start, it would quit almost instantly. It requires a lot of current to run the laser at burn level, so keep your AC adapter and cord with it. (not sure a computer would output enough)
Good point. I don't think I tried it with PC USB power, but I'll bet you are right.Keep in mind, it gets its power from the USB-c connection. I got things mixed up and had it connected to a generic phone charger for a bit once. It would connect, I'd go thru the uploading and centering process to burn, but when I tried to start, it would quit almost instantly. It requires a lot of current to run the laser at burn level, so keep your AC adapter and cord with it. (not sure a computer would output enough)
In preview, I see the box but can’t find how to get a center dot.After I got the software to work it wasn't an issue. I just move the banjo where it needs to be by the centering dot the laser will project.
I did my first burn today. I turned the power down and put some painters tape over the area until I was satisfied with the location. A center dot would be helpful.
on my LP2 there is a crosshairs style button on the actual unit.In preview, I see the box but can’t find how to get a center dot.
I did my first burn today. I turned the power down and put some painters tape over the area until I was satisfied with the location. A center dot would be helpful.
Bob
- Joined
- Feb 28, 2021
- Messages
- 1,807
- Likes
- 1,621
- Location
- Roulette, PA
- Website
- www.reallyruralwoodworks.com
yeah I think it's a very tiny very faint center dot that is hard to see - I never thought to try before but maybe try holding a plain white piece of paper over the area to see if the center dot actually is being projected - But I always just relied on the box myself because most of my badges also fit very nicely within a box formed so the points touch the ring in a 2" -ish recessed foot, or otherwise a ring made with point tool that I usually make to decorate the bottoms... so that pretty much gets it centered for me..In preview, I see the box but can’t find how to get a center dot.
I did my first burn today. I turned the power down and put some painters tape over the area until I was satisfied with the location. A center dot would be helpful.
On the LP1 using their software [on an iphone]. When I hit the preview button it shows the box shape. On the lower right of the screen there is a button that says "show center". I will try to get a screen shot when I head down to the shop. One thing that sucks with this software is it needs to hook to the laser or it won't let you do anything.
It's hit and miss getting the centering dot to show. Just have to keep backing out and go forward till stuff starts working.
Well I went through hell getting that USB C cable. It was supposed to be here Tuesday even paid extra for same day delivery. So Tuesday first call to Amazon, Wednesday second and third calls with a little harsh talk. Delivered late last night. Tried it first thing this morning. The cable is defective, I even bought the most expensive one, absolutely dead. Tried it on four devices, dead, dead, dead, dead. Now just because I read all above before typing this after the cable disaster I tried hooking the power to the computer. Plugged the USB into a USB port on my desk top and the LP started right up, opened the Ipad got a picture and it started to print I let it print for 10 seconds and shut it off. So it works plugged into the computer but this is a USB cord. What is bothering me at the moment is that I tried it with two different power banks and I have not got either to work. The small power bank should power it enough for at least a few burns and the big power bank should be capable of powering a 24 hour burn. Will look into this later as next step is to get a hold of Silkland about this USB C cable.
Bill, I’m sure you probably have old USB to lightning cords laying around. For just a few bucks, you can get a Lightning to USC adapter.
What is bothering me at the moment is that I tried it with two different power banks and I have not got either to work. The small power bank should power it enough for at least a few burns and the big power bank should be capable of powering a 24 hour burn. Will look into this later as next step is to get a hold of Silkland about this USB C cable.
Just curious, is the USB-C cable from Silkland rated for power delivery (PD)? I understand the USB-C PD rated cables allow the devices to negotiate and provide the best power possible.
I usually buy Anker brand from Amazon (as advised by tech son). I see they offer USB-C to USB-C PD cables for 60, 100, and 240 watts.
Also, a good power bank might have PD. Just a few days ago I bought an Anker 20,000 mAh portable power bank that claims to deliver 65 watts to a single device. It even has a short built-in USB-C cable. I haven't tested the power but it sure charges my phone quickly. But for some reason it's not free...
") However, it is FAA approved for carry-on use!
However, it is FAA approved for carry-on use!But If you need to connect from USB-A to USB-C I think the power options are more limited (no PD) but should still work. I think some USB-A ports on computers will only supply 5 watts. (I have zero idea about the power requirements for the LP1 or if it is rated for PD.)
Note that I also know almost NOTHING about this subject except for what Tech Son #1 told me. He's at work now doing techy things so I can't call and ask for clarification but I could send a message if you want. Around here, cables like that usually arrive the same day from Amazon.
JKJ
Last edited:
Well so far the LP1 will turn on and burn from my desktop, laptop and my big Power Bank using the Ipad. It says 5V 2A output is all that is needed. My Power Bank is 50,000 mAh. OK it won't work with Blue Tooth from computer or laptop but the C cable from the desktop or laptop should power it. By the way it will power up from USB 2.0 and 3.0 ports. From what I have found USB C is way more powerful than USB 2.0 AND 3.0.
I'm running mine with an android phone. Mine will allow me to do the whole setup, but when it's time to burn, it attempts to connect. Sometimes it works, sometimes it "can't find" my laser. I've learned to open the app and click at the very top to connect first.
As far as the center point goes, after I've set the design and size, I have the choice of a preview button or next (or burn?) button. No clue why you'd want to just start without aiming... When I hit preview, I get the flashing square showing size and location of the burn area. There's a slider for intensity that makes it lighter or darker. Sometimes I have to turn it up to see, and that's for a large flashing box. The center point is tiny, so you almost always have to turn up the brightness to be able to see it. It can be handy for centering stuff. For some unknown reason, mine hasn't been just showing the center point, but it becomes the corner of a shifted flashing box.
As far as the center point goes, after I've set the design and size, I have the choice of a preview button or next (or burn?) button. No clue why you'd want to just start without aiming... When I hit preview, I get the flashing square showing size and location of the burn area. There's a slider for intensity that makes it lighter or darker. Sometimes I have to turn it up to see, and that's for a large flashing box. The center point is tiny, so you almost always have to turn up the brightness to be able to see it. It can be handy for centering stuff. For some unknown reason, mine hasn't been just showing the center point, but it becomes the corner of a shifted flashing box.
I think if I was marking bowls or whatever with a laser it'd be a fairly crude marking as if done free hand. Maker name, type of wood and date should be enough.
A carefully designed, complicated graphic design might contradict the hand made, unique piece impression you want to convey.
On the other hand, if you're a production turner, go all out on the design. Nothing wrong with being a production turner. I read a quote from Bob Stocksdale saying he made enough of one of his signature designs to fill several football stadiums.
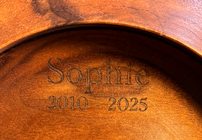
I did the engraving before finishing. One thing I noticed was before finishing, the engraving was flat with the burned wood and smooth. After finishing, the burned area disappeared and engraving was left. I like the engraving but would have preferred the darker burned area remained. This was on Walnut and one pass.
On a shadowbox frame I made for the collar of my best friend’s dog that is no longer with us, the wood was finished and didn’t lose the burnt color but I would have like more black.
How should get/keep more color in the engraving? Or is part related to wood species?
On a shadowbox frame I made for the collar of my best friend’s dog that is no longer with us, the wood was finished and didn’t lose the burnt color but I would have like more black.
How should get/keep more color in the engraving? Or is part related to wood species?
Attachments
I've had my LP1 for three years and used it a lot. I posted this on an earlier thread but the LP1 only works with the phone app, on a phone or tablet, ios or android. The windows app that Laserpecker has does not support the LP.
How should get/keep more color in the engraving? Or is part related to wood species?
Here's a laser design I did with my low power diode laser on a 1" diameter rotating part (nothing to do with the LP lasers). Actual height is about 1-1/2".
The coloring was done with acrylic pens to brighten the image. Easy to do even with fine detail since inks generally will not bleed across the laser burn lines.

Last edited:
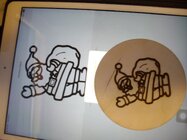
As promised pics from the iphone app.

