• We just finished moving the forums to a new hosting server. It looks like everything is functioning correctly but if you find a problem please report it in the Forum Technical Support Forum (click here) or email us at forum_moderator AT aawforum.org. Thanks!
  • Beware of Counterfeit Woodturning Tools (click here for details)
  • Johnathan Silwones is starting a new AAW chapter, Southern Alleghenies Woodturners, in Johnstown, PA. (click here for details)
  • Congratulations to Dave Roberts for "2 Hats" being selected as Turning of the Week for April 22, 2024 (click here for details)
  • Welcome new registering member. Your username must be your real First and Last name (for example: John Doe). "Screen names" and "handles" are not allowed and your registration will be deleted if you don't use your real name. Also, do not use all caps nor all lower case.

Show us your tool rack/cart

odie

TOTW Team
Joined
Dec 22, 2006
Messages
7,116
Likes
9,841
Location
Panning for Montana gold, with Betsy, the mule!
Might change it if I start doing more and getting more equipment. Need to update my pic as I have already added more stuff and modified it some.

Get used to it, my friend! :)

That board will eventually look like Swiss cheese....things added.....things subtracted....mistakes made.....change your mind on how to do it.....retrofitted......etc, etc., etc.....just give it some time!

And.....Who cares what it looks like?

The whole point is to make your shop work for YOU.....not the other way around! .....(and definitely not to impress anyone else....I have seen some shops that look so pristine and pre-planned, that it makes you consider the evolution behind it.....or lack thereof.) :)

-----odie-----
 
Last edited:
Joined
Feb 10, 2023
Messages
21
Likes
60
Location
Yardley, PA
Being brand new to turning, I haven't much to find room for. Yet! :D

Actually, the basement shop's in very early process. That cabinet I just hung today, and I'm thinking on the best way to hand the pegboard beside/below it. So thanks to you all for this great thread--it'll play a big role in my coming, initial build-out!

IMG_4437.JPGIMG_4438.JPG
 
Joined
Nov 14, 2009
Messages
33
Likes
8
Built the rolling cart to double as a tool holder and sharpening station. Then found a need for a wall mount rack. Along the way, I rigged up a tool holder under the lathe.84F7382E-D43C-4721-A4A7-8A48EA9F9A15.jpeg
 

Attachments

  • 36556113-EEF8-4718-A0D5-5C34A56D0862.jpeg
    36556113-EEF8-4718-A0D5-5C34A56D0862.jpeg
    539.8 KB · Views: 91
  • 63C14CA7-1A09-4A29-98A2-F6C6E53A9C93.jpeg
    63C14CA7-1A09-4A29-98A2-F6C6E53A9C93.jpeg
    565.7 KB · Views: 91
Joined
Jan 17, 2020
Messages
119
Likes
97
Location
Steilacoom, WA
1676644661737.png
I don’t know how my phone just copied this, but that’s wild.

I had a bunch of 80/20 left over from a failed van kitchen build. Decided to make a turning station. The drawers hold 200 pounds each. Left side is all gouges, right is sharpening, chucks/other accessories, finishing/sanding/buffing, then hollowing/coring. I’m surprised it all fits.
 
Joined
Jan 8, 2021
Messages
1
Likes
1
Location
Dickerson, MD
John, your design looks like a somewhat different way to keep tools from tipping out, but should still allow very easy access. Plus space for putting other small tools. I think I’m going to try something along those lines. This has been a great thread.
 
Joined
Jan 15, 2023
Messages
28
Likes
26
Location
San Angelo, TX
John, your design looks like a somewhat different way to keep tools from tipping out, but should still allow very easy access. Plus space for putting other small tools. I think I’m going to try something along those lines. This has been a great thread.
I am not sure if you can tell but the bottom board is slanted forward to create the tension against the rest of the rack. Also this allows any shavings to simply fall to the floor. Can't wait to see your version.
 
Joined
May 22, 2013
Messages
16
Likes
7
Location
San Angelo, TX
Not as many tools as you guys but trying to get started. Built this tool chest to hold what I have now....Drooling over the pics on here.
 

Attachments

  • IMG_0717 (002).JPG
    IMG_0717 (002).JPG
    428.8 KB · Views: 49
  • IMG_0716 (002).JPG
    IMG_0716 (002).JPG
    451.1 KB · Views: 48
Joined
May 22, 2013
Messages
16
Likes
7
Location
San Angelo, TX
Yes, they are hockey pucks. I don’t like the metal legs on concrete so the pucks work nicely. They can be trimmed flush to the metal legs but I like the larger footprint for more stability (arguable but that’s my rationale for not trimming). There is no wiggle... the pucks are quite hard. It’s much easier to pick up and move or lightly drag a machine and not worry about scraping metal on concrete.View attachment 45666
Man I like this idea, thanks.
 
Joined
Feb 7, 2023
Messages
295
Likes
1,708
Location
Gardner, MA
Added some wheels to make it move easier. Put a piece of left over plywood underneath so now I have a place to hang the tailstock. More holes drilled and tools added. They fill up fast don't they?
tool cart.JPG
 
Joined
Aug 5, 2022
Messages
216
Likes
121
Location
Appleton, WI
Get used to it, my friend! :)

That board will eventually look like Swiss cheese....things added.....things subtracted....mistakes made.....change your mind on how to do it.....retrofitted......etc, etc., etc.....just give it some time!

And.....Who cares what it looks like?

The whole point is to make your shop work for YOU.....not the other way around! .....(and definitely not to impress anyone else....I have seen some shops that look so pristine and pre-planned, that it makes you consider the evolution behind it.....or lack thereof.) :)

-----odie-----

odie, I agree with you that our shops should fit our needs without considering how others react to setup. However, I know two turners who leave their shops so clean at the end of every session that my little granddaughter would not respond "what a mess ".
 
Joined
Feb 6, 2010
Messages
2,980
Likes
1,955
Location
Brandon, MS
I need to make some more pics of the lathe layout since I have made some changes. I thing the shging op is dynamic because we are continually changing the things we turn as well as the techniques we use. For me convenience drive my lay out and storage methods. I do notice some problems finding things when I do a major realignment but that is the reason I started labeling drawers a few years ago. Then if I move those items I can also move the label.
 
Joined
Nov 1, 2013
Messages
325
Likes
733
Location
Gulfport, MS
Website
www.woodtreasuresbybreck.com
Howdy Breck...... :)

My tool edges are all pointing up, but looks like you've devised a way to put them facing down, and still visible....good job.

-----odie-----
Odie I do like the unhandled gouges with the point down, but since most of my handled tools are point up I still need to be careful and not just reach up to grab a tool without making sure I don't slice a finger on a razor shape gouge edge. I won't even mention how I know to not do that.
 
Joined
May 30, 2022
Messages
242
Likes
249
Location
Belchertown, MA
I am a simple guy with simple things. I like that it sits on the wall and keeps things very orView attachment 50208


Here is the one I built this weekend after seeing John’s post. I still need to add the magnet bar on the front, and drill holes for
other bits and pieces. Used a 2x4.
 

Attachments

  • image.jpg
    image.jpg
    440.7 KB · Views: 90
Joined
May 30, 2022
Messages
242
Likes
249
Location
Belchertown, MA
So far I like it. Tools go in and out easy, and it’s in easy reach, so I’m not tempted to rest tools on the ways. I like that it does not require a good aim to get the tool in the right spot. Could almost drop it in blindfolded.

Added the magnet bar. Great for holding my chuck keys in easy reach.

If I was doing it again I would space the tools a little closer together.
 
Joined
Aug 29, 2019
Messages
39
Likes
20
Location
Vienna, ME
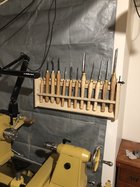
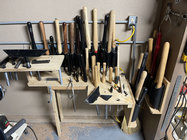
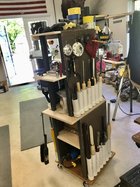
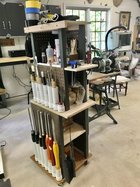
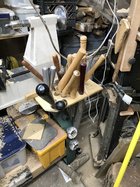
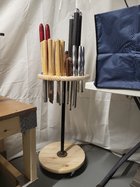
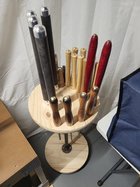
I dithered about making a custom tool rack for a long time, but it was a constantly-moving target. I'd get new tools, or change my patterns of work, and whatever design I had settled on was no longer appropriate. Also, wall space is very scarce in my shop (I have loads of shelves and lumber racks all the way around), so a freestanding rack made more sense. Rather than put a lot of effort into making something that would be perfect just until the next tool or work-pattern change came along, I quickly whomped together a couple of milk crates, a scrap of melamine and some old casters with zip ties and screws, and it has turned out to be a superb tool station. The tool tips slip down through the grating on the top which keeps the sharp stuff away from my fingers, and the smallest triangular holes in the grating hold tiny tools like scissors, tweezers and glue pipettes. I can group my tools by function, with the most-used tools at the front and left. Currently it's bowl gouges along the left side, small scrapers at the front, spindle tools along the right edge, hollowing tools and the walloping huge scrapers at the back, and miscellaneous in the middle. I've hung a few items on the outside as well (mallets and calipers and the like) since it's easy to attach wire loops to the crate grating. The grating also makes it easy for chips and dust to either fall through or get blown out.
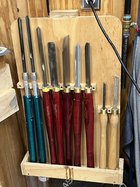
I no longer keep chucks in the shelf below the tools, since that space is full of pointy tool ends and I need to get at my chucks all the time. That space is now occupied by leather and rubber pads for different kinds of chucking, plus odds and ends I don't need to get into very often, and the chucks are on the lumber rack shelf immediately behind me as I work at the lathe. The bottom shelf is for the drill I use for power sanding, some templates, my Beall Buffer kit box and a few other odds and ends.
This whole assembly can roll, so if I'm turning down at the far end of the bed I can just trundle the whole mess down there. Normally it lives tucked into a little space between my headstock and the wall.
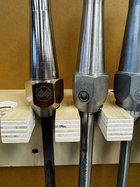
I don't like storing my regular turning tools on magnetized surfaces since they get magnetized themselves and will stick unpleasantly to my tool rest.
My system was essentially free (My favorite! It helps that I had some old casters in the shop.), took about 20 minutes to put together, and has proved remarkably versatile and flexible.

View attachment 50112
Now that's great thinking! And it sounds like it fits YOU to a T - the most important criteria.
 
Joined
Dec 29, 2022
Messages
835
Likes
814
Location
West Central, IL
My cart/cabinet that my vacuum pump sits on grew into something bigger the other day.

Now it also holds my chucks, jaws and miscellaneous glitterati, dyes and embellishments. Bottom drawer is to grow into space. Plus I don't like bending over.
 

Attachments

  • IMG_20230907_173420557.jpg
    IMG_20230907_173420557.jpg
    233 KB · Views: 28
  • IMG_20230907_173431839.jpg
    IMG_20230907_173431839.jpg
    435.1 KB · Views: 29
  • IMG_20230907_173445623.jpg
    IMG_20230907_173445623.jpg
    391.8 KB · Views: 29

odie

TOTW Team
Joined
Dec 22, 2006
Messages
7,116
Likes
9,841
Location
Panning for Montana gold, with Betsy, the mule!
A progression over the last few years. I can get to everything quickly.

Well, John.....your tool rack looks about as incongruent as mine does! ....but, you and I know this is an evolutionary process, and keeping up with your needs is more important than what it looks like! :)

Yes, I can fully understand the need to have the tools you use the most within reaching distance.....very important to keeping the momentum going.....but, I know you know that, too! :)

-o-
 
Joined
Jan 23, 2020
Messages
689
Likes
956
Location
Shingletown CA
Well, John.....your tool rack looks about as incongruent as mine does! ....but, you and I know this is an evolutionary process, and keeping up with your needs is more important than what it looks like! :)

Yes, I can fully understand the need to have the tools you use the most within reaching distance.....very important to keeping the momentum going.....but, I know you know that, too! :)

-o-
Before I forget what I was going to do next!
 
Joined
Oct 1, 2008
Messages
706
Likes
1,128
Location
Sydney Australia
With this latest move down the coast I have decided to make several changes to the way I set out the shop, plus do a few of those long-standing shops mods we all often carry in the back of the mind.
The main one is to design and build a mobile tool rack that will carry all the turning tools, chucks and inertia sanders, along whatever else that seems important . It will hang off a vertical oil drum stand, similar to but not exactly like the image
 

Attachments

  • 26008_20150323-081605.jpg
    26008_20150323-081605.jpg
    60.5 KB · Views: 12
Joined
May 26, 2018
Messages
55
Likes
48
Location
Houston, TX
I'm finding myself sticking tools hear and there and need to make a proper tool rack or cart so they are organized and accessible. I'm looking for ideas and would love to see how you have solved this. What do you like or don't like about what you have? Any plans to change or expand? Does it include chucks and other accessories?
Thanks!
Doug
Mine is bolted onto the top of right end of my lathe (I replaced the factory bolts with ones that are about an inch longer, to be able to get through the 3/4 “ plywood). A simple piece of plywood, with a small piece screwed vertically under it, up against the lathe leg (to keep the main piece horizontal), in which I’ve drilled holes (and a couple slots) of whatever diameter (or length, for the slots) tailored to the tool I want to be held there. All of them are my usual, go-to tools, that I use most often.
 

Attachments

  • IMG_5282.jpeg
    IMG_5282.jpeg
    477.3 KB · Views: 53
  • IMG_5281.jpeg
    IMG_5281.jpeg
    581.7 KB · Views: 54
Joined
May 30, 2022
Messages
242
Likes
249
Location
Belchertown, MA
I took a class at Snow Farm a couple weeks ago. This is what they have. It has casters to roll it around. I liked using it much better than my current setup on the wall behind the lathe. I’ll probably build one of these for myself. I’ll use the wall rack for less used tools.
 

Attachments

  • IMG_0187.jpeg
    IMG_0187.jpeg
    336.2 KB · Views: 76
Joined
Jul 18, 2020
Messages
52
Likes
38
Location
Seattle, WA
Here's a few photos of a new gouge rack I built for tools using the bolster system found on SB Tools' and Ashley Hardwood's lines. It's a pretty simple design: 3/4" holes drilled with a 1/2" gap between each. I laid out slot lines tangent to the holes, chamfered them using a 1" shear cutting chamfer bit, then cut the slots with a handsaw. The rightmost hole is 7/8" to accommodate the 3/4" bottom bowl gouge. A test board showed that the 7/8" worked, but the chamfer centered and looked nicer on the 3/4" holes, so I only cut one that size.

I'm also building a second rack for handled tools, based on John Hebdon's design upthread. I'll post photos when that's done.
 

Attachments

  • IMG_9558.jpeg
    IMG_9558.jpeg
    402.7 KB · Views: 42
  • IMG_9559.jpeg
    IMG_9559.jpeg
    311.8 KB · Views: 41
  • IMG_9560.jpeg
    IMG_9560.jpeg
    421.5 KB · Views: 41
Back
Top