
-
April 2026 Turning Challenge: Salad Bowl! (click here for details) -
Congratulations to David Bartell, People's Choice in the March 2026 Turning Challenge (click here for details) -
Congratulations to Ted Pelfrey for "Cherry Blossoms on Cherry" being selected as Turning of the Week for April 27, 2026 (click here for details) -
Welcome new registering member. Your username must be your real First and Last name (for example: John Doe). "Screen names" and "handles" are not allowed and your registration will be deleted if you don't use your real name. Also, do not use all caps nor all lower case.
You are using an out of date browser. It may not display this or other websites correctly.
You should upgrade or use an alternative browser.
You should upgrade or use an alternative browser.
What’s on your carving/embellishing bench?
- Thread starter Ted Pelfrey
- Start date
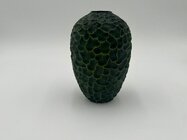
Love the color, shape, and carving!! Acrylic paints?All finished up.
Yes sirLove the color, shape, and carving!! Acrylic paints?
I have had a small walnut bowl on my Trent Bosch carving stand for a few days. It's sanded and has a few coats of finish on it, except for about a 1" wide, slightly raised band to carve, burn, and/or texture. I dug out my micromotor and practiced on a scrap (broken piece) but it seemed too slow. Then I fired up my burner pen and tried a few different tips and patterns, but didn't like that either. So, there it sits, staring at me every time I walk into the shop. 
Don’t give up! Post a pic , one of us may can provide an idea for that area.I have had a small walnut bowl on my Trent Bosch carving stand for a few days. It's sanded and has a few coats of finish on it, except for about a 1" wide, slightly raised band to carve, burn, and/or texture. I dug out my micromotor and practiced on a scrap (broken piece) but it seemed too slow. Then I fired up my burner pen and tried a few different tips and patterns, but didn't like that either. So, there it sits, staring at me every time I walk into the shop.
That's a beautiful piece. How did you get the accent color on the edges only?All finished up.
Thank you! It’s a brush brushing technique.That's a beautiful piece. How did you get the accent color on the edges only?
Dry brush?Thank you! It’s a brush brushing technique.
lol! Yes dry brushing!Dry brush?
Don’t give up! Post a pic , one of us may can provide an idea for that area.


Hammered texture? Burning a pattern ?
I have had a small walnut bowl on my Trent Bosch carving stand for a few days. It's sanded and has a few coats of finish on it, except for about a 1" wide, slightly raised band to carve, burn, and/or texture.
How about stippling? I use a it a lot, mostly with spindles and small things but sometimes with bowls. I use a small sort-of egg shaped carbide bit in dremel, touch the end to the wood to make one small dished spot, then another, then another… overlapping, randomizing, until the area is filled. Can take a bit of time. Then go over it lightly with 600 grit sandpaper and apply finish.
This is an example, Bradford Pear, carved then stippled. (After I finished it I decided I wasn’t wild about the proportions but hey, it’s done.)

This spindle has the same type of stippling.

JKJ
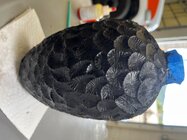
I have four or five hollow forms sitting on a rack in the shop and trying to figure out what I want to carve or burn on them. Look at them every time I’m in the shop. I think I have it figured out and then change my mindI have had a small walnut bowl on my Trent Bosch carving stand for a few days. It's sanded and has a few coats of finish on it, except for about a 1" wide, slightly raised band to carve, burn, and/or texture. I dug out my micromotor and practiced on a scrap (broken piece) but it seemed too slow. Then I fired up my burner pen and tried a few different tips and patterns, but didn't like that either. So, there it sits, staring at me every time I walk into the shop.


Cherry burl about 5" high
That's gonna be different.View attachment 80250
Cherry burl about 5" high
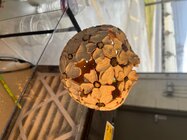
Just finishing up an Elm burl bowl. Just carved three little feet, I figured nature did enough embellishment. Finished green and let warp and wrinkle.


Love the feet! Do they start off as a mortise or a tenon? Just curious.Just finishing up an Elm burl bowl. Just carved three little feet, I figured nature did enough embellishment. Finished green and let warp and wrinkle.
View attachment 80269View attachment 80270
Thanks! With a tenon.Love the feet! Do they start off as a mortise or a tenon? Just curious.
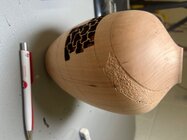
Here is the big brother of the Elm burl I posted earlier. I am putting 4 feet on this one mostly to distribute the weight because it is about 14" in diameter. This is a once turned bowl that was sanded to 320 green and let warp and wrinkle. I do put a bit of a curve on the tenon before removing it from the lathe. The rough carving was done with a Merlin 2 and a rough disk. I put the painters tape on to protect it from hand work with rasps and sanding.


Thanks for the process pics. Would love to see more if you took them.Here is the big brother of the Elm burl I posted earlier. I am putting 4 feet on this one mostly to distribute the weight because it is about 14" in diameter. This is a once turned bowl that was sanded to 320 green and let warp and wrinkle. I do put a bit of a curve on the tenon before removing it from the lathe. The rough carving was done with a Merlin 2 and a rough disk. I put the painters tape on to protect it from hand work with rasps and sanding.
View attachment 80300View attachment 80301
I have a couple more but they don't really show much.Thanks for the process pics. Would love to see more if you took them.
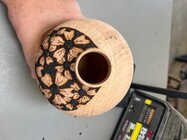
I used rotary tools to cut the curve on the inside of the foot. Then rasps and sandpaper to get blended in. I know I'm getting there when it takes the edge of the tape away and as long as I'm going lightly the tape protects the rest of the bottom.

After removing the tape I finish sanding, then wipe it with mineral spirits to find sanding scratches I missed.

There is always a chance four legs don't sit flat and need adjusting. This one was fine.

Very helpful thank you!I have a couple more but they don't really show much.
I used rotary tools to cut the curve on the inside of the foot. Then rasps and sandpaper to get blended in. I know I'm getting there when it takes the edge of the tape away and as long as I'm going lightly the tape protects the rest of the bottom.
View attachment 80329
After removing the tape I finish sanding, then wipe it with mineral spirits to find sanding scratches I missed.
View attachment 80330
There is always a chance four legs don't sit flat and need adjusting. This one was fine.
View attachment 80331
Great inspirational thread, any recommendations on a budget friendly beginner micromotor tool? Have a dremel I used for texturing a bowl once before but it's really under powered.
MDI has some nice beginner type micromotors. You can also look at it like some do a lathe purchase, buy once cry once.
My only fear is spending a bunch of money before trying it, only to realize I’m not good at it.
Maybe visit someone with the tools and experiment, or start with something very cheap and move up if inspired. I carved for years with Dremel tools - their flex shaft helps prevent the feeling you're holding a sweet potato. I also did a lot of carving with hand tools and files over the years but not on woodturnings..My only fear is spending a bunch of money before trying it, only to realize I’m not good at it.
Later, some more professional motorized options presented themselves, used but in good condition (and with lots of extra bits and such.
JKJ
Are you a member of a club?My only fear is spending a bunch of money before trying it, only to realize I’m not good at it.
No, I was but the club doesn’t exist anymore.Are you a member of a club?
Great new thread.
I know i have two additional clubs within an hour drive of me. One I just use their zoom meetings. Maybe contact clubs not so close. Many have mentors. That way you may use their micro motor to gauge what you need before you by. Good luck.No, I was but the club doesn’t exist anymore.
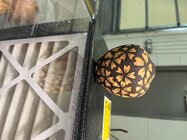
A couple of black maple, hollow form vessels with pyrography done by one of my former high school students. The smaller vessel includes a 13-lined ground squirrel with Virginia Blue Bells. The larger vessel has a pair of morning doves with sawtooth sunflowers. All native to Iowa where we live.


Those are fantastic!A couple of black maple, hollow form vessels with pyrography done by one of my former high school students. The smaller vessel includes a 13-lined ground squirrel with Virginia Blue Bells. The larger vessel has a pair of morning doves with sawtooth sunflowers. All native to Iowa where we live.
View attachment 81201View attachment 81202View attachment 81203
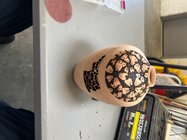
So good! I'm going to have to try something like that soon. Good work, Ted.Small maple HF with cherry blossoms . Kelly Dune on WOW challenged me to up my game on blossoms.
It’s a rabbit hole!So good! I'm going to have to try something like that soon. Good work, Ted.


Well this will be a first for me and learning as I go. Still have a lot of work to do on this one.
