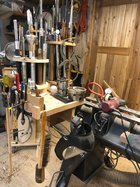
I like having some space to put the things I use most close at hand. Used the extension bolt holes to attach a 2x6 that acts as a base for a platform that holds all my ‘stuff’ I use regularly and seem to reach for most often. Works well for me and the way I work…my headstock is very rarely at the left end of the bed. The pictures of the ‘loaded’ state may be confusing, but the unloaded version is a little easier to see what’s going on.

-
March 2026 Turning Challenge: Olla! (click here for details) -
Congratulations to David Wyke, People's Choice in the February 2026 Turning Challenge (click here for details) -
Congratulations to Michael Nathal for "Eroded Wheel" being selected as Turning of the Week for March 23, 2026 (click here for details) -
Welcome new registering member. Your username must be your real First and Last name (for example: John Doe). "Screen names" and "handles" are not allowed and your registration will be deleted if you don't use your real name. Also, do not use all caps nor all lower case.
You are using an out of date browser. It may not display this or other websites correctly.
You should upgrade or use an alternative browser.
You should upgrade or use an alternative browser.
What’s on your lathe?
- Thread starter Rusty Nesmith
- Start date

Odie
Panning for Montana gold, with Betsy, the mule!
Looks like I just might get away with this one!
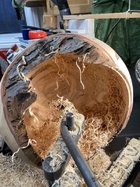
There's an entire thread discussing this Yellow Box burl bowl. You just never can tell what's in the interior of a piece of wood, and this one had a hidden very large void. If I'd have known about this in advance, I could have eliminated most of it, if I had oriented the wood differently....but, I got what I got! Anyway, it's left very thick, so the void doesn't break through to the interior.....and, because of that, it's very heavy.
This photo is prior to the application of the D.O. on the foot.
-o-
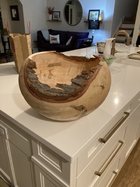
First turning of Persimmon, 12 x 6 inches, moisture content 30%. Lots of worm activity in the sapwood, mostly filled tunnels, but a few guys still active. Worm juices mixed with purple wood dust made an interesting, if weird, slurry. Sticky sap oozing from the sapwood as well. I left some sapwood at the upper sides, but otherwise feature the heartwood. I’m surprised at the colors, was expecting lighter blonde coloring. Lots of interesting stuff inside.
It cut cleanly with sharp tools, and wasn’t abrasive as I was expecting. The cutting fun would stop as soon as the gouge dulled a little though. I expect the second turning to be interesting. I assume it’ll be ‘hard as nails’.
I‘m a bit sorry it needs to go on the shelf. No worries though, I’ll move on to the next and forget all about it for the next 18 months!
That's a nice sized hunk of persimmon.
- Joined
- Dec 14, 2009
- Messages
- 2
- Likes
- 7


Neighbor lady wanted a pedestal bowl out of black walnut for her husband. Bit of a tall order. Fortunately I have a bowl I never finished that I could glue on a base to create said pedestal. Gonna be an interesting trip.
Interesting. I love wood like that. Do you plan to do any type of stabilizing? Cracks abound, or should I say character which I love to work with.
Just finished and presented to my neighbor lady. This was some lightly punky ash, had a lot of fun finishing it due to tear-out, compounded by some ground up turquoise that is quite fun to sand smooth without creating divots in the wood next to it. When I have cracks in the wood, like Gary's walnut, I use a dremel to carve out just a little past the cracks and fill with turquoise. I have not tried it on darker woods like walnut as I have limited access to that or other dark woods. I suspect the turquoise would get lost in the walnut but, only a guess on my part. I might just be tempted to use some coffee grounds and CA on very dark wood. IMHO
Gary, plz show us how that turns out, I'm a fan of it.
Gary, plz show us how that turns out, I'm a fan of it.
Attachments
Last edited:
The cracks are already filled with milliput, which is why it wasn't finished. I didn't like the way it looked. I’m going to try to build a gloss finish on it to match the milliput gloss.Interesting. I love wood like that. Do you plan to do any type of stabilizing? Cracks abound, or should I say character which I love to work with.
The reason for the abounding cracks is this is black walnut root which had crazy grain and a multitude of piths.
I use turquoise colored milliput on walnut. Mainly because I have a lot of walnut and only the blue milliput but I think it looks alright. Usually just do a ribbon around the rim. This one I added some glitter as an experiment. (some experiments work, some don't)Just finished and presented to my neighbor lady. This was some lightly punky ash, had a lot of fun finishing it due to tear-out, compounded by some ground up turquoise that is quite fun to sand smooth without creating divots in the wood next to it. When I have cracks in the wood, like Gary's walnut, I use a dremel to carve out just a little past the cracks and fill with turquoise. I have not tried it on darker woods like walnut as I have limited access to that or other dark woods. I suspect the turquoise would get lost in the walnut but, only a guess on my part. I might just be tempted to use some coffee grounds and CA on very dark wood. IMHO
Gary, plz show us how that turns out, I'm a fan of it.
Attachments

Marc, I recently acquired a very large persimmon, (24" across). Have turned a few things out of it to final thickness and found it moves a lot and loves to crack. I has a very musty odd odor and sort of sticky residue on the tools etc. I'm going to try some twice turned bowls and seal the end grain with full strength anchor seal and the rest of it with AS reduced 50% with water. A friend who deals with a lot of ebony suggested that to really slow down the drying rate. Yours should be a beautiful bowl when you get it done.First turning of Persimmon, 12 x 6 inches, moisture content 30%. Lots of worm activity in the sapwood, mostly filled tunnels, but a few guys still active. Worm juices mixed with purple wood dust made an interesting, if weird, slurry. Sticky sap oozing from the sapwood as well. I left some sapwood at the upper sides, but otherwise feature the heartwood. I’m surprised at the colors, was expecting lighter blonde coloring. Lots of interesting stuff inside.
It cut cleanly with sharp tools, and wasn’t abrasive as I was expecting. The cutting fun would stop as soon as the gouge dulled a little though. I expect the second turning to be interesting. I assume it’ll be ‘hard as nails’.
I‘m a bit sorry it needs to go on the shelf. No worries though, I’ll move on to the next and forget all about it for the next 18 months!
View attachment 58625View attachment 58626View attachment 58627
Don, the friend who gave me this log did a once turn on a platter. The amount of movement, overnight is surprising. The feather grain really pulled on that piece.Marc, I recently acquired a very large persimmon, (24" across). Have turned a few things out of it to final thickness and found it moves a lot and loves to crack. I has a very musty odd odor and sort of sticky residue on the tools etc. I'm going to try some twice turned bowls and seal the end grain with full strength anchor seal and the rest of it with AS reduced 50% with water. A friend who deals with a lot of ebony suggested that to really slow down the drying rate. Yours should be a beautiful bowl when you get it done.


I coated my first turned completely in anchorseal, and put paper towel patches on the iffy areas, bark inclusions and that large branch trunk, with more anchorseal in those areas. Might add towel patches on the rim too.
Slow is best.
24” is about the size of the log from which this came. Diameter is reduced from turning pith down, and the log was oval with the pith quite off center, so have one tall blank and a shorter side B.
I hope yours dries smoothly and crack free! Would enjoy seeing your once’s turned pieces.
Got some maple from a local arborist this week for free. Got there and all logs were 30 -36 inch diameter. Used my 14 inch chainsaw and took 2 hours to cut it up into 6 large bowl blanks. Spent last 2 days to cut 3 large natural edge bowls rough 16-17 inch diameter. Just wanted to maximize my laguna lathe and see how it could handle it. It did with flying colours but it sure was a workout for me. Anyway they are turned to around 1/2 inch thick, place them in shaving for 2 days and took them out today to air dry a bit. I don't mind if they warp or go out of shape. Thought maybe just storing them in a bag for 3-4 weeks and then sand and oil them. Any suggestions?
Attachments
Turned some scarf pins today

Filled a request by one grand daughter for a Yarn bowl, but it still has to get to her and it is 1000 miles from here 

Odie
Panning for Montana gold, with Betsy, the mule!
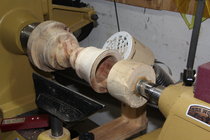
Worked past midnight last evening on maple burl bowl. It was sanded up to 400gt before I saw some tool marks.....rats! Closed up shop and went to bed at that point. I'll have to go back to 180gt, at least, to fix it......but, this will be later today. Such is to be expected occasionally, but it still is disappointing everytime this happens....
Can't see the tool marks in this pic.....but, I can assure you they are there!
-o-

Can't see the tool marks in this pic.....but, I can assure you they are there!
-o-
Lately it hasn’t been “What’s on your Lathe?”, but “What’s on your Plate?”
Been in California taking care of a grandchild, and came back East to a long ‘To-Do’ list. Next week I’ll be able to get back to the lathe!
This is the part of the forum I drop by when I have a few moments. I hope everyone has a great holiday, whatever your traditions might be, and here’s to a fulfilling New Year of turning.
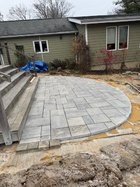
Yesterday got most of this patio completed. That is my (currently neglected ) shop in the background, to the right of the garage.
Been in California taking care of a grandchild, and came back East to a long ‘To-Do’ list. Next week I’ll be able to get back to the lathe!
This is the part of the forum I drop by when I have a few moments. I hope everyone has a great holiday, whatever your traditions might be, and here’s to a fulfilling New Year of turning.
Yesterday got most of this patio completed. That is my (currently neglected ) shop in the background, to the right of the garage.
Attachments
Got it loaded in the gallery.Just finished and presented to my neighbor lady. This was some lightly punky ash, had a lot of fun finishing it due to tear-out, compounded by some ground up turquoise that is quite fun to sand smooth without creating divots in the wood next to it. When I have cracks in the wood, like Gary's walnut, I use a dremel to carve out just a little past the cracks and fill with turquoise. I have not tried it on darker woods like walnut as I have limited access to that or other dark woods. I suspect the turquoise would get lost in the walnut but, only a guess on my part. I might just be tempted to use some coffee grounds and CA on very dark wood. IMHO
Gary, plz show us how that turns out, I'm a fan of it.
what are those 2 wheels to the left of the bowl touching it? Part of a steady rest that usually is 3 equidistant wheels surrounding the work I know, but this configuration stymies me, so what is it?Can't see the tool marks in this pic
Odie
Panning for Montana gold, with Betsy, the mule!
what are those 2 wheels to the left of the bowl touching it? Part of a steady rest that usually is 3 equidistant wheels surrounding the work I know, but this configuration stymies me, so what is it?
Alan.......
I use the Oneway bowl steady on nearly every bowl I make.....
-o-
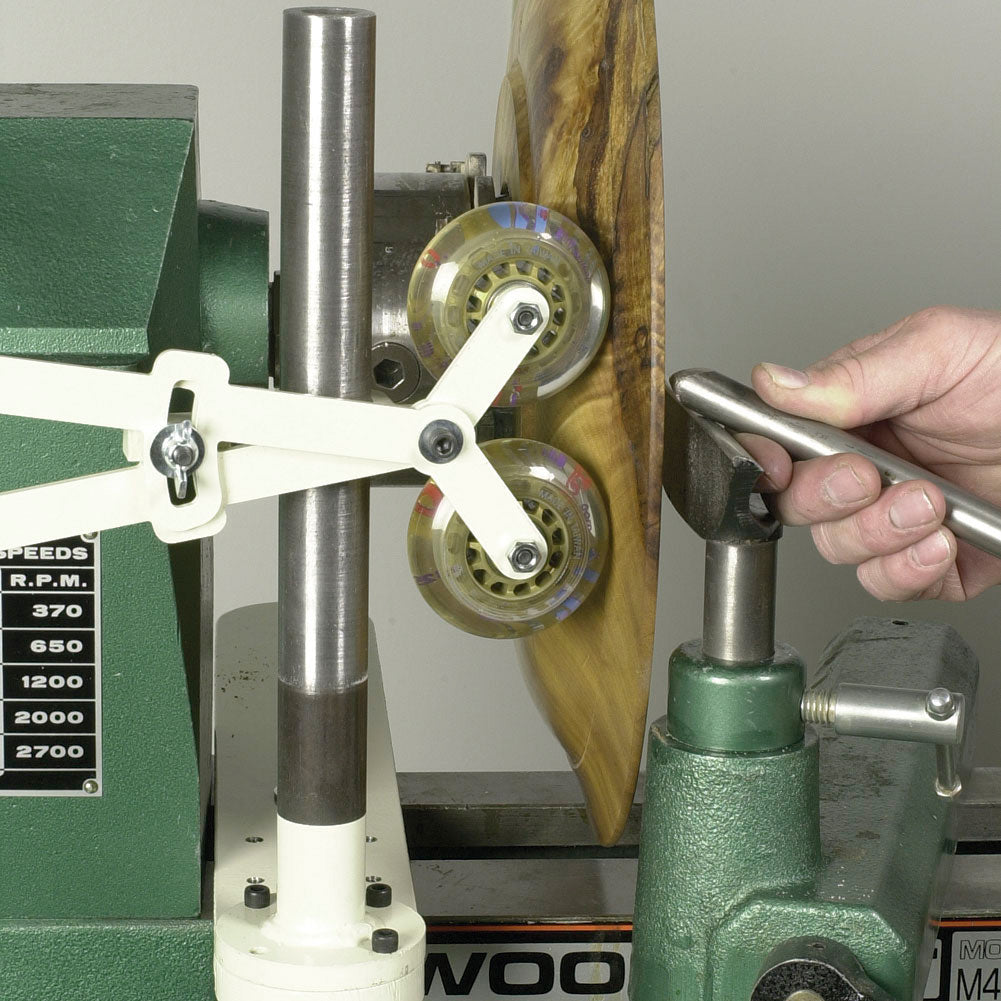
Oneway Bowl Steady
The Oneway® Bowl Steady is designed to eliminate vibration by supporting the work area when cutting. This eliminates the tendency for dig-ins and results in cleaner cuts and improved safety. The Bowl Steady can be used for all types of turning where vibration occurs. Infinite vertical and...
 www.woodturnerscatalog.com
edit: The photo used in the listing for the Oneway bowl steady is wrong, wrong, wrong!

(This photograph ^^^^^ always bugged me, and it's the same one they've been using for the past 20 years!)
To make this device work right, the wheel's axles need to run parallel to the spindle.....not opposed 90° to it, like in the photo.
The only way it could work that way, is to use a single wheel where the axle centerline directly points to, and intersects the centerline of the spindle. Two wheels just won't work like it shows in the photo, unless the angle of the wheel axles could be adjusted to both point directly towards the centerline of the spindle......they do not.
Last edited:
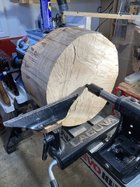
Merry Christmas everyone. Worked for 6 hours on this piece of maple. ( not sure what kind?). Was getting late but made it for Christmas Eve with the family for supper. (Everyone wondering what I'm doing in the garage?). Original blank weighed in at 75 pounds! Maxed out the laguna at 17.75 inch rough blank diameter and went from there. Got it down to 1/2 inch thick and called it a day. Put in lawn bag and will let it dry before sanding. Ended up around 17" diameter and 11 inch in height. Good workout between turning and hollowing.
Attachments

my wife wouldn’t even let me look at the lathe this weekend! You are lucky.Worked for 6 hours
Bedan practice! (homemade with Amazon Chinese steel)
Unsanded. I read it somewhere and I'm going to have to try it myself but I need to learn some French swear words other than the one I use a lot.
Everything was good until I took the tailstock away to do the bottom. When I tried to "experiment" with the other end without tailstock support it went downhill. The second one I didn't take a pic of and didn't sand it either but it only has a couple of ridges.
Any bedan users can tell me if the fuzzy ring you build up, is it normal to get big and start hitting your hand or am I doing something wrong? Could be anything- bevel angle, tool rest height, position of tool, didn't squint and stick my tongue out??
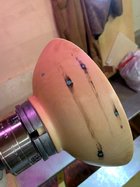
I'm going with egg shaped, not from a chicken. Very small dragon or lizard maybe?
Unsanded. I read it somewhere and I'm going to have to try it myself but I need to learn some French swear words other than the one I use a lot.
Everything was good until I took the tailstock away to do the bottom. When I tried to "experiment" with the other end without tailstock support it went downhill. The second one I didn't take a pic of and didn't sand it either but it only has a couple of ridges.
Any bedan users can tell me if the fuzzy ring you build up, is it normal to get big and start hitting your hand or am I doing something wrong? Could be anything- bevel angle, tool rest height, position of tool, didn't squint and stick my tongue out??
I'm going with egg shaped, not from a chicken. Very small dragon or lizard maybe?
Attachments

Last edited:
Odie, I have a bowl steady and have used it off and on for a few projects but have never used it on a bowl! You mentioned that you use it on every bowl. Is it more for your beads or for getting a clean cut on the inside without tool marks or both. I would be interested to hear your thoughts.
Odie
Panning for Montana gold, with Betsy, the mule!
Odie, I have a bowl steady and have used it off and on for a few projects but have never used it on a bowl! You mentioned that you use it on every bowl. Is it more for your beads or for getting a clean cut on the inside without tool marks or both. I would be interested to hear your thoughts.
Good morning, Don......
When you mention "beads", I'm assuming you mean my detail grooves. The answer is yes, it does help there, but the Oneway bowl steady also works in any case when you're applying tools to wood.
Getting the "perfect cut" is an elusive prospect, and there are many elements in obtaining it. Having said that, I've found the Oneway bowl steady to help sometimes, and not in others. I have tested whether the cut is improved, with and without the OBS at the same time, using the same tools on the same bowls.....numerous times......every time I've run this experiment, everything the same, and using, or not using the OBS was the only variable. This proved to me that the OBS does work, but there are other times when it makes no difference in the cut. For me, I nearly always use the OBS as a matter of standardizing the process, and it's well worth having it, when it improves the cut. You never know if the OBS is going to improve the cut, or not.....but, there is not much effort in installing it.
^^^^^ Look again to what I have highlighted in bold above.....because it's very important to mentally embrace this concept. The OBS is helpful in some cases, and when it does help, absolutely everything else in the total equation MUST also be working positively towards the perfect cut. This total equation, when it's working for you, is a very difficult thing to achieve.....and there are times when the OBS does help to achieve it.
-o-
Last edited:
Piece of Curupau. This stuff is hard as a rock.

Outside turned and ready to go back on the lathe. I wanted to incorporate a cup and saucer type look.
Outside turned and ready to go back on the lathe. I wanted to incorporate a cup and saucer type look.
With Odie's detail work, I can see the need for a bowl steady rest. I have spent some time experimenting with trying to bet bowls perfectly round. With a gouge finish, the bowl tends to have 2 strong pencil lines and 2 light to non existent pencil lines. With a shear scrape, I can get an almost perfect circle on the outside of the bowl, but most of the time, the circle is never complete. I am guessing that this is because of end grain/side grain, and as the bowl spins, it elongates a bit along the long grain axis, and gets slightly more narrow on the side grain axis.
robo hippy
robo hippy
Odie
Panning for Montana gold, with Betsy, the mule!
Piece of Curupau. This stuff is hard as a rock.
Phil......I have wood identification books from Eric Meier and Terry Porter, plus I use the online database quite a bit. I haven't been able to locate Curupau, but I do have listings for Curupay. Is it possible that this wood you're using is Curupay? Curupay is also very dense and difficult to work with. It's from Argentina, Brazil, and Paraguay.
-o-
Not sure. This is what I got from the website I bought it from.
Kiln Dried Curupau
Also known as Patagonian rosewood due to its color variance and density, but is not a true rosewood variety. Recommended for experienced turners. Wood typically has some variations in color. The wood is predominantly a mix of tan, blue and gray, but frequently contains streaks of black and/or reddish orange. This species is dense. Grain is typically straight, but may occasionally contain light figure. Sands to a very high lustre, finishes easily, and is stable when dried.I've never heard of it before either. It was on sale this month 4x4x2 inch piece for 4 dollars. I like to try odd pieces maybe once a month just to see how they are! That's how I ended up with the Canarywood and Entimoe ones.
What is curupau wood?

Description: Curupau or Patagonian Rosewood is found in the forests of Bolivia and Paraguay. Also known as Curupay, Curupau or Patagonian Rosewood is a very appealing wood that is highly compatible with any home design or color scheme.
Description: Curupau or Patagonian Rosewood is found in the forests of Bolivia and Paraguay. Also known as Curupay, Curupau or Patagonian Rosewood is a very appealing wood that is highly compatible with any home design or color scheme.
Some of the flamed box elder during the drying process. The 2 rolling pins on the right are drying nicely, but the 2 ones on the left must have had some irregular grain and resulted in bananas. I will be cutting these into shorter pieces for perhaps Christmas ornaments. The 2 hollow forms are drying rapidly. So far no checks or cracking. Weekly weight monitoring continues.

Yep, all the same wood, and yes, harder than concrete. I've turned a few small bowls with it. It is a b***h to sand, so it demands a great finish off the tool. And like the true rosewoods in the dahlbergia family, it is very colorful and takes a gorgeous finish. I got a few of those square blanks when gotwoodllc had their Black Friday sale. I may make a few square bowls, or adapt it to my tea-light/incense burner combo.What is curupau wood?
Description: Curupau or Patagonian Rosewood is found in the forests of Bolivia and Paraguay. Also known as Curupay, Curupau or Patagonian Rosewood is a very appealing wood that is highly compatible with any home design or color scheme.
spalted tamarind, 8 inch diameter and 3 inch height. Watched a bunch of NRS videos to learn more (including Reed’s) and what a difference. Able to sand at 120 and virtually no tear out. One coat so far of PTO.


The 2 rolling pins on the right are drying nicely, but the 2 ones on the left must have had some irregular grain and resulted in bananas. I will be cutting these into shorter pieces for perhaps Christmas ornaments.
View attachment 58706
The banana pieces will still make some nice French style rolling pins...

french rolling pin
Say bonjour to your new favorite wooden French style rolling pin from Earlywood. It's the perfect tapered rolling pin. Choose from jatoba, Mexican ebony, or hard maple rolling pins. The perfect gift for bakers!
 www.earlywooddesigns.com
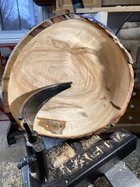
Working on the inside of the bowl now. I'm surprised how easy the inside went compared to the outside.
Taking a coffee break and will start on finish. Think I will try Tung oil.

Taking a coffee break and will start on finish. Think I will try Tung oil.
Odie
Panning for Montana gold, with Betsy, the mule!
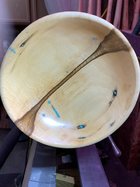
Now that Christmas is over, I was able to re-sand this maple burl bowl and apply the DO last night.
-o-


-o-
I gave the Black Locust bowl that is shown earlier here and in the Photo Gallery to the couple that gave me the wood. They told me that no one came and got the rest of the wood and I was welcome to get more if I wanted. I have the previous load rough turned and I really like this wood, so I took them up on the offer. So this post is more of what's on my lathe next.
I need help putting the wood in my truck mostly because of back issues. But gravity always helps unloading. I thought I was working smart by backing my truck up by the LPC ( log processing center) and pushing it to the ground. Then I would lift the log into place to cut. With the 50 degree weather yesterday I didn't want to make ruts in the yard so I stopped at the edge of the driveway. I was think of using a dolly or rolling the logs to the LPC then a light came on. I moved the LPC to the truck tailgate and then could roll the logs on to it. Then I wanted to kick myself for not thinking of that years ago.")

I got it all cut down the pith and Anchorsealed to give me more time to rough turn it. If I can make it off of the reclining chair today I'll restock it next to the pole barn.

I need help putting the wood in my truck mostly because of back issues. But gravity always helps unloading. I thought I was working smart by backing my truck up by the LPC ( log processing center) and pushing it to the ground. Then I would lift the log into place to cut. With the 50 degree weather yesterday I didn't want to make ruts in the yard so I stopped at the edge of the driveway. I was think of using a dolly or rolling the logs to the LPC then a light came on. I moved the LPC to the truck tailgate and then could roll the logs on to it. Then I wanted to kick myself for not thinking of that years ago.
I got it all cut down the pith and Anchorsealed to give me more time to rough turn it. If I can make it off of the reclining chair today I'll restock it next to the pole barn.
Thanks Odie for the detailed response. I will do a little experimenting myself. It only takes about 2 min to put it on.Good morning, Don......
When you mention "beads", I'm assuming you mean my detail grooves. The answer is yes, it does help there, but the Oneway bowl steady also works in any case when you're applying tools to wood.
Getting the "perfect cut" is an elusive prospect, and there are many elements in obtaining it. Having said that, I've found the Oneway bowl steady to help sometimes, and not in others. I have tested whether the cut is improved, with and without the OBS at the same time, using the same tools on the same bowls.....numerous times......every time I've run this experiment, everything the same, and using, or not using the OBS was the only variable. This proved to me that the OBS does work, but there are other times when it makes no difference in the cut. For me, I nearly always use the OBS as a matter of standardizing the process, and it's well worth having it, when it improves the cut. You never know if the OBS is going to improve the cut, or not.....but, there is not much effort in installing it.
^^^^^ Look again to what I have highlighted in bold above.....because it's very important to mentally embrace this concept. The OBS is helpful in some cases, and when it does help, absolutely everything else in the total equation MUST also be working positively towards the perfect cut. This total equation, when it's working for you, is a very difficult thing to achieve.....and there are times when the OBS does help to achieve it.
-o-
I think it’s padauk, about 7.5 inch diameter. One coat PTO.

