let both pieces sit for 2-3 days, true them up, and then glue together.
I always do this, as recommended by Richard Raffan and other box makers. If the wood is not completely dry, I rough turn/hollow both the lid and the box body and set them aside to dry. Raffan said to number the pieces or tape them loosely together to keep the pieces together.
But even if pieces are completely dry, there can still be stresses in the wood. I always do like Dean mentioned, turn to ALMOST the finial size then let sit for at least overnight, preferably longer. Note that all this is for end-grain boxes; side/face grain can be more trouble.
For an insert in the lid, I'd also let all pieces "rest" a few days before turning to final fit. For side/face grain boxes,
I'd definitely align the grain. Even a completely dry face grain box can change/warp just moving it from one house to another and certainly can move with the seasons. A tapered-fit lid (described below) helps a lot with that but minimizing the effects of seasonal/environmental movement is one reason many turners make end grain boxes which are less likely to go out of round.
Something to consider for side/face grain fits is the orientation of the movement natural in wood as it dries and moves with the seasons. In general (as long as you stay away from the pith (and heartwood/sapwood transitions in some species), wood shrinks the most tangentially to the rings - probably the orientation across your lid and insert. (Movement along the grain is almost zero) The online Wood Database has movement data for various species. Might be best to pick species with similar shrinkage data for the best chance of them moving together instead of in opposition. (For an extreme example, I might avoid combining Mesquite and Red Oak.) This is still with final turning, fitting, and assembling after drying completely and stress relieving. The book Understanding Wood by R. Bruce Hoadley is excellent for learning all about wood movement.
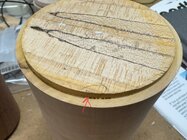
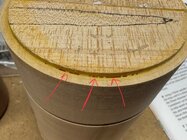
@Mark Ahlenius, to fix the gaps in the pictures you showed I'd be concerned that a dark filler would look odd if the dark band was not even all the way around. If the wood is now stable, I'd be inclined to put the lid on the lathe and turn an even groove and fill that.
I hate it when the lid on any box sticks due to seasonal changes. To eliminate any misfit on both end grain and face grain boxes I now make most with tapered fit lids. Makes life easier for everyone. (The only reason I can see for making the popular suction fit boxes is to try to impress other woodturners.) People actually using the boxes usually don't want to have to use both hands or fight to remove the lid. Same with Beads-of-courage boxes. I make either internal or external tapers depending on my mood and design. Some examples:
The first box below is made from end grain. The taper-fit lid sits down a bit inside the upper rim of the box.
I made the second one with layers of face grain, all aligned - this BOC box has a internal taper on the body of the box.


The first Beads of Courage box below has an external taper on the box, the lip on the lid is tapered inside to fit over the lower taper.
The second one has a internal taper on the box. The lids on all these boxes are easy to remove with one hand.


JKJ