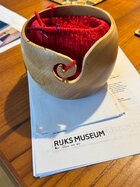
Man that stuff is beautiful! Loved the piece you gave me!!!Quick 30 minute bowl. Sugarberry.
View attachment 86019
Last edited:

Man that stuff is beautiful! Loved the piece you gave me!!!Quick 30 minute bowl. Sugarberry.
View attachment 86019
I had a 20" limb break off a massive sugarberry a couple of months ago. I'm keeping an eye on the spalting. I'll have a lot of this stuff in a couple of months. You and friends can come over and get some when it's ready. Eric can stand around and crack jokes.Man that stuff is beautiful! Loved the niece you gave me!!!

Her dad didn’t mind?Man that stuff is beautiful! Loved the niece you gave me!!!
Went and checked out her bio and links at Northern spalt, some interesting info, a bit more scientific, i actually have one of her books in kindle format on my ipad, good stuff, hate to leave too many things to chance when it comes to resources like wood, yea it grows on trees,Persimmon is in the ebony family, and used to be used for golf driver heads before they got the fancy metal ones. As for spalting, check out Seri Robinson, aka Dr. Spalt. Mostly it takes about 6 months, and some moisture in the wood. Not sure if it is possible for dried wood to be wet up again to the point where it can spalt or not. Much more than 6 months and it gets too soft since spalting is the first step in rotting. Some woods spalt more easily than others.
robo hippy
 but hey, waste not want not plus im kinda a tech nerd when it comes to this stuff, love the details and data.


I have got a Bridgeport but I don't have an indexing head. When you decide you don't need the indexing head you could send it north and I will give it a good home.Every shop needs a Bridgeport.......
View attachment 86038View attachment 86039View attachment 86040
A dividing head is also useful.
I was working on this black walnut platter, but not liking the pith came through and had to "fix" it. Going to the trash can.
View attachment 86061


Walnut often has a small, hollow pith. A quick filler for dark wood is coffee grounds and CA.I was working on this black walnut platter, but not liking the pith came through and had to "fix" it. Going to the trash can.
View attachment 86061


I just got tired of spending too much time on messed up wood. That platter was nice color, but very easy to tear out, just not worth it sometimesWalnut often has a small, hollow pith. A quick filler for dark wood is coffee grounds and CA.


That band is amazing. How’d you do it?2.5 x 5.75 walnut
You ever make something for a little thank you gift then you think "kinda pretty to just put paper clips or coins in?" This is for my buddy that welded the eBay knurler handle on for me.
Oh well. practice makes better. (never be perfect with wood. I noticed should have spent some more time sanding. lots of scratches)
$12 knurler from eBay. Look for one that has prominent teeth on the wheels. Double wheel that swivels. It's the same principal as a crown or sorby texturing tool just two smaller wheels with a different pattern.That band is amazing. How’d you do it?


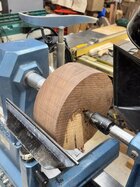
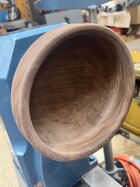
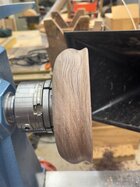
 Roughing out some Tamarind bowls
Just off the lathe - Purpleheart and Acrylic.
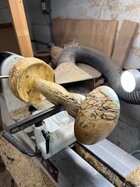
Grandson wanted to "make" a wand - his older brother had a wand-making session some years back.
We went through the entire process starting with picking a blank and making a full-scale sketch. The design changed, of course, as he came up with more ideas! ("Can we do this?", "...ahhh, well, sure!")
This was his first time interested in the shop so he did nothing with the lathe spinning. As attention span allows, we'll do some lessons in the future. Gotta start somewhere!
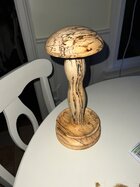
View attachment 86172
He had seen some of my other wands and went crazy with the design. The piece of transparent purple acrylic in the middle has a 1/4" dia tenon on each end epoxied into holes in the handle and shaft.
The turning was easy. But I don't particularly recommend the "in process" design evolution method! We started with the blank he picked out, partially turned it, then as the "specs" changed, cut it apart and mounted the pieces separately for shaping and drilling. This required some creative ideas to hold the pieces and maintain precision!. There are better and easier and quicker ways. (After getting the idea of adding a "crystal" in the middle he probably looked through the colors on hand for an hour.) But spending quality time was the important thing.
Since the result is not the strongest design for an active kid, I told him this one was for show, not to be used in battle with the Forces of Evil. Next time we'll make sturdier one-piece wand he can go crazy with - already picked out and have a Honduran Mahogany blank ready to go - will be far quicker and easier. Now he's getting ideas for details with texturing, friction-burned lines.
JKJ


I’m thinking of how I can use the golden ratio and variations. Template would be part of the answer. Have never tried that on a turning.

George, that call blank looks fantastic! It will be a stunner when you get it all sanded and polished up!Getting there. I’ll stop turning here and move to the most fun part, finishing!
I am still just making basic moves.
I do need to go back to some nice, inexpensive wood, where my tears over mistakes are fewer
A bit more expensive these castings!


") lol. These are the Jaws I decided to spend $$ on, following a recommendation here. This call I purposely made shorter. giving me some left over material for a separate Mouth end part to incorporate in a future call.
lol. These are the Jaws I decided to spend $$ on, following a recommendation here. This call I purposely made shorter. giving me some left over material for a separate Mouth end part to incorporate in a future call. Am still as always have, doing everything freehand/thought. No template on cardboard. I need to stop that! Good news... it is already sold. ! Profit: ooohhh about Minus 2,000$