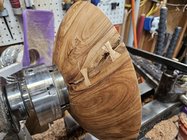
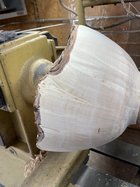
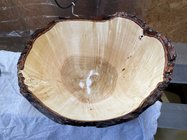
Finished turning the interior of the Black Walnut bowl a few posts up, and.......sort of made a funnel. Ugh! Well, the bottom of the bowl is somewhat soft sapwood. I had decided to continue the curve through the tenon and have a somewhat small foot (think Sally Burnett). However, I underestimated how far into the bowl the previous turner's spurs and center were driven. When I got to the very bottom of the interior, about an 1/8" of fibers just ripped out of the center. There it was, a tiny little hole that traveled all the way through my 3/8" deep tenon. After a little bit of sanding to clean up the view, I could even see the two spur marks. Holy cow, I guess the wood was pretty soft to begin with and the spur drive went deep. That said, ultimately the mistake is my fault, as I should have accounted for this possibility. Kind of sucks, but it is what it is. Here are a couple of pics:
View attachment 61698
View attachment 61699
I almost never try to salvage a mistake like this, BUT my plan was to heavily embellish the bowl. I'm almost certain that in the end the mistake will be invisible, so I might actually glue in a small plug. Have to stew on it though.

")


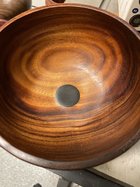

 I usually don’t like the look of plugs, but that Ebony works so well with Monkeypod. Nice work!!
") Looks great, though. Like an African sunset.
Looks great, though. Like an African sunset.