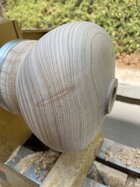
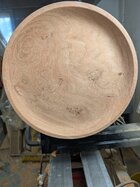
Hey Reed, it’s definitely Canarywood. Strange piece though. I cut this blank from some dimensional 8/4 stock I got a while ago. Mostly sapwood, and there was some sort of blue fungal decay. Once oiled it should look a bit more vibrant. I’ll post a photo of another section when I get back to the shop so you can see more of the blue.Michael, I have worked canary wood a couple of times, though it has been a while. That would be last guess for what you are showing. Colors just look wrong. Some thing else?
robo hippy

-
It's time to cast your vote in the March 2026 Turning Challenge. (click here for details) -
Congratulations to Chris Lawrence for "Dragon's Grip" being selected as Turning of the Week for March 30, 2026 (click here for details) -
Welcome new registering member. Your username must be your real First and Last name (for example: John Doe). "Screen names" and "handles" are not allowed and your registration will be deleted if you don't use your real name. Also, do not use all caps nor all lower case.
You are using an out of date browser. It may not display this or other websites correctly.
You should upgrade or use an alternative browser.
You should upgrade or use an alternative browser.
What’s on your lathe?
- Thread starter Rusty Nesmith
- Start date
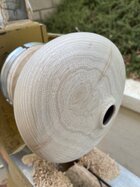
@robo hippy here a couple shots of the other roughout. I put a light coat of oil on so it looks a bit more like Canarywood. But you can see it’s still mostly sapwood. Chatoyance is pretty high, even considering this isn’t sanded at all.


Spectraply shavings are fun.

I understand Spectraply is made of layers of Birch.
Turns cleanly, even oriented as a face turning, cutting across end grain as with a typical bowl.
JKJ
I understand Spectraply is made of layers of Birch.
Turns cleanly, even oriented as a face turning, cutting across end grain as with a typical bowl.
JKJ
@robo hippy here a couple shots of the other roughout. I put a light coat of oil on so it looks a bit more like Canarywood. But you can see it’s still mostly sapwood. Chatoyance is pretty high, even considering this isn’t sanded at all.
View attachment 76221
View attachment 76222
I have two slabs of Canary wood (one quite small now) and some looks a lot like yours. Lots of variation, of course There are multiple species of Canary Wood, all under the genus Centrolobium. Hobbithouseinc says maybe 10 species. Scroll down the page to get an idea of the variation in color.
What they use it for in South America may surprise us as woodturners. From the Wood Database:
Common Uses: Construction lumber, railroad crossties, flooring, veneers, boatbuilding, furniture, cabinetry, and turned items.
Imagine a 100 miles of railroad crossties of canary wood.
At very least everyone should agree it's wood.
")

JKJ
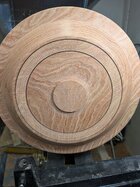
Perhaps my sense of style is not well developed, but I'm not sure I prefer the more ornate bowl bottoms over something simpler. They appear very well done but I think I have simpler tastes (or lower level of skill)I agree John. Yours does not look like a plain mortise and with all of the detail added the normal person would never know. I ran across one of my first pieces in the house. I turned it over and saw just a plain mortise and could only stand there a cringe.
Dave Landers
Beta Tester
The important thing (to me) is that the bottom of a piece looks intentional - not necessarily ornate or fancy, but appears like some thought and attention was given to it. The bottom is part of the whole, and I prefer to see the whole piece completed.Perhaps my sense of style is not well developed, but I'm not sure I prefer the more ornate bowl bottoms over something simpler. They appear very well done but I think I have simpler tastes (or lower level of skill)
This does not necessarily mean ornamentation. It also doesn't necessarily require removing the chucking point.
For my work, I usually prefer to remove the chucking point and leave a just simple foot.

Dave, I think we may be of the same mind on this. I am working on incorporating a little more detail on my work, mostly focusing on having a small amount of intentional detail on the foot.The important thing (to me) is that the bottom of a piece looks intentional - not necessarily ornate or fancy, but appears like some thought and attention was given to it. The bottom is part of the whole, and I prefer to see the whole piece completed.
This does not necessarily mean ornamentation. It also doesn't necessarily require removing the chucking point.
For my work, I usually prefer to remove the chucking point and leave a just simple foot.
View attachment 76267
I think some people prefer much more detail on the bottom but it can feel incongruous to the rest of the bowl to me. Great thing about this is there's a lot of different ways to go to suite each individuals preferences.
Very nice!A 9 inch ash HF, one of the biggest I’ve hollowed.
Second turning walnut. 12 x 3.


Something small from Eastern Red Cedar.
This about wore me out! Held on the drive end by my usual short turned #2 morse taper. Used the left-handed steady method as always.
I picked a horrible blank, full of dense knots and some hidden internal cracks. Dealing with the extra vibration when cutting through hard knots was challenging! I almost broke it twice but refused to give up. I did have to make some compromises on diameters and detail. And when shaping the final detail at the drive end the wood fell apart from a spiderweb network of invisible cracks - gave me a design opportunity!
This one loosely follows the design of another I made a long time ago.
First picture: on the lathe, shaped, sanded, starting on the texturing.
Second picture: turning, distressed texturing, and friction wire-burned accent lines completed.

With several coats of "danish" oil and a touch of Renaissance wax. Ready for delivery!

I made this to give to a genuine medical wizard. He needs no magic wand but I thought it might be fun. I told some about the recent series of unfortunate events involving a huge storm-downed oak tree and a dog, resulting in a nice ride in an ambulance and a weekend in the ER. There I met the wizard facial reconstruction surgeon who performed miracles with the magic in his hands. Thank Heaven above for doctors, medical staff, and facilities!
Anyone nearby who could use some big red oak, come visit. I might put some of it on the sawmill and see what it's like inside.
BTW, in the first picture above you may notice something on the lathe spindle. This little collar screws onto the lathe spindle and lets me comfortably turn the piece by hand, helpful with sanding, carving, or texturing. I made it long ago from Dogwood, threaded with a 1.25x8 tap, and textured with a Wagner knurling tool. When sanding by hand or working on detail this makes it easier than reaching around to rotate the lathe with the hand wheel or turning the the lathe spindle threads with my fingers!

JKJ
This about wore me out! Held on the drive end by my usual short turned #2 morse taper. Used the left-handed steady method as always.
I picked a horrible blank, full of dense knots and some hidden internal cracks. Dealing with the extra vibration when cutting through hard knots was challenging! I almost broke it twice but refused to give up. I did have to make some compromises on diameters and detail. And when shaping the final detail at the drive end the wood fell apart from a spiderweb network of invisible cracks - gave me a design opportunity!
This one loosely follows the design of another I made a long time ago.
First picture: on the lathe, shaped, sanded, starting on the texturing.
Second picture: turning, distressed texturing, and friction wire-burned accent lines completed.
With several coats of "danish" oil and a touch of Renaissance wax. Ready for delivery!
I made this to give to a genuine medical wizard. He needs no magic wand but I thought it might be fun. I told some about the recent series of unfortunate events involving a huge storm-downed oak tree and a dog, resulting in a nice ride in an ambulance and a weekend in the ER. There I met the wizard facial reconstruction surgeon who performed miracles with the magic in his hands. Thank Heaven above for doctors, medical staff, and facilities!
Anyone nearby who could use some big red oak, come visit. I might put some of it on the sawmill and see what it's like inside.
BTW, in the first picture above you may notice something on the lathe spindle. This little collar screws onto the lathe spindle and lets me comfortably turn the piece by hand, helpful with sanding, carving, or texturing. I made it long ago from Dogwood, threaded with a 1.25x8 tap, and textured with a Wagner knurling tool. When sanding by hand or working on detail this makes it easier than reaching around to rotate the lathe with the hand wheel or turning the the lathe spindle threads with my fingers!
JKJ
Last edited:
After getting distracted and forgetting to set my laser a nice walnut hollow form is no more. The only thing that got hurt worse was my feelings . So, I just switched to a piece of maple.


. So, I just switched to a piece of maple.
Last edited:
And form was so nice. I’ve got lots of those!After getting distracted and forgetting to set my laser a nice walnut hollow form is no more. The only thing that got hurt worse was my feeling
View attachment 76296
View attachment 76295
Just when you think it's going good, mother nature throws a curve. Thought I might get lucky and be able to turn this away on the front but no such luck... Crack! And I was really happy with the back side.
18 inch honey locust.
18 inch honey locust.
Attachments
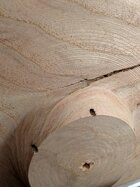
Epoxy and sawdust. Worth saving.Just when you think it's going good, mother nature throws a curve. Thought I might get lucky and be able to turn this away on the front but no such luck... Crack! And I was really happy with the back side.
18 inch honey locust.
I'm working on saving it, just adds more time to it. I was hoping to have it done for my clubs "show and tell" on Monday.Epoxy and sawdust. Worth saving.
I keep a Box O’ Shame with such things to show students that every honest woodturner makes mistakes. I get it out when someone’s spirit is crushed by a mishap.After getting distracted and forgetting to set my laser a nice walnut hollow form is no more
Last edited:
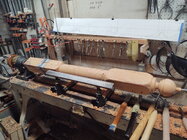
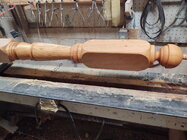
A pine newel from customers dirty, cracked, partially rotted, nail filled, imbalanced wood. About 60% of the original timber was discarded to get this piece. 'Supposed to be around 100 years old, but still required all sanding to be done with paper in one hand and a wet sponge in the other.
Attachments
5.5” x 5.5” x 3/16” Navajo form from a piece of cherry tree we had to take down in back. In hindsight, should have either used a glue block or smaller tenon.

Finished the maple HF today, 7” tall x 10” wide with a coat of DO applied. I used the principle of thirds as I’m still working on shapes. I was hoping to carve this one but the grain looks too good to carve. I think I’m going to cut down a poplar to get some simple grain wood.


.A white birch bowl: ~8”x4”


Kevin, that Acacia might look nice stained like this piece of oak I didBlack acacia from last night
View attachment 76092
And Masur Birch from this morning
View attachment 76093

A beauty!Finished the maple HF today, 7” tall x 10” wide with a coat of DO applied. I used the principle of thirds as I’m still working on shapes. I was hoping to carve this one but the grain looks too good to carve. I think I’m going to cut down a poplar to get some simple grain wood
View attachment 76327
View attachment 76326
View attachment 76325
That is gorgeous wood and you sure did it justice. Awesome work.Finished the maple HF today, 7” tall x 10” wide with a coat of DO applied. I used the principle of thirds as I’m still working on shapes. I was hoping to carve this one but the grain looks too good to carve. I think I’m going to cut down a poplar to get some simple grain wood
View attachment 76327
View attachment 76326
View attachment 76325
Thank you. This was a large limb or part of a crotch limb from the large maple log I have. Dug it out of the pile since it was a short piece, got one HF and turned four bowls today from it.That is gorgeous wood and you sure did it justice. Awesome work.
I designated today as National Turn a Green Bowl Monday! Had a 3’ x 16” piece of side limb or off shoot of the maple log I had. The thing with most limbs is the pith never runs straight so I just split the difference and cut between the pith on each side of the cutoff piece and it had a slight curve to it.
It worked out pretty good as I got four bowls and only had to turn one down on the face 1-1/2” and one 1”.


It worked out pretty good as I got four bowls and only had to turn one down on the face 1-1/2” and one 1”.
Awesome work all around David! I have 4 - 44 inch long 28" dia. logs of Ambrosia maple left to be cut. You've inspired me to get them cut into rough blanks for bowls and hollow forms ASAP.
Here's the save.Epoxy and sawdust. Worth saving.
Attachments
Oof, how? Looks like there's plenty of material there...Oops!

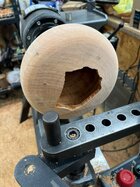
I took a different approach to blowing out my hollow form today. I approached from the bottom. Would not be a major problem except the inside bottom is just too thin to make another recess. I will save it in some other fashion.

Piece of elm. I don't dare try to remove the tenon after all the above turning issues!


Finished turning the hurricane bowls for a silent auction late summer to help artist who lost equipment. The chestnut didn’t have a pleasant smell so I grabbed a dry red cedar bowl to give the shop a nicer smell.
Was planning just a basic bowl and decided to turn a bead from the outside to the inside of the rim. Then decided to turn another bead a little lower on the rim and then added a third bead with a deep undercut rim.
When cleaning up the third bead which, had a knot in it, with the small skew it bounced a little which resulted in some torn grain. I couldn’t get the bead fixed to my satisfaction so end up turning it off.
So now it’s a two bead rim with a little more hand sanding needed on the beads.


. Was planning just a basic bowl and decided to turn a bead from the outside to the inside of the rim. Then decided to turn another bead a little lower on the rim and then added a third bead with a deep undercut rim.
When cleaning up the third bead which, had a knot in it, with the small skew it bounced a little which resulted in some torn grain. I couldn’t get the bead fixed to my satisfaction so end up turning it off.
So now it’s a two bead rim with a little more hand sanding needed on the beads
.Roughing out some walnut bowls and doing a little coring. I must say that wet black walnut is quite the messy wood to turn (rusty and black stained bed ways, stained hands…) and this stuff must have been full of silica as I could only get through hollowing out one 10” bowl before the gouge was noticeably dull. It has a nice finished product though.

Agreed.
Green walnut isn't much fun but after it drys, it is a whole different wood.
Green walnut isn't much fun but after it drys, it is a whole different wood.
It is worth the effort. However on finish turning it seems to show sanding scratches more than most other woods, so I kind of look at finish turning walnut as a skill builder in Final Cut and sanding technique.
I was going through some dry maple bowls looking for one to finish turn today and found a pecan mixed in. Looking at the shape I thought it was setting a bad drying example for my maples so had to get it out of there.
Finished turned with first coat of DO.


for my maples so had to get it out of there.Finished turned with first coat of DO.
We may have to start a “ what blew out on your lathe today “ forum.So I’m not alone?
View attachment 76400