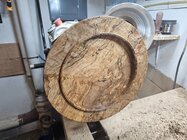
Great looking bowl David. I really like to see the original bowl form or sometimes even the rough blanks for projects so that you can see the work that goes into a final project. Also shows how to get the grain orientation which is sometimes I still struggle with, especially with hollow forms. I noticed you use DO for your finishes, ever tried TRied and True Oils then their varnish oil for the final coat? Just wondering for a final finish for maple and food safe products. Again really admire your all your work. Have a great weekend.I was going through some dry maple bowls looking for one to finish turn today and found a pecan mixed in. Looking at the shape I thought it was setting a bad drying examplefor my maples so had to get it out of there.
Finished turned with first coat of DO.
View attachment 76472
View attachment 76471
View attachment 76470

-
It's time to cast your vote in the March 2026 Turning Challenge. (click here for details) -
Congratulations to Chris Lawrence for "Dragon's Grip" being selected as Turning of the Week for March 30, 2026 (click here for details) -
Welcome new registering member. Your username must be your real First and Last name (for example: John Doe). "Screen names" and "handles" are not allowed and your registration will be deleted if you don't use your real name. Also, do not use all caps nor all lower case.
You are using an out of date browser. It may not display this or other websites correctly.
You should upgrade or use an alternative browser.
You should upgrade or use an alternative browser.
What’s on your lathe?
- Thread starter Rusty Nesmith
- Start date
I use Tried and True Danish and original and Mahoney’s Walnut oil. Depends on the wood species as to which I use. Never tried the varnish oil but have looked at it a time or two.Great looking bowl David. I really like to see the original bowl form or sometimes even the rough blanks for projects so that you can see the work that goes into a final project. Also shows how to get the grain orientation which is sometimes I still struggle with, especially with hollow forms. I noticed you use DO for your finishes, ever tried TRied and True Oils then their varnish oil for the final coat? Just wondering for a final finish for maple and food safe products. Again really admire your all your work. Have a great weekend.
If using Tried and True I sometimes do two coats of DO and finish it with a final coat of the original. Then after a few days I’ll dry buff.
Last edited:
Well never say never, as it looks like I’m turning more heart bowls for the gallery. They sold the last one and asked for more. I wasn’t too enthused about it until they said also sold a couple of large bowls, so now I’m turning a few hearts. Mostly maple with some cherry, oak and poplar mixed in, just grabbed whatever cutoffs were close.


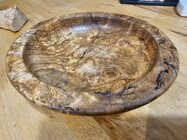
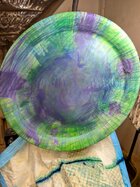
. Mostly maple with some cherry, oak and poplar mixed in, just grabbed whatever cutoffs were close.A spalted maple platter
- Joined
- Jan 20, 2010
- Messages
- 13
- Likes
- 37
Beautiful Hughie! The contrasting figure is very striking.and the ugly duckling emerges.
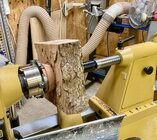
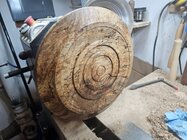
Grabbed a chunk off of the wood pile. Didn't have anything in mind just started turning.

- Joined
- Jan 20, 2010
- Messages
- 13
- Likes
- 37
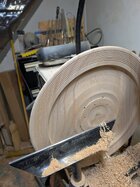
Got a few yarn bowls with finish curing. The shape and routing take a little practice so they got cleaner as they went along.

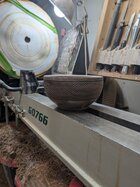
Needed something to keep the paint off of the lathe.


That's a good idea. I've got too much junk on top of mine to do that.Needed something to keep the paint off of the lathe.
View attachment 76679View attachment 76680View attachment 76681
 Where did you get that position-able dust collection tube section?
Bought it on Amazon. It works great!
Locline 80813.
Locline 80813.
Trying to utilize as much of this Elm burl as I can. Had a piece that I thought I practice a hollow form. This is about 5" wide and 4" tall.
I drilled a 1/2" hole to depth and thought to myself, that will keep people from putting there finger into see how smooth it is.")

I couldn't get to the corner with the tools I had so ground a hex key. This is the second one I made the first one was smaller and chattered too much.

I wasn't sure how to hold it to finish the foot. It didn't get that mush vacuum so I taped it too.

It is still wet, but I did coat it with Danish oil. I never touched the collar but a small burl eyelet fell out. Hopefully it holds together as it dries.

I drilled a 1/2" hole to depth and thought to myself, that will keep people from putting there finger into see how smooth it is.
I couldn't get to the corner with the tools I had so ground a hex key. This is the second one I made the first one was smaller and chattered too much.
I wasn't sure how to hold it to finish the foot. It didn't get that mush vacuum so I taped it too.
It is still wet, but I did coat it with Danish oil. I never touched the collar but a small burl eyelet fell out. Hopefully it holds together as it dries.
Instead of tying up the lathe for finishing try something like this, made from a rotisserie motor.Needed something to keep the paint off of the lathe.
View attachment 76679View attachment 76680View attachment 76681

Trying to utilize as much of this Elm burl as I can. Had a piece that I thought I practice a hollow form.
View attachment 76684
View attachment 76687
Nice form! And beautiful wood. But... you used that wood for a PRACTICE piece?? Yikes.
JKJ
GORGEOUS spalted maple!! Did it give you many problems with punky end-grain tear-out? I currently have 3 large maple logs under a tarp spalting. I'm wondering if all the heat and humidity this summer will accelerate that process? I probably need to check on them.Last one, promise. Here's the top side.
Beautiful, James-David Ellsworth would be proud of that homemade hollowing tool (and the form as well!).Trying to utilize as much of this Elm burl as I can. Had a piece that I thought I practice a hollow form. This is about 5" wide and 4" tall.
I drilled a 1/2" hole to depth and thought to myself, that will keep people from putting there finger into see how smooth it is.
View attachment 76684
I couldn't get to the corner with the tools I had so ground a hex key. This is the second one I made the first one was smaller and chattered too much.
View attachment 76685
I wasn't sure how to hold it to finish the foot. It didn't get that mush vacuum so I taped it too.
View attachment 76686
It is still wet, but I did coat it with Danish oil. I never touched the collar but a small burl eyelet fell out. Hopefully it holds together as it dries.
View attachment 76687
Thanks! Spalted maple burl, a few punky areas but not too terrible tbh.GORGEOUS spalted maple!! Did it give you many problems with punky end-grain tear-out? I currently have 3 large maple logs under a tarp spalting. I'm wondering if all the heat and humidity this summer will accelerate that process? I probably need to check on them.
Stunning.Trying to utilize as much of this Elm burl as I can. Had a piece that I thought I practice a hollow form. This is about 5" wide and 4" tall.
I drilled a 1/2" hole to depth and thought to myself, that will keep people from putting there finger into see how smooth it is.
View attachment 76684
I couldn't get to the corner with the tools I had so ground a hex key. This is the second one I made the first one was smaller and chattered too much.
View attachment 76685
I wasn't sure how to hold it to finish the foot. It didn't get that mush vacuum so I taped it too.
View attachment 76686
It is still wet, but I did coat it with Danish oil. I never touched the collar but a small burl eyelet fell out. Hopefully it holds together as it dries.
View attachment 76687
Thanks! Well it wasn't my first time practicing, but it has been a while, most of my hollowing lately has been globes for ornaments.Nice form! And beautiful wood. But... you used that wood for a PRACTICE piece?? Yikes.
JKJ
I made my first hollow form in a hands on class with David Ellsworth. I used two of his hollowing tools along with a couple of Hunter carbide ones. I should take the time to make a couple of bent ones from drill rod and glue in a cutting tip.Beautiful, James-David Ellsworth would be proud of that homemade hollowing tool (and the form as well!).
Well I’ll never make it as a production turner. I turned seven backs of the heart bowls and was bored out of my mind, so I stopped and second turned a 15-1/2” maple bowl. Went back out the next day and turned the balance and finished two. I’ve been going out and finishing two or three heart bowls at a time. Have two more to go.
I can turn bowls or hollow forms all day long but turning the same thing over and over is not for me, all bowls and hollow forms are different.


. I turned seven backs of the heart bowls and was bored out of my mind, so I stopped and second turned a 15-1/2” maple bowl. Went back out the next day and turned the balance and finished two. I’ve been going out and finishing two or three heart bowls at a time. Have two more to go.I can turn bowls or hollow forms all day long but turning the same thing over and over is not for me
, all bowls and hollow forms are different.I can turn bowls or hollow forms all day long but turning the same thing over and over is not for me
Ditto!
Beautiful work, David-And I feel this comment too! I am in full production mode getting ready for a big summer show next Saturday, cranking out the usual craft show fare, which means a lot of small spindles. Now granted, there is nothing better for skill practice with a skew and spindle gouge than spindle work, but about every 4 or 5 spindles, I have to stop, change belt and drive settings, and do a bowl or two or I'm liable to throw something through my shop window lol.Well I’ll never make it as a production turner
I can turn bowls or hollow forms all day long but turning the same thing over and over is not for me
View attachment 76705
View attachment 76704
View attachment 76703
I call this my Phil H. inspired platter.
Underneath the cloak of disguise is an ash platter. Roughly 17 inches. About the third design challenged result? I would have liked the original version better probably but the color is growing on me...(kind of like a fungus)
Underneath the cloak of disguise is an ash platter. Roughly 17 inches. About the third design challenged result? I would have liked the original version better probably but the color is growing on me...(kind of like a fungus)
Attachments
Last edited:
Shape is wonderful.A 9 inch ash HF, one of the biggest I’ve hollowed.
I really love your texturing work, John. That wand in the middle is supreme.Something small from Eastern Red Cedar.
This about wore me out! Held on the drive end by my usual short turned #2 morse taper. Used the left-handed steady method as always.
I picked a horrible blank, full of dense knots and some hidden internal cracks. Dealing with the extra vibration when cutting through hard knots was challenging! I almost broke it twice but refused to give up. I did have to make some compromises on diameters and detail. And when shaping the final detail at the drive end the wood fell apart from a spiderweb network of invisible cracks - gave me a design opportunity!
This one loosely follows the design of another I made a long time ago.
First picture: on the lathe, shaped, sanded, starting on the texturing.
Second picture: turning, distressed texturing, and friction wire-burned accent lines completed.
View attachment 76276
With several coats of "danish" oil and a touch of Renaissance wax. Ready for delivery!
View attachment 76277
I made this to give to a genuine medical wizard. He needs no magic wand but I thought it might be fun. I told some about the recent series of unfortunate events involving a huge storm-downed oak tree and a dog, resulting in a nice ride in an ambulance and a weekend in the ER. There I met the wizard facial reconstruction surgeon who performed miracles with the magic in his hands. Thank Heaven above for doctors, medical staff, and facilities!
Anyone nearby who could use some big red oak, come visit. I might put some of it on the sawmill and see what it's like inside.
BTW, in the first picture above you may notice something on the lathe spindle. This little collar screws onto the lathe spindle and lets me comfortably turn the piece by hand, helpful with sanding, carving, or texturing. I made it long ago from Dogwood, threaded with a 1.25x8 tap, and textured with a Wagner knurling tool. When sanding by hand or working on detail this makes it easier than reaching around to rotate the lathe with the hand wheel or turning the the lathe spindle threads with my fingers!
View attachment 76279
JKJ
So I’m not alone?
View attachment 76400
Oh, so sad. Looks REALLY thin...was that the goal, and you just took it a bit too far, or did you overthin by accident?
Accident. Wasn’t as aware of where tool tip was as I should have been.Oh, so sad. Looks REALLY thin...was that the goal, and you just took it a bit too far, or did you overthin by accident?

I made this to give to a genuine medical wizard. He needs no magic wand but I thought it might be fun. I told some about the recent series of unfortunate events involving a huge storm-downed oak tree and a dog, resulting in a nice ride in an ambulance and a weekend in the ER. There I met the wizard facial reconstruction surgeon who performed miracles with the magic in his hands.
Follow up. I stopped by the office and gave the wand to the magical surgeon a few days ago. He and his wife - the clinic manager, the office staff, (and the two patients in the waiting room) were SO fascinated! I also brought other wands to show. None had ever seen anything like this. (And it's amazing how many die-hard Harry Potter fans are out there - there's a fortune to be made folks, if you are so inclined)
Now the Dr and his wife plan to bring their kids to our farm and shop to let them see woodturning in action. Maybe they'll also want see some tiny just-hatched peacocks and guineas and take some peacock feathers home.,
Good clean fun!
JKJ
Last edited:
I love your wands, John-I keep meaning to make some for my craft shows, but get sidetracked by other projects like this 8-inch camphor burl tray I'm finishing up. My 1st time turning it, and it won't be my last. It's beautiful, cuts and sand super easy, and Brad @gotwoodllc had it on sale in his Bargain Bin where I get most of my squares. If you don't mind your shop smelling like a Vick's VapoRub factory, it's great stuff, but that smell is LOUD, y'all! My eyes were watering even with dust collection, PPE and a fan. Even after watering some flowers and turning the hose on myself after a lunch break, I still smell it! Oh, well, my sinuses are clear. (Oh, and 1 quick tip for turning squares for anyone who doesn't know: that sandpaper wrapped around a popsicle stick on top of my headstock makes short work of accurate sanding on the side flats).Follow up. I stopped by the office and gave the wand to the magical surgeon a few days ago. He and his wife - the clinic manager, the office staff, (and the two patients in the waiting room) were SO fascinated! I also brought other wands to show. None had ever seen anything like this. (And it's amazing how many die-hard Harry Potter fans are out there - there's a fortune to be made folks, if you are so inclined)
Now the Dr and his wife plan to bring their kids to our farm and shop to let them see woodturning in action. Maybe they'll also want see some tiny just-hatched peacocks and guineas and take some peacock feathers home.,
Good clean fun!
JKJ


Holy cow, that's stunning. Very nice work.
I love your wands, John-I keep meaning to make some for my craft shows, but get sidetracked by other projects like this 8-inch camphor burl tray I'm finishing up. My 1st time turning it, and it won't be my last. It's beautiful, cuts and sand super easy, and Brad @gotwoodllc had it on sale in his Bargain Bin where I get most of my squares. If you don't mind your shop smelling like a Vick's VapoRub factory, it's great stuff, but that smell is LOUD, y'all! My eyes were watering even with dust collection, PPE and a fan. Even after watering some flowers and turning the hose on myself after a lunch break, I still smell it! Oh, well, my sinuses are clear. (Oh, and 1 quick tip for turning squares for anyone who doesn't know: that sandpaper wrapped around a popsicle stick on top of my headstock makes short work of accurate sanding on the side flats).
View attachment 76762View attachment 76763
My demo practice Piece for our monthly meeting. 
Thanks, John, but I can't take any credit for the beautiful wood. I always say that a woodturner's job is not to create beauty, but to reveal it.Holy cow, that's stunning. Very nice work.
I was given 4 large pieces of a mystery wood which turned out to be American Elm, not that common in southern Ontario. It’s very wet so the hollowing is going relatively quick. Will second turn when it is dry in a few months.

I love your wands, John-I keep meaning to make some for my craft shows, but get sidetracked by other projects like this 8-inch camphor burl tray I'm finishing up. My 1st time turning it, and it won't be my last. It's beautiful, cuts and sand super easy, and Brad @gotwoodllc had it on sale in his Bargain Bin where I get most of my squares. If you don't mind your shop smelling like a Vick's VapoRub factory, it's great stuff, but that smell is LOUD, y'all! My eyes were watering even with dust collection, PPE and a fan. Even after watering some flowers and turning the hose on myself after a lunch break, I still smell it! Oh, well, my sinuses are clear. (Oh, and 1 quick tip for turning squares for anyone who doesn't know: that sandpaper wrapped around a popsicle stick on top of my headstock makes short work of accurate sanding on the side flats).
View attachment 76762View attachment 76763
Aaron,
That's incredible! But noting your comment "I can't take any credit for the beautiful wood" reminds me of the ancient Woodturner's Insult: if you can't think of anything positive about a piece just say: "My, what beautiful wood!"
 In your case, of course, the form, turning, and surface also look incredible! Hard to tell from a picture though - send it to me for a closer look. Oops, just missed my birthday...
For rims, edges (and lots of other things), I make two sizes of plywood sanding sticks, 2" wide and 1" wide - I use spray adhesive to fasten a different grit to each side of a stick. I write the grit on the edges with a little arrow pointing to one face. I use 1/2" Raiata ply, smooth on both sides.
These are well-used 2" wide sanding sticks, overdue for replacement. (I've replaced the sandpaper twice since then!)

Speaking of sanding sticks: Besides working on thin edges like you mention, it's surprising how often I use these.
I also make one BIG sanding "stick", 2"x2"x18", with coarse sandpaper fastened to one side that was milled flat. Made and used per Harvey Meyer's suggestion: hold against the spinning thick rims of independently turned layers for glue-ups for things like Beads of Courage boxes. The goal is to make the joints perfectly flat while they are still on the lathe, after the partial hollowing is complete, just before glue up. Works well. This was with kiln dried 8/4 stock, cherry, with a basswood layer for carving.


I've made several BOC boxes with this method from various woods. It's a LOT easier than hollowing one solid chunk.
You think I used enough clamps???

I have camphor blocks but I've never even seen one close to that gorgeous.
If you go by Brad's again, when you get home please put me in your will. I'm pretty sure I'll be gone first, though...
JKJ
Last edited:
- Joined
- Jul 18, 2018
- Messages
- 1,385
- Likes
- 3,075
- Location
- Baltimore, MD
- Website
- loujacobswoodturning.com
This past weekend I was offered some hickory from a neighbor whose son had a tree fall on his house and deck. When I showed up on Saturday the hickory was mostly rotten at the core and I was only able to get out a sound log about 8’ long by 10” in diameter. He showed me a soft maple tree that he didn’t think I’d be interested in, and seemed surprised when I jumped at it. I’ve been processing bowl blanks and rough turning 10 bowls, between 10 and 12 1/2” from it. A couple of pieces had what I think might be called quilted figure. Am I using that term accurately here? For that large piece, I was able to core out a smaller bowl rather than turn away all that beautiful figure. 

John-Thanks for your kind words and your usual ingenious solutions to everyday turning problems. I love the idea of the sanding sticks. As always, your deliberate solutions inspire me to up my game in my shop where I can. I probably need to make a few of these.Aaron,
That's incredible! But noting your comment "I can't take any credit for the beautiful wood" reminds me of the ancient Woodturner's Insult: if you can't think of anything positive about a piece just say: "My, what beautiful wood!"
For rims, edges (and lots of other things), I make two sizes of plywood sanding sticks, 2" wide and 1" wide - I use spray adhesive to fasten a different grit to each side of a stick. I write the grit on the edges with a little arrow pointing to one face. I use 1/2" Raiata ply, smooth on both sides.
These are well-used 2" wide sanding sticks, overdue for replacement. (I've replaced the sandpaper twice since then!)
View attachment 76767
Speaking of sanding sticks: Besides working on thin edges like you mention, it's surprising how often I use these.
I also make one BIG sanding "stick", 2"x2"x18", with coarse sandpaper fastened to one side that was milled flat. Made and used per Harvey Meyer's suggestion: hold against the spinning thick rims of independently turned layers for glue-ups for things like Beads of Courage boxes. The goal is to make the joints perfectly flat while they are still on the lathe, after the partial hollowing is complete, just before glue up. Works well. This was with kiln dried 8/4 stock, cherry, with a basswood layer for carving.
View attachment 76770 View attachment 76771
I've made several BOC boxes with this method from various woods. It's a LOT easier than hollowing one solid chunk.
You think I used enough clamps???
View attachment 76772
I have camphor blocks but I've never even seen one close to that gorgeous.
If you go by Brad's again, when you get home please put me in your will. I'm pretty sure I'll go first, though...
JKJ
As for Brad's awesome stocks of wood, I often order online (usually getting my order the next day or so; they are the best!). I know you have a lot of access to great free local wood where you live, but if you ever want more exotics and find yourself down in the midlands of South Carolina (an outer suburb of BFE-Donalds to be exact), definitely give them a visit. His warehouse is like Disney World for old dudes lol. He always lets me pick through his racks for the best pieces.
Or just drive down I-26 to Spartanburg, and I will take you there myself! They don't get many in-person shoppers, as they are mostly an online business, so you would most likely have the place to yourself. Plus, I know a couple of great mom and pop hole in the wall joints half an hour back up the road in Belton, SC. Take care! Aaron