This is my lathe tool cabinet.
 This is my lathe tool cabinet.
That's really nice. I've been thinking about making something like that.View attachment 27005 View attachment 27006 View attachment 27004 View attachment 27003 View attachment 27007 This is my lathe tool cabinet.


My tool rack. Doors opened and closed. The white panels are dry erase boards. View attachment 26996 View attachment 26997

")


Pretty clean looking shop, odie and you claim to be a busy woodturner??? The place looks like it hasn't been "in use" since before the last licence plate posting on the wall!! HA! HA!
-----odie----- And collects license plates. Now Odie that is what I call organized!!I love seeing other turner's shops, especially those that look well used.....
I took these photos yesterday.......the shop is always a "work in progress", so I thought I'd update.
View attachment 27015 View attachment 27016 View attachment 27017 View attachment 27018 View attachment 27019
-----odie-----
(We really really need a laughing emotee!I'm not sure that Odie does any turning. I think that he just makes shop jigs.
)Now Odie that is what I call organized!!


meeee tooooooo You do not learn if u do not try(We really really need a laughing emotee!
You know, Lamar......there has been a million times I've told myself "now, I've got everything just the way I want it"......only to change things around......again, and again!
I think some people have a natural instinct to resist modifying tools and tooling. Admittedly, sometimes I screw things up that way.......but, the successes are absolutely worth the aggravation of the occasional SNAFU!.......
-----odie-----
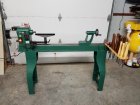
Thanks for the idea Mike!. It's not in this picture, but I made a toolbox later to hold my chucks, etc.... It sits on the second shelf and goes from one end to the other. That puts a bit more weight on the lathe right now. With what I'm doing on it, I don't get any movement or vibration yet. If/when I get good enough to advance to large items, I will probably looking at ways to secure the lathe better. Thanks again!Bobby,
With that model of lathe you can cut a piece of plywood and position between the lathe legs which can provide a platform to lay sandbags which will be needed when turning larger pieces or you can bolt the lathe to the floor.
I'm kinda OCD. Lol I always cleanup after I turn and before I finish. Then vacuum and sweep shop after project is done.I have no idea how do you guys keep your shop clean. Mine has chips in every corner and every drawer.
I'm kinda OCD. Lol I always cleanup after I turn and before I finish. Then vacuum and sweep shop after project is done.
A shop vac is a good way to gather up all that sawdust. Good for the flower beds and stuff. LolI need to spend a day deep cleaning and re-arranging my shop. I should get a shop vac too... maybe next summer, I’m busy (lazy) to do it in the winter


Got this from a friend who picked it up at a garage sale. Works great for me with two lathes, can work from both sides.
View attachment 27097 View attachment 27098 View attachment 27097
") .
.


Love your Harley Odie, reminds me of my motorcycle days!Us Harley riders are a breed apart from the rest of the pack
Thanks Odie for listening! Glad you enjoyed it my friend.@Bobby Smith......I just played some of your music. I am impressed......you are very good, Bobby.....an amazing talent! At first, you reminded me of Jim Croce, but with your own particular style. I am now subscribed to your channel.
-----odie-----
Us Harley riders are a breed apart from the rest of the pack......and, sometimes it takes one to appreciate the kind of free thinking mentality many of us harbor within our souls!
View attachment 28667
.JPG")
.JPG")
.JPG")
.JPG")
.JPG")
.JPG")


What's that carpet and jig for on your secondary tool cart?
.JPG")
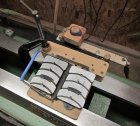
That is an interesting point you have about raising burrs, maybe a new thread should be started to discuss the various uses and methods. The first might be to explain the diagram on the carpet.Sorry Russell.......I hadn't realized you had asked me a question, until just now. The little schematic you see drawn on the rug is part of my method of raising burs on scrapers. This is a more recent addition, but I've been manually raising burs for quite a long time. What you are seeing are the last two steps of a 4-step method of doing this. Raising burs is not very common for woodturners anymore......usually you see mostly woodcarvers doing this now, but it was something that woodturners did use more commonly long ago. This is along the same lines as my insistence on using a traditional grind gouge, while most turners use, or have moved on to the more modern swept back grinds.
-----odie-----
View attachment 29018
That is an interesting point you have about raising burrs, maybe a new thread should be started to discuss the various uses and methods. The first might be to explain the diagram on the carpet.
Yes Odie an explanation of your burr turning method would be interesting
.JPG")
lathe.
I use the raised bur scrapers in much the same way that others use a ground bur scraper. No difference in how it's used, but with practice, the raised bur is a bit more versatile.
The four steps I use to raise a bur are:
1. grind scraper forward edge on grinder (just like making a "ground bur")
2. Polish the bottom corners of the scraper. (This makes the scraper slide on the tool rest easier while canted for shear scraping)
3. remove ground bur. The veritas jig is removed from the drill press vise, and the scraper is held firmly between the vise jaws. (I'm using a flat diamond hone for this)
4. Raise the bur on the Veritas jig. (held solidly in the vise jaws, and using my hips to apply force)
-----odie-----
The veritas is now mounted on a drill press vise, and the outlines you see on the previous photo represent the positioning of the vise while I perform the last two steps of raising the bur:
View attachment 29020