
-
It's time to cast your vote in the February 2026 Turning Challenge. (click here for details) -
Congratulations to Gabriel Hoff for "Highly Figured Masur Birch Round Bottom Box" being selected as Turning of the Week for March 2, 2026 (click here for details) -
Welcome new registering member. Your username must be your real First and Last name (for example: John Doe). "Screen names" and "handles" are not allowed and your registration will be deleted if you don't use your real name. Also, do not use all caps nor all lower case.
You are using an out of date browser. It may not display this or other websites correctly.
You should upgrade or use an alternative browser.
You should upgrade or use an alternative browser.
What’s on your lathe?
- Thread starter Rusty Nesmith
- Start date

Re-handled my Hunter Hercules. Old handle was a glue up and was starting to fail along the joint. New handle is walnut and finished with DO.

Nothing at the moment. I'm getting it cleaned up and ready to move out to make space for its replacement. 
")
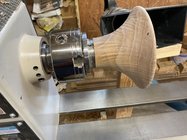
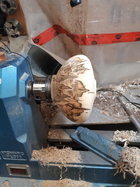
White oak. This is the biggest I have attempted. I was able to get it trued up today. Next time I will work on shape.
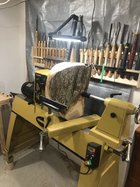
I really need to work on my interrupted cut skills! At 300 rpm I found it really hard to keep the gouge steady. Anyone have any pointers?
I really need to work on my interrupted cut skills! At 300 rpm I found it really hard to keep the gouge steady. Anyone have any pointers?
Attachments
Mike do not leave it sitting on the lathe to dry and split.

Start turning the piece from the center out, keep turning layers off.

That is how I rough turn my pieces of wood.
shape it, turn a recess, flip around and hollow.


All done in one day, if you can't do that, spray it wet and wrap in plastic.
Start turning the piece from the center out, keep turning layers off.
That is how I rough turn my pieces of wood.
shape it, turn a recess, flip around and hollow.
All done in one day, if you can't do that, spray it wet and wrap in plastic.
Last edited:
Odie
Panning for Montana gold, with Betsy, the mule!
Maple burl.....
-----odie-----


-----odie-----
Mike,White oak. This is the biggest I have attempted. I was able to get it trued up today. Next time I will work on shape.
I really need to work on my interrupted cut skills! At 300 rpm I found it really hard to keep the gouge steady. Anyone have any pointers?
Don't know what the blank looked like when you put it on the lathe. With bigger blanks like this, the better you initially prepare the blank the better off and faster rpm you'll be able to spin. Some use the bandsaw to round the blank and that's okay to do but I use the chainsaw to do all the rounding and flip the blank over to take a good amount of the high side bark off the blank. These pics are from a smaller blank but same principle applies.


Also from your pic, you have the machine feet sitting on blocks of wood. Can't see if that block is recessed for the foot to sit into or not but even if it is, don't believe it's the best set-up especially if you plan on doing big out of round pieces alot. If one of those feet ever vibrates out, your going to be trying to catch 700+ pounds of machine from tipping over........don't ask how I know. Here's what I did to a previous machine that I needed to jack up in the air. Just replaced the caster stem with enough length to go thru the spacer. Other ways work also. Maybe you do but I'd question you having good machine contact with the floor when spinning big pieces like you have shown.

Leo
It’s in a big garbage bag waiting for me to get back to it. I’d did not spray it. Hope it’s still ok. Starting from center where it’s mostly flat is a great idea! I only get an hour here and there, so no way I could get it roughed out in one day. Maybe once I retire!
Dave
I never thought of doing more with chainsaw. I round it on bandsaw, but it’s hard to control on that small table. Love the idea of using the chainsaw to round it and do some initial shaping.
I do have indents for the blocks under the feet, but I’m not happy with the stability. I’m going to replace the blocks with 4x4 laying down and bolt the legs to that. Thanks for the heads up. I’ll be real careful until it’s replaced.
Latest chunk of firewood turned into something.


Walnut cake stand. Need to smooth the transition from the neck to the top, sand the neck and then make the base concave on the bottom. I sourced a plexiglass 12 inch dome on Amazon. It will sit in a groove on top of the stand.

I have been roughing out some Ambrosia maple hollow forms/urns. This tree has spectacular colour but it must have been home to an old tree fort. I think I have found at least one nail in every piece I have turned from it so far, including one deep inside the taller vessel. Luckily they have all been relatively small. The black stain from the iron is a good indicator that there is a nail or some kind of iron is in there when you are working on the outside of the wood, unfortunately there is no warning when you are hollowing until you hear the unmistakable tick-tick-tick.
Attachments

Does the pattern match both sides on the squat one? Either way that one is going to look awesome finished with the pattern up from the bottom like that!I have been roughing out some Ambrosia maple hollow forms/urns. This tree has spectacular colour but it must have been home to an old tree fort. I think I have found at least one nail in every piece I have turned from it so far, including one deep inside the taller vessel. Luckily they have all been relatively small. The black stain from the iron is a good indicator that there is a nail or some kind of iron is in there when you are working on the outside of the wood, unfortunately there is no warning when you are hollowing until you hear the unmistakable tick-tick-tick.
Dave, that riser set up you have does not look steady. I put my 3520A up on a 4 by 4, and drilled a slight recess into the top for the leveling feet to go into. Your set up looks to be 6 to 8 inches high, so that would have been a 4 by 6 or 4 by 8. That high up, I would have put cross bracing up as well.
robo hippy
robo hippy
Torreya (aka Stinking Cedar) destined to be a bowl. Likely the rarest wood I’ll turn. Note, I said rarest, not nicest 

Robo,Dave, that riser set up you have does not look steady. I put my 3520A up on a 4 by 4, and drilled a slight recess into the top for the leveling feet to go into. Your set up looks to be 6 to 8 inches high, so that would have been a 4 by 6 or 4 by 8. That high up, I would have put cross bracing up as well.
robo hippy
Actually, it was very stable. Since my basement floor where the machine was located is sloped in x, y & z, all 4 contact points were different. Each spacer was a different height. Tailstock spacers were something like 2" on front side & 2.5" on the back side difference from headstock spacers. All in attempt to get spindle center to 51" (just where I like it). That picture was taken after the fact so that's why there's a stick under the caster, just to keep the machine level in another spot in the shop (with a more sloped floor!). The Vic with independent adjustable legs solved all of that drama.

Making either stools or plant stands....haven't decided which yet. This blank was 12/4 with a lot of checks and defects on both sides. Was able to turn off enough wood to get a defect free blank. Wiped on a little mineral spirits to see which side I wanted to meet your bottom side. If your the first to correctly guess the species, I will pay for a night stay in the Nob Hill Arkansas Hilton!
Hickory?
Nope, growth rings too far apart for hickory.Hickory?
Hint, there is a bit of yellow tinge on the left side which is common in this species.
Well, only yellow wood I'm familiar with is hedge apple but I don't think it checks much. Or mulberry I guess.
Larry, is it Kentucky Coffee Tree?
I hope it's a coffee tree, I know where there is one of those on the ground. Pretty neat grain if it is.
It's pretty wood, Coffee tree u say
elm?
Odie
Panning for Montana gold, with Betsy, the mule!
Odie
Panning for Montana gold, with Betsy, the mule!
Red Mallee burl from Australia.....


Another fine example of your work!
I used some DO last night and I might be a convert.
I used some DO last night and I might be a convert.
Whew, you guys made some good guesses! I was scared I might have to put somebody up in the Nob Hill Hilton.
Its sweet gum.

Fresh off my sawmill a few years ago.
Its sweet gum.
Fresh off my sawmill a few years ago.
Sweetgum! Oh nice—the longer it sits, the prettier it gets.
Cool, I love sweetgum. I hate the tree because of all the stupid gumballs in my yard, but it can make some nice turnings. (And I was gonna guess mulberry).
Playing around with iridescent paints on a small cherry hollow form

It does look like Siberian Elm with the light and dark grain and wide year rings, but the zigzag wwww are not there that I can see, though some does look like, and no I have never turned Sweet Gum, or else I would probably known it.View attachment 52145
Making either stools or plant stands....haven't decided which yet. This blank was 12/4 with a lot of checks and defects on both sides. Was able to turn off enough wood to get a defect free blank. Wiped on a little mineral spirits to see which side I wanted to meet your bottom side. If your the first to correctly guess the species, I will pay for a night stay in the Nob Hill Arkansas Hilton!
Here is a Siberian Elm bowl.

Some progress on the Torreya bowl I posted yesterday. Going for a traditional calabash form. The Torreya is forcing me to take......my......timmmmeee. The wood is dry, super soft, and really prone to intense tearout. An insult to John Jordan, for sure. That said, despite the difficulties, the grain is really beautiful. Shellac, a spindle detail gouge, and sheer scraping with my 3/8" bowl gouge is the combo that gets me clean cuts. I did some preliminary sanding at 150g to check on the form. Still a little bit of work left to do on the bottom as well as the top 1/4 of the bowl. Then on to the interior. I'm getting there, slowly but surely.

Is that a USC Trojan logo?finally got to get back to the lathe. 18" diameter walnut. largest I've ever turned. first time turning completely with the headstock pivoted 180 and using the outrigger. will post it to my album when finished
You use a dovetail with your "c" jaws or you have changed them out?Some progress on the Torreya bowl I posted yesterday. Going for a traditional calabash form. The Torreya is forcing me to take......my......timmmmeee. The wood is dry, super soft, and really prone to intense tearout. An insult to John Jordan, for sure. That said, despite the difficulties, the grain is really beautiful. Shellac, a spindle detail gouge, and sheer scraping with my 3/8" bowl gouge is the combo that gets me clean cuts. I did some preliminary sanding at 150g to check on the form. Still a little bit of work left to do on the bottom as well as the top 1/4 of the bowl. Then on to the interior. I'm getting there, slowly but surely.
View attachment 52170
I do use a dovetail with the C jaws. A little bit more of a relaxed angle than with proper dovetail jaws. Mostly out of habit, but I do feel like I get a better grip/bite with the stepped jaws if the angle is less than 90 degrees. Of course, the flat shoulder is the most important thing.You use a dovetail with your "c" jaws or you have changed them out?
You are a brave man Michael, a dry Cedar/softwood into a deeper bowl, certainly not suitable for scrapers IMO and course sandpaper is not kind to this soft wood, and yes you will need to take your time.Some progress on the Torreya bowl I posted yesterday. Going for a traditional calabash form. The Torreya is forcing me to take......my......timmmmeee. The wood is dry, super soft, and really prone to intense tearout. An insult to John Jordan, for sure. That said, despite the difficulties, the grain is really beautiful. Shellac, a spindle detail gouge, and sheer scraping with my 3/8" bowl gouge is the combo that gets me clean cuts. I did some preliminary sanding at 150g to check on the form. Still a little bit of work left to do on the bottom as well as the top 1/4 of the bowl. Then on to the interior. I'm getting there, slowly but surely.
View attachment 52170
I see some splits in it already, my experience is that Cedar does like to do that, anyway good luck, and oh ja be careful with oils as a finish, the soft wood will like to soak it up like it is going out of stile
I hope you will get a beauty, I'm waiting for it.
Thanks, Leo--it's certainly an adventure! The splits were there from the get go, unfortunately. Less than ideal--normally, I would turn them away, but in this case, given the rarity of the wood, I'm just going to deal with them. The exterior has been challenging enough, and I suspect the interior will be even more so. I'm planning to do the bulk of the hollowing and then finish with a Hunter Badger. I think that will give me the best chance at a clean interior.You are a brave man Michael, a dry Cedar/softwood into a deeper bowl, certainly not suitable for scrapers IMO and course sandpaper is not kind to this soft wood, and yes you will need to take your time.
I see some splits in it already, my experience is that Cedar does like to do that, anyway good luck, and oh ja be careful with oils as a finish, the soft wood will like to soak it up like it is going out of stile
I hope you will get a beauty, I'm waiting for it.
I have one other blank that is smaller and cleaner....but I'll probably save that one for another time when I get bored haha.
Good call with avoiding an oil finish. Given the slow progress, I've had a lot of time to ponder what to use. I'm leaning toward Minwax Polycrylic.
- Joined
- Apr 8, 2009
- Messages
- 17
- Likes
- 5
Nice work and beautiful lathe!A piece of straight- grain madrone that’s been hanging around as a roughout for far too long…
View attachment 50297
As an aside - I’m in the same camp as Neil. At least 90% of the bowls I turn are footed. An open form bowl with a beautifully flowing curve from rim to foot appears to float above the surface it’s on - anchored only by the well executed foot. Its an illusion not shared by a footless form. Rant concluded…