• We just finished moving the forums to a new hosting server. It looks like everything is functioning correctly but if you find a problem please report it in the Forum Technical Support Forum (click here) or email us at forum_moderator AT aawforum.org. Thanks!
  • Beware of Counterfeit Woodturning Tools (click here for details)
  • Johnathan Silwones is starting a new AAW chapter, Southern Alleghenies Woodturners, in Johnstown, PA. (click here for details)
  • Congratulations to Dave Roberts for "2 Hats" being selected as Turning of the Week for April 22, 2024 (click here for details)
  • Welcome new registering member. Your username must be your real First and Last name (for example: John Doe). "Screen names" and "handles" are not allowed and your registration will be deleted if you don't use your real name. Also, do not use all caps nor all lower case.

What’s on your lathe?

Joined
Jul 18, 2018
Messages
1,073
Likes
1,760
Location
Baltimore, MD
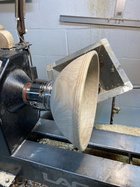
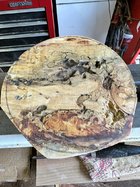
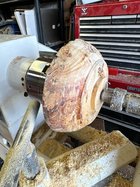
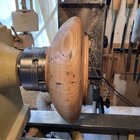
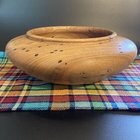
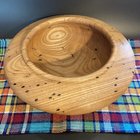
The ash blank that I just turned this bowl from has been on the shelf drying for about two years. I wish it didn’t have the bug tunnels, but some folks seem to actually prefer the “character” they impart to a piece of Un-buggy wood. Go figure! The bowl is 11 1/2” diameter by 4” tall.
 

Attachments

  • 039FC042-20CA-4C8D-BCF7-83094B80C659.jpeg
    039FC042-20CA-4C8D-BCF7-83094B80C659.jpeg
    743.4 KB · Views: 29
  • 4D7F3E3D-51A7-493E-8B89-2149162589D2.jpeg
    4D7F3E3D-51A7-493E-8B89-2149162589D2.jpeg
    921.2 KB · Views: 29
  • D76CFC7A-2498-4546-A70F-0CADCF251830.jpeg
    D76CFC7A-2498-4546-A70F-0CADCF251830.jpeg
    1 MB · Views: 28
Joined
Oct 13, 2016
Messages
1,067
Likes
1,549
Location
Rainy River District Ontario Canada
Finished the exterior and hollowing the interior of the Torreya calabash. Tomorrow I’ll sand the interior and work on fixing some cracks and other things. The light at the end of the tunnel is finally visible. Whew!
View attachment 52185
Hopefully you have some of the bark left to pulverize and fill the crotch and bark inclusions that are missing some of it, a blender would make quick work of a small chunk of bark, CA soak will keep it in place, so far so good 1thumb.gif
 

Michael Anderson

Super Moderator
Staff member
TOTW Team
Joined
Aug 22, 2022
Messages
1,359
Likes
3,908
Location
Chattanooga, TN
Hopefully you have some of the bark left to pulverize and fill the crotch and bark inclusions that are missing some of it, a blender would make quick work of a small chunk of bark, CA soak will keep it in place, so far so good View attachment 52195
Thank you! That’s a great idea about the pulverized bark. Didn’t even cross my mind.
 
Last edited:
Joined
Feb 7, 2023
Messages
295
Likes
1,704
Location
Gardner, MA
Well............................two things.

I'm in no way ever going to be confused with a painter!
Plus if you get to close to a spinning chunk of wood with a sharp object you just may take a big chunk out of your work and have to start over!!
My humble 3rd rendition of a light house. Tried to make it look old and weathered.
IMG_4627.JPG
 
Joined
May 30, 2022
Messages
242
Likes
249
Location
Belchertown, MA
Mike,
Also from your pic, you have the machine feet sitting on blocks of wood. Can't see if that block is recessed for the foot to sit into or not but even if it is, don't believe it's the best set-up especially if you plan on doing big out of round pieces alot. If one of those feet ever vibrates out, you’re going to be trying to catch 700+ pounds of machine from tipping over........don't ask how I know. Here's what I did to a previous machine that I needed to jack up in the air.

Dave

I took your observation to heart. I used an old landscape timber, cut it to size, and bolted it between the leg and the PM riser using 3/8 x 7 bolts. Not only is it safer but it’s more stable too.

I was surprised to find that the bolts PM uses for the feet and leg extension is an oddball size 1/-12. That’s why I used 3/8 thru bolts instead.
 

Attachments

  • ED67F285-AD73-4790-BE06-57264B9680F2.jpeg
    ED67F285-AD73-4790-BE06-57264B9680F2.jpeg
    315.8 KB · Views: 42
Joined
Oct 3, 2013
Messages
169
Likes
229
Location
Ambridge, PA
Dave

I took your observation to heart. I used an old landscape timber, cut it to size, and bolted it between the leg and the PM riser using 3/8 x 7 bolts. Not only is it safer but it’s more stable too.

I was surprised to find that the bolts PM uses for the feet and leg extension is an oddball size 1/-12. That’s why I used 3/8 thru bolts instead.
Very nice modification Mike.
 
Joined
Mar 14, 2022
Messages
65
Likes
60
Location
Salt Lake City, UT
That’s what I ended up doing. I added a few coffee beans to the bark to darken the fill a bit.
View attachment 52211
My wife drinks tea that she buys in bulk. I have tried some used tea leaves from the strainer in a grinder. I like that there are a variety of colors and it is natural. I would imagine that adding a bit of the bark would create a very nice filler matieral.
 

Michael Anderson

Super Moderator
Staff member
TOTW Team
Joined
Aug 22, 2022
Messages
1,359
Likes
3,908
Location
Chattanooga, TN
Todays task on this never ending Torreya project is to repair and/or mitigate the cracks. I’m using a variety of techniques. In this case, pewa/butterflies/dutchmen for the more serious/cluttered areas. Other areas are getting other types of repairs.

17863997-543B-4DF4-9A55-045F3584C3FF.jpeg

Apologies if it seems like I’m spamming this thread with my progress photos. It’s an effective way to keep me motivated during this bowl project. o_O
 
Joined
Oct 13, 2016
Messages
1,067
Likes
1,549
Location
Rainy River District Ontario Canada
Todays task on this never ending Torreya project is to repair and/or mitigate the cracks. I’m using a variety of techniques. In this case, pewa/butterflies/dutchmen for the more serious/cluttered areas. Other areas are getting other types of repairs.

View attachment 52213

Apologies if it seems like I’m spamming this thread with my progress photos. It’s an effective way to keep me motivated during this bowl project. o_O
Michael, we/I like pictures of what different turners do with/on their pieces, it also keeps the forum "alive", I have used staples that I made, to keep splits from opening more, or preventing from happening.

Some of the staples got relocated after finish turning in a obscure location, but the important part is that they do work well.

Staple keeping split closed.jpg Black Cherry crotch with staple.jpg


Beech bowl with staple.jpg

Black Walnut crotch with staple.jpg
 
Last edited:

Michael Anderson

Super Moderator
Staff member
TOTW Team
Joined
Aug 22, 2022
Messages
1,359
Likes
3,908
Location
Chattanooga, TN
Thanks, Leo. I always appreciate the example photos. I’ve used staples a handful of times, salvaged from copper wire or coat hanger wire. Here’s the most recent:
0CC616E5-6228-4AFD-B52E-178A8EF6553A.jpeg
Very effective method for keeping cracks from opening. For this one I wanted to stick with wooden repairs. Partly for the challenge, partly for practice, partly for tradition, and partly just for fun :)
 

Michael Anderson

Super Moderator
Staff member
TOTW Team
Joined
Aug 22, 2022
Messages
1,359
Likes
3,908
Location
Chattanooga, TN
This will likely be the last progress photo of the Torreya calabash I’m working on. Yesterday, I managed to inlay 6 Walnut pewa. Today’s task is to add a few small Wenge pewa and a couple of Mahogany poho patches to some weak endgrain. I think that will complete all the inlays. Tomorrow, I hope to do my final sanding and start the finishing process. Here is the final layout before I start cutting into the bowl.

FF83E079-B42B-42DD-B17A-7736AE9B2541.jpeg
 
Last edited:
Joined
Jan 23, 2023
Messages
168
Likes
227
Location
Calgary, AL
This will likely be the last progress photo of the Torreya calabash I’m working on. Yesterday, I managed to inlay 6 Walnut pewa. Today’s task is to add a few small Wenge pewa and a couple of Mahogany poho patches to some weak endgrain. I think that will complete all the inlays. Tomorrow, I hope to do my final sanding start the finishing process. Here is the final layout before I start cutting into the bowl.

View attachment 52244
Neat idea Michael. How do you cut the pockets for the patches/Dutchman? By hand? or router with a jig?
Be safe and stay well.
Barry W. Larson
Calgary, Alberta, Canada eh!
 

Michael Anderson

Super Moderator
Staff member
TOTW Team
Joined
Aug 22, 2022
Messages
1,359
Likes
3,908
Location
Chattanooga, TN
Heya Barry! For a couple of the larger Dutchmen I used a router and jig from Slabstitcher. It’s meant for flatwork, so it took some finagling to get the angles right. For the other ones, I’ve been hogging out the majority with a palm router, and then use a chisel to clean up the edges and corners. The problem with this method is the router follows the contour of the bowl, which means I need to sand away the same profile in the back of each inlay. The benefit of the jig is that it cuts in one plane, so I can just inlay the patch the same way I would with flatwork.
 
Joined
Jan 23, 2023
Messages
168
Likes
227
Location
Calgary, AL
Heya Barry! For a couple of the larger Dutchmen I used a router and jig from Slabstitcher. It’s meant for flatwork, so it took some finagling to get the angles right. For the other ones, I’ve been hogging out the majority with a palm router, and then use a chisel to clean up the edges and corners. The problem with this method is the router follows the contour of the bowl, which means I need to sand away the same profile in the back of each inlay. The benefit of the jig is that it cuts in one plane, so I can just inlay the patch the same way I would with flatwork.
Thanks Michael. I like the effect, so I'll be doing some experimenting. I built a jig for flatwork some time ago; from you comment I just need to experiment in applying it to round work! If you have some pictures of your jig in use they would be appreciated.
Be safe and stay well.
Barry
 

Michael Anderson

Super Moderator
Staff member
TOTW Team
Joined
Aug 22, 2022
Messages
1,359
Likes
3,908
Location
Chattanooga, TN
I thought I had taken a photo during the process, but I guess not. Here’s a photo of the removed template that shows some shims I taped to the backside. This stabilized the jig so that it sat on a tangent to the bowl’s curve. I then taped it to the bowl itself so it wouldn’t move around during routing.
184A0AFA-A603-45A2-8074-E405B7EC1FC0.jpeg
 

Michael Anderson

Super Moderator
Staff member
TOTW Team
Joined
Aug 22, 2022
Messages
1,359
Likes
3,908
Location
Chattanooga, TN
Nice, Monty. That form is looking great so far. I haven’t heard of Obeche before. Thanks for the link. It almost looks like a light colored Mahogany.
 
Joined
Oct 6, 2022
Messages
352
Likes
937
Location
Brenham, Texas
Nice, Monty. That form is looking great so far. I haven’t heard of Obeche before. Thanks for the link. It almost looks like a light colored Mahogany.
The wood came from English Woods in a "selection box" with some other woods that are uncommon here. Cost of the wood was reasonable and the quality was excellent, but shipping was egregious.
 
Last edited:
Joined
Jan 23, 2023
Messages
168
Likes
227
Location
Calgary, AL
I thought I had taken a photo during the process, but I guess not. Here’s a photo of the removed template that shows some shims I taped to the backside. This stabilized the jig so that it sat on a tangent to the bowl’s curve. I then taped it to the bowl itself so it wouldn’t move around during routing.
View attachment 52248
Perfect! Thanks Michael. Useful stuff that blue tape!
Be safe and stay well.
Barry
 
Back
Top