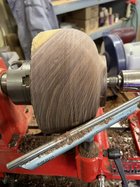
Unseasoned bowls are roughed out, using faceplate for outside, and then using a chuck gripping a tenon for removing the interior.
Then bowls are prepared with full coverage anchorseal.....if over 14% MC.
Bowls are then seasoned by weight until stabilized for a minimum of 3 months without change in weight.....sometimes longer, depending on the season of the year. (Usually longer during the winter months, or when I decide more time is necessary, or appropriate.)
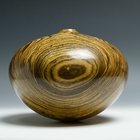
Seasoned bowls are then mounted to waste blocks and second, or finish turned.
@Paul May ,
this is the point where you see the above bowl in post #2382, and this is where I normally turn the outside first, and then the interior. Because finish turning the interior usually results in some additional warpage, resulting from the wall thickness becoming much thinner.....and warpage a major contributor to loss of geometric integrity.
-o-

")


")