• We just finished moving the forums to a new hosting server. It looks like everything is functioning correctly but if you find a problem please report it in the Forum Technical Support Forum (click here) or email us at forum_moderator AT aawforum.org. Thanks!
  • Beware of Counterfeit Woodturning Tools (click here for details)
  • Johnathan Silwones is starting a new AAW chapter, Southern Alleghenies Woodturners, in Johnstown, PA. (click here for details)
  • Congratulations to Dave Roberts for "2 Hats" being selected as Turning of the Week for April 22, 2024 (click here for details)
  • Welcome new registering member. Your username must be your real First and Last name (for example: John Doe). "Screen names" and "handles" are not allowed and your registration will be deleted if you don't use your real name. Also, do not use all caps nor all lower case.

What’s on your lathe?

odie

TOTW Team
Joined
Dec 22, 2006
Messages
7,116
Likes
9,837
Location
Panning for Montana gold, with Betsy, the mule!
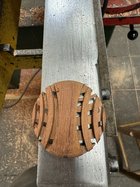
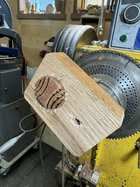
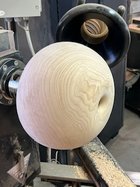
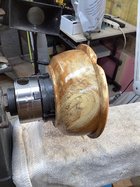
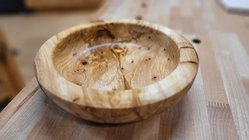
Was able to finish this Cottonwood burl bowl this evening. Tore up some of my sanding discs and paper, but did manage reasonably well. This is the bowl I was working on when I mentioned about using a Sharpie pen to ID spots while turning. As you can see, the problem void was reduced a little, but the wall thickness was a major problem, and couldn't go any further than this.....did turn out good enough to sell, though.....someone out there wants a really gnarly Cottonwood burl bowl! Big voids have always been a real problem for my style of multi-faceted turning.....but, I don't let that prevent me from acquiring great examples when I see them!

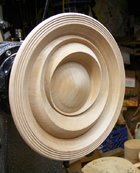
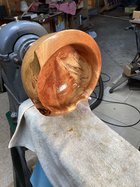
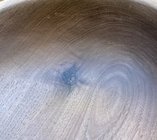
The photo on the left shows some great chatoyance showing up in the interior.....this nice attribute will be enhanced when it gets the Beall 3-step buff treatment. :)

-o-


20240210_221208.jpg 20240210_221238.jpg
 
Last edited:
Joined
Sep 5, 2023
Messages
66
Likes
382
Location
East Northport, NY
I'm describing it as a bolt-on CNC, so the lathe itself becomes a 4-axis CNC. It moves linearly in X and Z (parallel and perpendicular to the ways), the lathe spindle rotates from a pulley on the handwheel, and the tool sits on a "B" axis so it can set the tool normal to any surface of the bowl (on the exterior). The hard part is the software. This is really just (another) test. It does really work nicely for putting in pewas.
Look expensive?
 
Joined
Nov 27, 2021
Messages
55
Likes
139
Location
Silver Spring, MD
Website
discord.gg
Look expensive?
Most of the parts I already had sitting around, so I only spent around $200 and nearly half of that was the router. If I was building it from scratch using the same concept with slightly different components, I think it would be around $700 in parts for the motion system. I'm kind of entertaining the idea of selling kits that would fit any lathe with 14" swing or greater.
 
Joined
Feb 18, 2023
Messages
615
Likes
1,112
Location
Orange, CA
Most of the parts I already had sitting around, so I only spent around $200 and nearly half of that was the router. If I was building it from scratch using the same concept with slightly different components, I think it would be around $700 in parts for the motion system. I'm kind of entertaining the idea of selling kits that would fit any lathe with 14" swing or greater.
That would be great especially if you had a training video or two to go with it. Brilliant.
 
Joined
Feb 18, 2023
Messages
615
Likes
1,112
Location
Orange, CA
I need advice. Turning a nice piece of dry black walnut and noticed this small defect on outside as I shaped. But when I hollowed, it is more obvious and ugly on inside bottom. How to disguise/fix? Last picture a close up of interior defect, inside not sanded yet.
put in brown CA, then coffee grounds and some thin CA over that. Nice and smooth sanded to 3000 but still ugly. But with a coat of oil, it then blends in well. IMG_5299.jpeg
 

Attachments

  • IMG_5294.jpeg
    IMG_5294.jpeg
    615.5 KB · Views: 42
Last edited:
Joined
Feb 18, 2023
Messages
615
Likes
1,112
Location
Orange, CA
Those little imperfections add character to turnings. Often have to use CA to fill cracks or bug holes as that is the wood on hand. Usually spray the area with Shellac before applying CA glue which helps keep the CA from staining the area around the cracks/holes. Your repair looks good to me.
learning a lot on this site. Glad to be corrected and advised. I have a mentor but I only see him every couple weeks. The “mentors” here are much more available.
 
Joined
Oct 16, 2004
Messages
13
Likes
41
Location
Winona, MN
Website
www.instagram.com
From that ... to this.
A colleague of a friend wanted a quickie demo, saw this sumac offcut, and joked that while this is interesting looking wood it's too bad that you can't turn it.
So, I pinched it between centers, and it turned out that something could be turned out. It's clunky, but he went back to St. Louis with a prized souvenir.
 

Attachments

  • 20240207_175334.jpg
    20240207_175334.jpg
    459 KB · Views: 33
  • 20240207_153504.jpg
    20240207_153504.jpg
    611.3 KB · Views: 33
Joined
May 28, 2015
Messages
1,554
Likes
178
Location
Bainbridge Island, WA
Historic elm tree from our island taken down in November when it started dropping tree-sized limbs on carport. First photo is a piece similar to several others we cut. Green bowl is ~11 but short due to deep bark inclusions, but I left quite a bit of bark on the outside. Our artsie folks appreciate that peek at nature. Fingers crossed for the drying process.
 

Attachments

  • 20231202_133633.jpg
    20231202_133633.jpg
    643.9 KB · Views: 33
  • 20240211_170214.jpg
    20240211_170214.jpg
    140.2 KB · Views: 33
  • 20240211_152603.jpg
    20240211_152603.jpg
    199.4 KB · Views: 33
Joined
Feb 11, 2022
Messages
92
Likes
136
Location
Fort Bragg, CA
Brian Havens who has not done any videos in a while used plastic straws to demonstrate grain orientation, and I will resurrect his straw idea when I do a new bowl turning video.

robo hippy
Sadly, Brian Havens had been gone for a few years. I learned a lot from his videos when I was getting started turning
 
Joined
Sep 19, 2023
Messages
395
Likes
604
Location
Columbia, TN
Those little imperfections add character to turnings. Often have to use CA to fill cracks or bug holes as that is the wood on hand. Usually spray the area with Shellac before applying CA glue which helps keep the CA from staining the area around the cracks/holes. Your repair looks good to me.
I agree. I rarely try to fix things like that. Not every piece is the same, of course, and there are always exceptions.

I subscribe to the Japanese theory of Wabi-Sabi.
 
Joined
Jul 27, 2020
Messages
300
Likes
1,214
Location
Durham, NC
Damn. You are right. I need better glasses.
Sorry, Alan. I was a bit rude and blunt.
Truly though, sanding for a great finish is a difficult aspect to our craft. Doing it well and proper can make even a simple bowl sing.
There will be another unclean section in your piece 180 degrees from what you show in your pic. These are the difficult areas always.
In addition to what has been said already, don’t use dull sandpaper. If you’re not sure, you are, and it is dull. The roughness of the paper will still hog away the flat grain/side grain, but isn’t sharp enough to cut the endgrain areas so won’t fix the problem and will introduce more trouble by knocking the bowl out of round.
Work with fresh, new, sharp paper and stay with 120 until all defects have been corrected. Really important to persevere on this. Afterward, the rest of the sanding will move smoothly and quickly.
 
Joined
Feb 18, 2023
Messages
615
Likes
1,112
Location
Orange, CA
Sorry, Alan. I was a bit rude and blunt.
Truly though, sanding for a great finish is a difficult aspect to our craft. Doing it well and proper can make even a simple bowl sing.
There will be another unclean section in your piece 180 degrees from what you show in your pic. These are the difficult areas always.
In addition to what has been said already, don’t use dull sandpaper. If you’re not sure, you are, and it is dull. The roughness of the paper will still hog away the flat grain/side grain, but isn’t sharp enough to cut the endgrain areas so won’t fix the problem and will introduce more trouble by knocking the bowl out of round.
Work with fresh, new, sharp paper and stay with 120 until all defects have been corrected. Really important to persevere on this. Afterward, the rest of the sanding will move smoothly and quickly.
I have thick skin. No problem being blunt. I hate sanding and often find myself having to backtrack a few grits when some new defect pops up—I think I need better lighting. Your comments are appropriate and helpful.
 
Joined
Dec 28, 2019
Messages
456
Likes
480
Location
Tallahassee, FL
hmm looks like small snowman eyeballs and buttons too.
My FiL has been making Christmas themed ornaments for the family for almost 30 years and so he's done all the common themes, snowman, hats, bells, spires, birdhouses and some uncommon ones like Cat in the Hat and hot air balloons. So trying to find a theme he hasn't turned is getting hard. I was going to do cardinals for this year but he did ducks for 2023 and I thought another bird was too close to his theme. So this year's theme is a mouse in honor of a "Twas a Night before Christmas" and now I have more than a year to think of next year's theme. :D
I could just not turn ornaments but they're fun and quick to do. I turn something quick like an ornament when I start turning for the day as a warm up exercise.
 
Last edited:
Joined
Aug 14, 2007
Messages
5,491
Likes
2,841
Location
Eugene, OR
I did a crank shaft turn some years back. It was a really fun project. Good practice for off set centers. Mine was for a 6 cylinder....

robo hippy
 

Tom Gall

TOTW Team
Joined
Feb 20, 2013
Messages
965
Likes
1,776
Location
Hillsborough, NJ
My FiL has been making Christmas themed ornaments for the family for almost 30 years and so he's done all the common themes, snowman, hats, bells, spires, birdhouses and some uncommon ones like Cat in the Hat and hot air balloons. So trying to find a theme he hasn't turned is getting hard. I was going to do cardinals for this year but he did ducks for 2023 and I thought another bird was too close to his theme. So this year's theme is a mouse in honor of a "Twas a Night before Christmas" and now I have more than a year to think of next year's theme. :D
I could just not turn ornaments but they're fun and quick to do. I turn something quick like an ornament when I start turning for the day as a warm up exercise.
I'm jealous. I'm also the "Procrastinator in Chief". I've been making a different style ornament for about 35 years (missed 2-3 years), and coming up with a new design/technique can be difficult. I usually don't start designing until mid-December. Started designing earlier in December this year because I had to make both 2022 & 2023 ornaments. Didn't finish the last one until late on Christmas Eve. Fortunately/unfortunately (?) I had fewer ornaments to make this year. And .... I don't find them quick to make. :( 
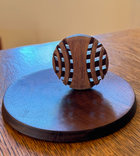
I still have to make my own ornaments, but haven't been in the shop since Christmas Eve.
 

odie

TOTW Team
Joined
Dec 22, 2006
Messages
7,116
Likes
9,837
Location
Panning for Montana gold, with Betsy, the mule!
Was up till midnight working on this 12" diameter Goncalo Alves bowl last night. Too bad the figuring didn't turn out as good as I'd hoped, but still an acceptable bowl.

This photo shows the tooled interior just prior to sanding. Most of you will know how difficult bone-dry and dense Goncalo Alves is for getting a tearout free surface. The interior has some faint end grain tearout that was delt with using the "60gt gouge"!
20240214_215417.jpg
These two photos were taken shortly after the D.O. was applied:
20240214_232816.jpg 20240214_232845.jpg

-o-
 
Last edited:
Joined
Apr 30, 2022
Messages
455
Likes
2,274
Location
Beavercreek, OH
Website
www.ovwg.org
Was up till midnight working on this 12" diameter Goncalo Alves bowl last night. Too bad the figuring didn't turn out as good as I'd hoped, but still an acceptable bowl.

This photo shows the tooled interior just prior to sanding. Most of you will know how difficult bone-dry and dense Goncalo Alves is for getting a tearout free surface. The interior has some faint end grain tearout that was delt with using the "60gt gouge"!
View attachment 60539
These two photos were taken shortly after the D.O. was applied:
View attachment 60540 View attachment 60541

-o-
It still looks nice! The form though will always be recognized as your signature work!
 
Joined
Nov 27, 2021
Messages
55
Likes
139
Location
Silver Spring, MD
Website
discord.gg
You tube sent me a suggestion for this guy and it made me think of your post here.
His is more low tech I guess you'd say. Have you ever seen him?

View: https://youtu.be/LJh6uIpDQ8o?si=IPp2WObnrA6P1v_g
That's very cool! I love the low tech, but highly functional approach.

For a variety of reasons, I've not wanted to get into making the overall form of pieces with the CNC. I really enjoy turning the form by hand and working on improving my technique. I see the CNC as primarily an embellishment tool. I've done some yarn bowls with it, which makes them close to painless. And doing pewas fast is a real treat.
 
Joined
Feb 7, 2023
Messages
295
Likes
1,707
Location
Gardner, MA
Grabbed a piece of Catalpa from the same log I cut last time. This time it warped on the lathe so bad I couldn't finish turning it! I sanded as best I could but even that wasn't fun!
bowedmuch.jpg
 

Tom Gall

TOTW Team
Joined
Feb 20, 2013
Messages
965
Likes
1,776
Location
Hillsborough, NJ
Practice for an upcoming demo
Nice ... well defined and nice OC spacing! Are you using a vacuum chuck, a multi-axis tenon, or just shifting the tenon in the chuck for mounting? I can't remember the name of the Canadian turner that used this technique to great effect.
 
Back
Top