and down the rabbit hole he goes . . .Going to start with this one…

Power Pro
Compare the Power Pro with machines costing hundreds more. The brushless motor style handpiece not only puts out 10N.CM making it one of the most powerful handpieces out there, but it will go up to 90,000rpms. With 180 watts of power, this machine will glide through your carvings. You will be...powercarvingdepot.com

-
It's time to cast your vote in the March 2026 Turning Challenge. (click here for details) -
Congratulations to Chris Lawrence for "Dragon's Grip" being selected as Turning of the Week for March 30, 2026 (click here for details) -
Welcome new registering member. Your username must be your real First and Last name (for example: John Doe). "Screen names" and "handles" are not allowed and your registration will be deleted if you don't use your real name. Also, do not use all caps nor all lower case.
You are using an out of date browser. It may not display this or other websites correctly.
You should upgrade or use an alternative browser.
You should upgrade or use an alternative browser.
What’s on your lathe?
- Thread starter Rusty Nesmith
- Start date
This rabbit hole only has two entrances, one for bowls and one for hollow formsand down the rabbit hole he goes . . .
 ! The carving is just to maintain the the appearance of the structure
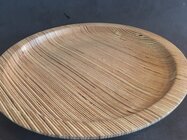
Curve continued and foot removed.
Finished with black dye that I sanded off to reveal the grain. Blue dye added with green and yellow dappled in for highlights. Finished with friction polish.

Finished with black dye that I sanded off to reveal the grain. Blue dye added with green and yellow dappled in for highlights. Finished with friction polish.
Same.We’ve all done that and I did it recently.
Odie
Panning for Montana gold, with Betsy, the mule!
Doing some serious sanding last evening....!

Forgot to take pictures while on the lathe, but these came off in past couple days. First is segmented piece using aspen, wenge and black dyed veneer. 16 segments per row plus 16 veneer between each segment, total of 17 rows for 527 pieces (bottom is a single piece of wenge). This is 6-3/4” tall x 3-1/8” wide and 3/16” thick.
Second piece is cherry from a tree we took down. I’m playing with this shape, but something’s off - I’ll keep working on it. Piece is 4-7/8” tall x 7-1/4” wide and 3/16” thick.


Second piece is cherry from a tree we took down. I’m playing with this shape, but something’s off - I’ll keep working on it. Piece is 4-7/8” tall x 7-1/4” wide and 3/16” thick.
Tried turning a Camphor live edge. Was on my last piece of sand paper when it caught in the hole and tore the sander out of my hand. This broke the live edge off and turned it into .......


There's always the option of using a black felt tipped marker to stain the exposed edge.
You can take your sander and make your own natural edge with the broken part. Just blend it in with the edge that’s not broken.Tried turning a Camphor live edge. Was on my last piece of sand paper when it caught in the hole and tore the sander out of my hand. This broke the live edge off and turned it into .......
View attachment 75193View attachment 75194
Finished up the walnut hollow form today. It measures 8-3/4” tall x 7-1/2” wide and the base is 2-5/8” per the chart showing hollow form dimensions, base 1/3 the diameter. However it looks fatter in the photo but not in person. I guess it’s true the camera adds 10 pounds.
Also turned a few green walnut bowls.


.Also turned a few green walnut bowls.
However it looks fatter in the photo but not in person.
Maybe try moving the camera back and either using a longer lens if you have one, or zoom in a bit. (Or just take a shot from further back then crop in an image processing program to get the framing you want.) Up close with a wide angle can cause more distortion. That's a common method for portrait photography for several reasons, one, a more flattering perspective of the subject.
JKJ
I think I take the photos to close up and need to zoom out some. It’s amazing how different it looks compared to the photo.Maybe try moving the camera back and either using a longer lens if you have one, or zoom in a bit. (Or just take a shot from further back then crop in an image processing program to get the framing you want.) Up close with a wide angle can cause more distortion. That's a common method for portrait photography for several reasons, one, a more flattering perspective of the subject.
JKJ
- Joined
- Feb 6, 2010
- Messages
- 3,518
- Likes
- 2,596
- Location
- Brandon, MS
- Website
- threeringswoodshop.square.site
When you take the photo your eye adjusts to the perspective or real look. The lens changes this with things like depth of field and distortion of the image such as fisheye (common in closeup lens use). Like JKJ said you can adjust some of this effect in programs and sometimes even with the software on your phone.I think I take the photos to close up and need to zoom out some. It’s amazing how different it looks compared to the photo.
I’ll play with the phone and see if that helps.When you take the photo your eye adjusts to the perspective or real look. The lens changes this with things like depth of field and distortion of the image such as fisheye (common in closeup lens use). Like JKJ said you can adjust some of this effect in programs and sometimes even with the software on your phone.
I think I take the photos to close up and need to zoom out some.
Just to be clear, don't "zoom out" which won't help with the perspective (if you mean what most people do by "zooming out"), but physically move the camera further away and either zoom in (magnify) to frame the shot or crop the photo.
All this can be quite confusing to someone used to thinking in terms of focal length for film camera! What's worse, some phone cameras switch lenses when you zoom in and out (actually, they can seamlessly switch cameras - the technology is exploding).
Fortunately you don't need to know any of that. Just back away from the subject! Fortunately for us, the image resolution on today's digital cameras is incredible compared to what we used even a few decades ago.
I even shot a magazine cover with a phone camera over 10 years ago - I still can't believe the quality even then. We are so spoiled today.
JKJ
The suggestion I got from a teacher was to set your smartphone to 2x or 3x zoom to get a better picture.I think I take the photos to close up and need to zoom out some. It’s amazing how different it looks compared to the photo.
Good instruction! That will force you to not get too close!The suggestion I got from a teacher was to set your smartphone to 2x or 3x zoom to get a better picture.
Another reason for a longer (“ or zoomed in”) lens that can apply to woodturnings - the depth of field is reduced, blurring the background (depending on the lighting, of course) With this, focus is important, sometimes difficult when shooting things that move. A couple of examples, where the background vegetation would be distracting.


BTW, another reason to take portraits of people from a little further away is to make the model feel less “crowded” and more comfortable. But I don’t think a hollow form cares too much…
")
JKJ
Last edited:
Tom Gall
TOTW Team
Only problem with that is that you will lose the continuous curvature of the grain at the rim. However, some may not even notice that ... or even care.You can take your sander and make your own natural edge with the broken part. Just blend it in with the edge that’s not broken.
Hi David. Is the walnut hollow form once-turned or twice turned? I turn mine to 3 /4 inch, dry and then turn Thanks.Finished up the walnut hollow form today. It measures 8-3/4” tall x 7-1/2” wide and the base is 2-5/8” per the chart showing hollow form dimensions, base 1/3 the diameter. However it looks fatter in the photo but not in person. I guess it’s true the camera adds 10 pounds
Also turned a few green walnut bowls.
View attachment 75206
View attachment 75205
View attachment 75204
Here is the finished platter I was complaining about back in post #5,077. Used Watco Danish Oil.


Here is the finished platter I was complaining about back in post #5,077. Used Watco Danish Oil.
View attachment 75223View attachment 75224
That's horrible. You should ship it to me immediately!
- Joined
- Nov 27, 2021
- Messages
- 269
- Likes
- 1,152
- Location
- Silver Spring, MD
- Website
- www.transpirationturning.com
Working on a December hollow form. Inside is done, so it's on a home made mandrel. Final pass and sand left.

This one is once turned. I haven’t tried twice turning HF’s yet but plan to, especially side grain. The end grain doesn’t seem to move as much as the side grain.Hi David. Is the walnut hollow form once-turned or twice turned? I turn mine to 3 /4 inch, dry and then turn Thanks.
- Joined
- Feb 6, 2010
- Messages
- 3,518
- Likes
- 2,596
- Location
- Brandon, MS
- Website
- threeringswoodshop.square.site
So you are hollowing first? I have always turned outside to finish and then hollow. How is this working for you?Working on a December hollow form. Inside is done, so it's on a home made mandrel. Final pass and sand left.
Cherry burl: 6 1/2” wide x 3 1/2” tall.


This one is once turned. I haven’t tried twice turning HF’s yet but plan to, especially side grain. The end grain doesn’t seem to move as much as the side grain.
To get an idea how much wood will warp when drying relative to the orientation and where the blank is cut from the tree, look up the species in a chart, or better, in the online Wood Database. For example, look at Black Cherry:
Black Cherry | The Wood Database (Hardwood)
The volumetric shrinkage is important, but tangential and radial shrinkages can make a big difference for predicting face grain turning warping. The tangential shrinkage often about twice that of the radial shrinkage. That causes warp as face grain (flat sawn) turnings dry. One number, the T/R Ratio, puts both of these together. The higher the T/R ratio, the more warpage.
BTW, tangential is tangent to the rings, looking at the end grain of a cross-cut log section. Radial is across the radius of the log, or to minimize juvenile wood effects, from the pith out towards the bark.
For comparison look at the volumetric shrinkage and T/R ratios of Black Mesquite and Red Oak
Black Mesquite | The Wood Database (Hardwood)
Red Oak | The Wood Database (Hardwood)
So a face (side) grain blank turning might warp far more than an end grain turning. (All this is the reason that quarter-sawn boards are more stable that flat-sawn boards when working with flat wood.)
This is just an average for samples tested - the actual T/R ratio varies with the specific tree, where the blank is cut from the tree, and the proximity to the pith on one side, or worse, reaction wood. Shrinkage along the grain, the longitudinal shrinkage, is usually so small it can be ignored.
If interested, this Wood Database article might be useful:
Dimensional Shrinkage | The Wood Database
The T/R ratio is the reason lidded boxes are often made from end grain blanks so the lid is less likely to stick. My solution to things with lids, such as Beads of Courage boxes, where it is sometimes impractical to avoid turning side grain, is to make tapers on both lid and vessel.
There is far more to the story. The best book I’ve found about wood, how it dries, how it shrinks and far more is Understanding Wood by R. Bruce Hoadley. Unlike some practically unreadable technical writings, Hoadley is both a craftsman and a wood technologist and explains things on our level! I keep an extra copy of the book on hand to lend to those who show an interest.
Sorry for the “blog”; hoping this might be useful to some.
JKJ
Beautiful piece, Joel.
Beautiful!Here is the finished platter I was complaining about back in post #5,077. Used Watco Danish Oil.
View attachment 75223View attachment 75224
Love me some cherry burl. What finish did you use?
Thanks. OB shine juice.Love me some cherry burl. What finish did you use?
I turn the outside first then drill out the middle with a 1/2 inch bit. Hollow out the inside while still attached. Cut off and turn the part that was still hooked by the chuck and reverse it on the mandrel for final smooth and sand. Then finish. Hope I said that right.So you are hollowing first? I have always turned outside to finish and then hollow. How is this working for you?
Scored another batch of maple squares today!

My snuff box from what I learned during Jeff Luedloff’s demo on Saturday when he practiced what he will be doing at the AAW Symposium in June. Pretty happy for my first one.


This is my third attempt at spiral. I decided to make a small fruit bowl, 9" diameter x 2 1/2" tall. White oak with a large undercut rim to replace the inner bead mostly done on an open fluted bowl. It's starting to get a little better/easier to do a good job.
Attachments
Rough out of a maple HF tonight. Wrapped in stretch film and will finish up the outside tomorrow and start on hollowing. About 8” diameter now but debating on going a little smaller and see if I can get more sapwood out.


I like it like that! Use a Steadyrest?Rough out of a maple HF tonight. Wrapped in stretch film and will finish up the outside tomorrow and start on hollowing. About 8” diameter now but debating on going a little smaller and see if I can get more sapwood out.
View attachment 75306
View attachment 75305
No steady rest, I may make one this summer. I’ve not needed one so far but I’m sure it would be a good idea to use one. I’ll definitely need one if I go bigger on HF’s.I like it like that! Use a Steadyrest?
Chunk of apple. Attempting hollow form number 2 for today.

Chunk of apple. Attempting hollow form number 2 for today.
View attachment 75316
Yikes what huge calipers! Somehow I ended up with calipers in 4 or 5 sizes. My favorite for small things (small vessels, ornaments and such) are these made from brass. Maybe I'll make some larger ones. Dual mode.


JKJ