-
It's time to cast your vote in the March 2026 Turning Challenge. (click here for details) -
Congratulations to Chris Lawrence for "Dragon's Grip" being selected as Turning of the Week for March 30, 2026 (click here for details) -
Welcome new registering member. Your username must be your real First and Last name (for example: John Doe). "Screen names" and "handles" are not allowed and your registration will be deleted if you don't use your real name. Also, do not use all caps nor all lower case.
You are using an out of date browser. It may not display this or other websites correctly.
You should upgrade or use an alternative browser.
You should upgrade or use an alternative browser.
What’s on your lathe?
- Thread starter Rusty Nesmith
- Start date
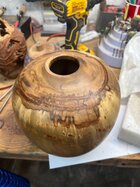
Sweet gum 8” by 7”
Attachments
I turned my wife a cane for her birthday with some wood from my FiL. I could have bought her a nice cane for the price I paid for the hardware. ")

I like it but……what is that piece hiding in the backgroundSweet gum 8” by 7”
 ?????
?????
It’s a reject. My son likes it so I’m cleaning it up to give to him.


Eking out some small pieces from a large wormy cherry burl with rot pockets- found a live grub in a channel in the second piece!
Last edited:
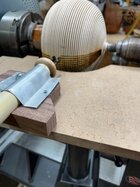
Interesting hollowing tool. Is that shop-made?
No, the boring bar and cutter holder are from Lyle Jamieson. The boring bar is resting on a shim I made for my Trent Bosch hollowing jig.Interesting hollowing tool. Is that shop-made?
Nice cane! Tell your wife I said Happy Birthday!I turned my wife a cane for her birthday with some wood from my FiL. I could have bought her a nice cane for the price I paid for the hardware.
View attachment 75358
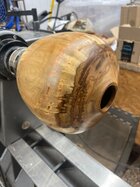
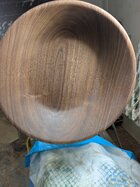
Another leaky vessel.

A friend suggested using a white board behind the lathe to help see the emerging contours.
I got away with using my Kelton mandrel this time but I need to get some plastic pipe sections for reverse chucking pieces with a natural edge opening.
A friend suggested using a white board behind the lathe to help see the emerging contours.
I got away with using my Kelton mandrel this time but I need to get some plastic pipe sections for reverse chucking pieces with a natural edge opening.
Last edited:
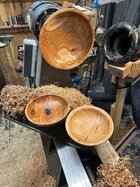
I got some more Elm burl. This one seemed to work out better as natural edge bowls. They were turned to finished thickness and sanded to 180. One has a round bottom, I'm still deciding on the other two.


Finished turning the maple tonight and put a coat of DO on it to try and slow the drying since it was a very wet piece, measures 9-3/4 x 8. May carve some on it once my micro gets here as of now it’s taking a tour of the US thanks to USPS putting it on the wrong truck! It was 3 hours away and it looks like it will take two weeks to get to me!


- Joined
- Feb 6, 2010
- Messages
- 3,518
- Likes
- 2,596
- Location
- Brandon, MS
- Website
- threeringswoodshop.square.site
Told the wife I would do one of these for a while and it came off lathe today. On the finishing table now. Top piece is Red Top, upright is Indian Rosewood, and bottom is walnut.

Wow!Finished turning the maple tonight and put a coat of DO on it to try and slow the drying since it was a very wet piece, measures 9-3/4 x 8. May carve some on it once my micro gets here as of now it’s taking a tour of the US thanks to USPS putting it on the wrong truck! It was 3 hours away and it looks like it will take two weeks to get to me!
View attachment 75384
View attachment 75383
View attachment 75382
Very nice! Good form and beautiful color and figure. I’d almost be afraid to carve on it, wondering if carving might distract the eye from the natural beauty.Finished turning the maple tonight and put a coat of DO on it to try and slow the drying since it was a very wet piece, measures 9-3/4 x 8. May carve some on it once my micro gets here as of now it’s taking a tour of the US thanks to USPS putting it on the wrong truck! It was 3 hours away and it looks like it will take two weeks to get to me!
View attachment 75384
View attachment 75383
View attachment 75382
My general feeling is if the wood is plain, add detail (turned, carved, textured).
JKJ
I’m with John. Just to beautiful of a piece of timber to carve. Plenty of bland stuff out there.Very nice! Good form and beautiful color and figure. I’d almost be afraid to carve on it, wondering if carving might distract the eye from the natural beauty.
My general feeling is if the wood is plain, add detail (turned, carved, textured).
JKJ
@Ted Pelfrey @John K Jordan , I will probably not carve, just wanting to see how good the grain looks when dry.
Turned a walnut hollow form today, little different shape than the vase type I’ve been turning. Still working to get the shape right. It’s 7-1/2” tall and this one may get carved . Have plans for the little raised part on the top but may remove it.


. Have plans for the little raised part on the top but may remove it.Another beauty! Keep churning them out, love seeing them!
A mulberry bowl about 8" with lots of cracks. The "vase" is ash with India ink. The ink got a little thin in spots so I'll have to redo it. I'm not sure yet on finish. I might go with shellac.


I ended up putting 3 coats of the India ink on the carved hollow form I did. I used 0000 steel wool to blend the ink after it was dry and before adding another coat, really helped the look.A mulberry bowl about 8" with lots of cracks. The "vase" is ash with India ink. The ink got a little thin in spots so I'll have to redo it. I'm not sure yet on finish. I might go with shellac.
View attachment 75449View attachment 75450
I ended up putting 3 coats of the India ink on the carved hollow form I did. I used 0000 steel wool to blend the ink after it was dry and before adding another coat, really helped the look.
I'll do that. How long did you let each coat dry?
I let it dry overnightI'll do that. How long did you let each coat dry?
A piece of redwood burl that my daughter and I turned into a collaborative project. Started out as a real quick turned shallow bowl. It had a a very uneven top side that I suggested we just turn flat. My daughter thought it would be worth a try to make it a live edge bowl. We decided to give it a try despite the fact that the wood had some real soft spots and cracks. We got it turned down to this point and now starting to fill the cracks and crannies with CA. I didn’t think we would get this far before it flew apart, however, my daughter had confidence. We will probably wrap it with Saran Wrap and some duct tape after the CA dries to help hold it together before we do the final inside turnings.


This seemed like a good idea at the time. I decided to make a tripus, a hollow form suspended by three irregular legs defined by the outline of a maple burl about 16" in diameter and 8" deep. I got the primary shape defined, cut out the legs oversized and shaped most of the hollow form bottom between centers, leaving a 6" tenon on a tapered stem. Reversed and hollowed it out, taking the final scraping cut inside the bottom at 550 rpm when one of the legs flew off, punching a hole in the 1/4" melamine coated particleboard backdrop. Drat! If I had left the shell thicker, thinned the legs out more, spun it at a lower speed, worked faster... there's always next time. At least I wasn't in the line of fire.
edit: After a little more thought I realize how vulnerable the legs were to centrifugal force once I had jigsawed out the arcs of material between them. I did this to lighten the piece and bring it into better balance (so I could increase the rpms above 300) but mostly to allow for using the video camera to guide the hollowing tool. Next time I will thin the legs down more and cut holes between the legs, leaving the bottom rim intact - and moderate the speed.. I was surprised that the failure happened where it did at the top of the smallest diameter leg in seemingly strong material, but the 1/4" thick shell did have a void at one edge of the break and the relatively thick and heavy legs trying to fly out at 25+ mph overcame the shell's strength.
I don't like losing the material and work that went into the piece but I learned something useful and didn't get hurt. The hole in the backdrop illustrates the wisdom of wearing face and head protection and staying out of the way as much as possible.
Last edited:
Some non-failures. That is, they are in one piece.


Last edited:
Some non-failures. That is, they are in one piece.
View attachment 75509View attachment 75508View attachment 75506
Nice. I especially like the form of NonFailure #3.
Nice. I especially like the form of NonFailure #3.
Agreed, nice to see a well executed example of that form!
I decided to salvage this piece. Contemplating whether to add some ebony splines across the red epoxy glueline.


Apple on the lathe. Cherry and the computer for the display and logo I made.
Going to a friend who used to own one.


Going to a friend who used to own one.
I don’t understand. What is it?
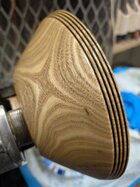
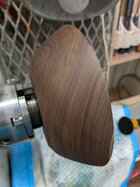
Gearshift knob for a Tr6.
“The Triumph TR6 (1968-1976) is a highly regarded British sports car known for its distinctive styling and performance. It was a popular and successful model, with over 94,000 units produced during its eight-year run. The TR6 is powered by a 2.5-liter straight-6 engine and is known for its blend of power and drivability”
“The Triumph TR6 (1968-1976) is a highly regarded British sports car known for its distinctive styling and performance. It was a popular and successful model, with over 94,000 units produced during its eight-year run. The TR6 is powered by a 2.5-liter straight-6 engine and is known for its blend of power and drivability”
Yup. What he said. Custom shift knob.
I don't normally post my work to this thread or the forum member's gallery, but my latest batch of about a dozen pieces has just gone to the gallery and they have now added those to their website...
https://www.theateliercrafers.com.au/search?page=1&q=neil+Strong
The pieces get removed from the website soon after they get sold and the listing will dwindle away until I need to take the next batch of pieces to the gallery. I'm fortunate in that the countless hundreds of pieces that I've sent to galleries over many years have all sold, eventually, which allows me to keep turning and learning.
So, this is by way of a show and tell of what was recently on my lathe... no two pieces are the same because every piece of wood is different, as the ticket that goes with each piece says:
Beautiful pieces of wood that guide me
in what form they might take in their new life
beyond the living tree
in what form they might take in their new life
beyond the living tree
Last edited:
- Joined
- Feb 6, 2010
- Messages
- 3,518
- Likes
- 2,596
- Location
- Brandon, MS
- Website
- threeringswoodshop.square.site
Looks good and I see selling. What is old Red Gum? Why not just Red Gum?
Looks good and I see selling. What is old Red Gum? Why not just Red Gum?
Red Gum darkens with age after being cut, but it takes a very long time for that to happen, like a century or more. The older the Red Gum gets the darker it becomes. My main source is large old recycled stockyard corner fencepost that have stood out in the weather for all that time. You don't get too many of those now and sadly you won't in the future with newer fencing methods.
Here is the difference. The piece on the left below has had no time for its wood to darken since coming down. The one on the right was from a fencepost that would have been 100 to 120yrs old and I've had it in my stash for a further 50yrs. With that piece I left the weathered surface of the fencepost on the rim of the bowl for the connoisseur who will appreciate that...


.