Welcome to comment on this…
I’ll drop by the auto store.. I think 205 is one step finer

I’ll drop by the auto store.. I think 205 is one step finer

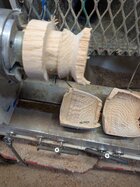
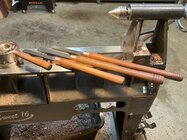
The wooden block in the pic is to size the two ends of the taper and the length is 2”.Ah, finial finesse is a first-class function!
I don't remember seeing the Lucas method demonstrated but then my brain cell count is constantly decreasing. I think he told me once he turned a longer taper than I do. Probably holds better, but not needed for how I use one.
Hey, I did a demo on my 2MT holding in the Crossville club in June of 2016. I didn't see you there. WHAT, you missed that one???
And showed/taught it in nine other clubs, private sessions, and workshops. Missed those too??? I have another one scheduled for a club in Charlotte NC in a couple of months. I always show that holding method when I demo thin spindles since it has several advantages. The way I make and used them is also in my Thin Spindle doc posted on this site too (Appendix 1, page 20).
JKJ

"Best" depends on what you are making, how you want to capture the figure, and a lot on the individual log. Lots of compromises.Speaking of putting things on your lathe,,,
What is the best orientation for crotches? I mean, i know laying it flat on my mill gets me the best figure but whats the best when poking it on the lathe?
Its been a conundrum, stand there looking at the damn things for hours thinking through the variations, i have a pretty sizable pile of logs that i stuck on the side recently from doing some clearing on my place just to turn into blanks, huge number of crotches of all different sizes, am contemplating my next move with them as i want to maximize the yield, nice material can be hard to come by. Is mostly koa but also have a bunch of jacaranda and Monterey cypress in there, at the moment all in logs end coated to minimize checking, but know full well i need to do something with it all soon. They range from stuff in the 30” range to 8”, Some of the big ones i want to saw down on my mill and turn platters, think those would be nice."Best" depends on what you are making, how you want to capture the figure, and a lot on the individual log. Lots of compromises.
The best figure in a crotch is usually right between the branches.
So if you want to capture that figure in what you're making, try to avoid turning it into shavings.
That starts at the chainsaw/bandsaw but obviously also on the lathe.
If you're making a bowl, you might want to get the crotch figure in the bottom of the bowl, because at the rim it usually doesn't show well (and most of it ends up on the floor). But having the crotch at the bottom means the rim is around the outer edge of the wood (the bark) and that may limit the size of the bowl. A natural-edge bowl is often a good choice as the figure is in the bottom and the branches sorta give the bowl a heart shape. You might also need to include some of the pith(s) to capture more figure (bandsaw/chainsaw cut offset from center), which (besides dealing with pith in your bowl) means you get one figured piece rather than two.
Similar sort of tradeoffs apply if you're making a platter, but it's probably easier to capture more figure across more of a shallow platter.
If you're doing a hollow form, you can orient the form side-grain so the figure is around the outside of the vessel (but so are the piths possibly). If the log is large enough, you might go side-grain with the top of the vessel in the figure (and maybe avoid the piths). Or you can orient the form so that the mouth of the vessel is pointing between the branches, which will probably get more figure across the top of the vessel. But you still may have pith to deal with (depending on relative size of the vessel and crotch).

Sam, I’m usually around 800 to 1000 rpm. I’m sure everyone has a preference.Famous last words.......
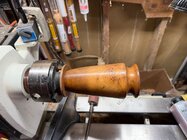
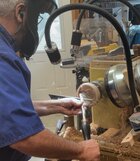
"I'll just clean this up inside just a little bit more and let it dry"
I think it might have caught in that big worm trail. Too slow of rpm maybe. What's a good average rpm for inside hollow forms roughly 5-6 inch diameter?
Too slow of rpm maybe. What's a good average rpm for inside hollow forms roughly 5-6 inch diameter?

I was pretty slow around 550. I don't know if that contributed or not. Kept hitting a spot where it was grabbing, figured it was that hole that's visible.Sam, I’m usually around 800 to 1000 rpm. I’m sure everyone has a preference.
I was pretty slow around 550. I don't know if that contributed or not. Kept hitting a spot where it was grabbing, figured it was that hole that's visible.
") )
)


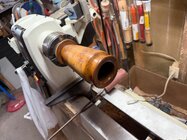
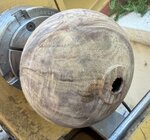
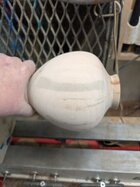
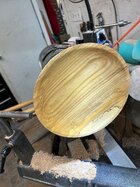
A friend brought me two sections of walnut that had been laying out in the weather for a couple years. Most had splits in the sap wood but I found a crotch piece that look fairly good. I’ve had it covered and off the ground for a few months. I was able to turn a 12-1/4” and 13-1/2” today. Sanded to 180 and will put on the drying rack for a couple months and finish sand when dry.
View attachment 85448
View attachment 85447
View attachment 85446

Those are beautiful! They’ll really pop when you put a finish on there!A friend brought me two sections of walnut that had been laying out in the weather for a couple years. Most had splits in the sap wood but I found a crotch piece that look fairly good. I’ve had it covered and off the ground for a few months. I was able to turn a 12-1/4” and 13-1/2” today. Sanded to 180 and will put on the drying rack for a couple months and finish sand when dry.
View attachment 85448
View attachment 85447
View attachment 85446
![20260222_200309[1].jpg](https://www.aawforum.org/community/data/attachments/82/82700-7f0b29f03b5d2a2e33cc714d850f5f66.jpg?hash=u_yG3DSU4N "20260222_200309[1].jpg")


What was the orientation of the crotch when you cut it? Almost looks like it was sort of angling across it as it looks like the heart centers in there but kinda on an angle? Just asking because i have a pile of crotches and trying to figure out how to blank themA friend brought me two sections of walnut that had been laying out in the weather for a couple years. Most had splits in the sap wood but I found a crotch piece that look fairly good. I’ve had it covered and off the ground for a few months. I was able to turn a 12-1/4” and 13-1/2” today. Sanded to 180 and will put on the drying rack for a couple months and finish sand when dry.
View attachment 85448
View attachment 85447
View attachment 85446
The limbs forked off the top of the crotch and I split the crotch right through the middle of the pith. I had to cut back the length before splitting due to cracks on both ends.What was the orientation of the crotch when you cut it? Almost looks like it was sort of angling across it as it looks like the heart centers in there but kinda on an angle? Just asking because i have a pile of crotches and trying to figure out how to blank them


I was using 3m's version called "finesse-it" one time on some epoxy on a rim and got it on the wood. Wasn't pretty, almost like it dried it out or something.Welcome to comment on this…
I’ll drop by the auto store.. I think 205 is one step finer
View attachment 85343

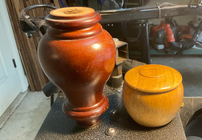
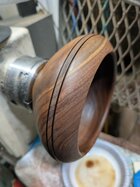
Very nice!Walnut, 8 x 4.25
Candy dish with embellishment done with an ebay knurler.
For $12 it'll work (on walnut anyway)

Yes, nice effect!Walnut, 8 x 4.25
Candy dish with embellishment done with an ebay knurler.
For $12 it'll work (on walnut anyway)


Not much more challenging than punky wood, but can be worth the effort for the spalting!A soft and semi punky spalted ambrosia maple. Going slow with this one. I tried some varathane wood hardener but didn’t like the way it didnt clean up with the negative rake so I shaved it some more with the bowl gouge and soaked it with shellac. I think an 80 grit gouge may work better.

Second batch of cored Sweet Gum, one more batch to go. Will store a boxes of shavings and open 6-8 months later. View attachment 85259

 .
.